- Getting Started
- Administration Guide
-
User Guide
- An Introduction to Wyn Enterprise
- Document Portal for End Users
- Data Governance and Modeling
- Working-with-Resources
- Working with Reports
- Working with Dashboards
- View and Manage Documents
- Understanding Wyn Analytical Expressions
- Section 508 Compliance
- Developer Guide
Create a Direct Query Model
The procedure for creating a Direct Query Model for a dashboard is typically composed of four steps -
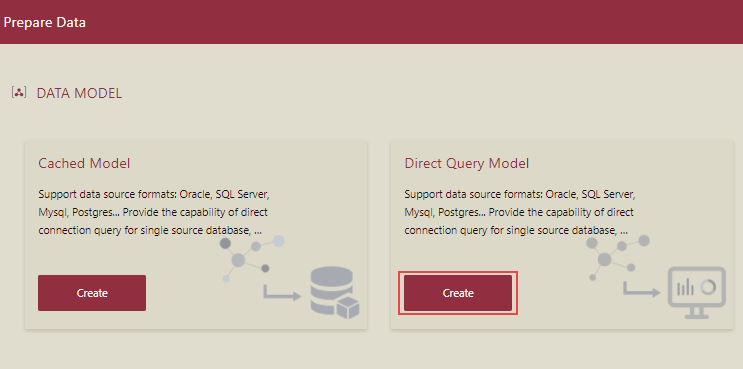
Select the model type.
Specify the data source.
Configure data source connection details. And,
Select the desired tables and views.
In Wyn Enterprise, you can create a Direct Query Model by manually filling in the configuration details in the designer or by re-using an existing data source available on the server. This article describes the detailed steps to create a Direct Query Model using both these methods.
To Create a Direct Query Model Using an Embedded Data Source
An embedded data source is defined in the Direct Query Model itself and is used only by that model. Use the below steps to create a Direct Query Model with an embedded data source.
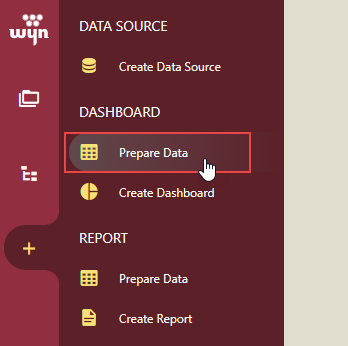
On the Resource Portal, navigate to the Create tab and then select Prepare Data under the Dashboard section.
To create a new Direct Query Model, click the Create button.
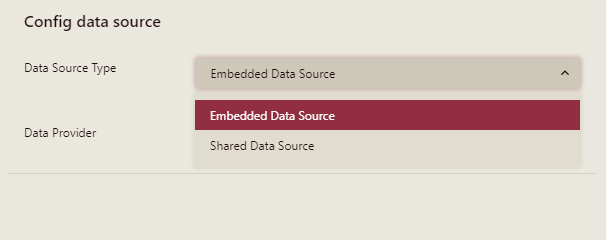
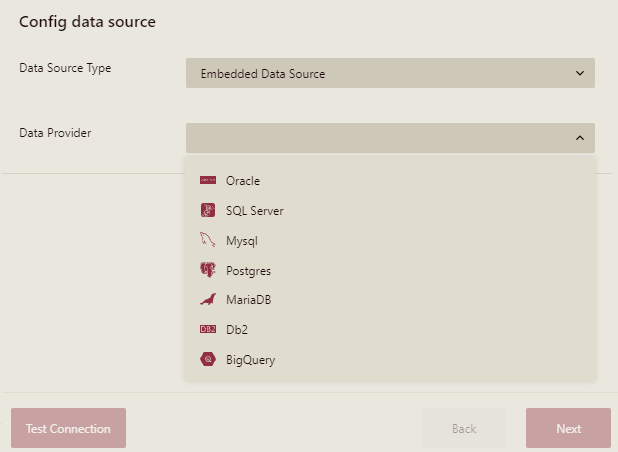
In the Create Data Model window that appears, set the Data Source Type to Embedded Data Source.
Select the Data Provider you want to use for the Direct Query Model. The supported data providers are Oracle, SQL Server, MySQL, Postgres, MariaDB, IBM DB2, and BigQuery.
Based on the chosen data provider, the configuration details for the data source can vary. Let's say, you chose the SQL Server provider as shown below.
You can connect to the data source by either entering the configuration details in the respective fields or directly through the connection string.
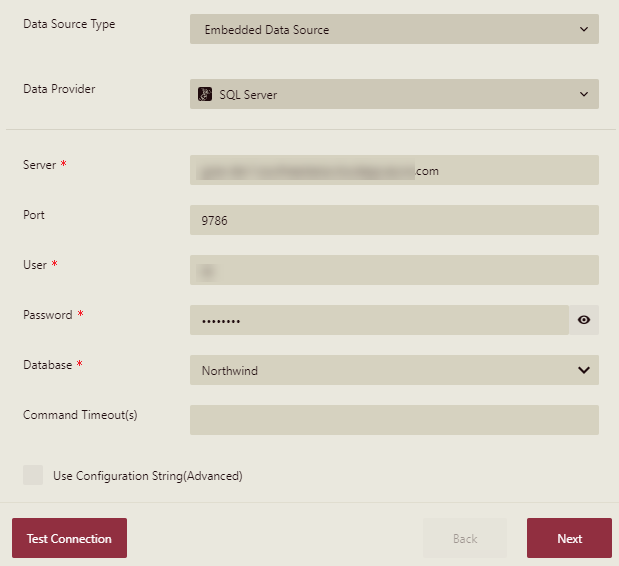
To verify the data source connection, use the Test Connection button, and then click the Next button to proceed further.
Select the tables and views you want to include in the Direct Query Model. You can choose to display tables or views in the list by clicking the Tables or Views button, respectively. You can use the following options as well -
Include current relations - This option is used to include or exclude the existing relations in the selected tables and views.
Include related tables - This option is used to include or exclude the related tables in the selected tables and views. It is disabled in case you have not included current relations in the selected tables and views.
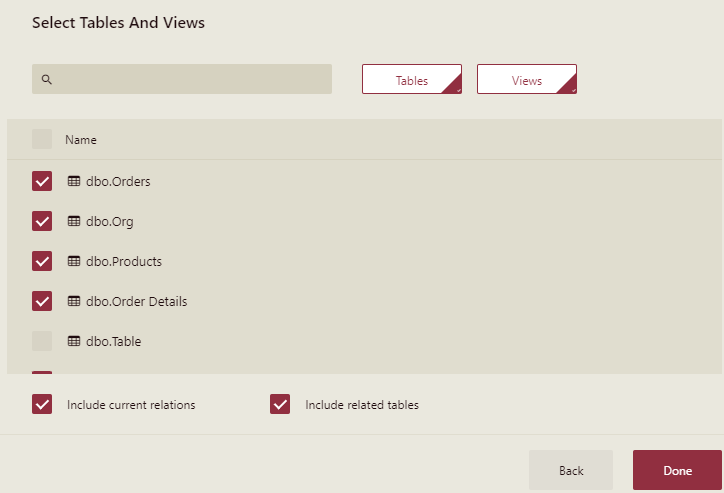
Now, click the Done button.
Based on the defined settings, a Direct Query Model is created as shown below.
To Create a Direct Query Model Using a Shared Data Source
A shared data source is one that already exists on the portal and can be reused to create different Direct Query Models. It is best suitable in scenarios where you want to use an existing data source that takes advantage of the data-pulling capabilities provided by a data model.
On the Resource Portal, navigate to the Create tab and then select Prepare Data for the dashboard.
Click the Create button to create a Direct Query Model for the dashboard.
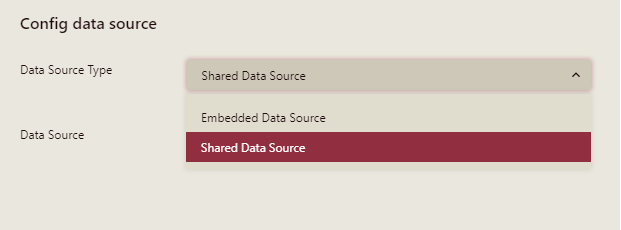
In the Create Data Model window that appears, set the Data Source Type to Shared Data Source.
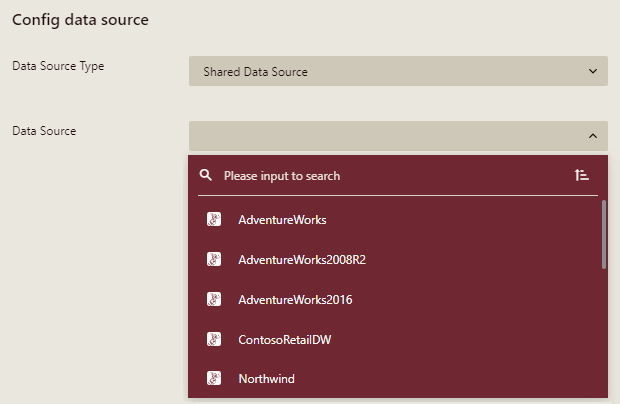
From the Data Source dropdown, select a Datasource you wish to use for the Direct Query Model. The Data Source dropdown lists the data sources that are available on the server and supports Direct Query Models including the following:
RDBMS Datasource - SQL Server, MySQL, Oracle, Postgres, MariaDB, IBM DB2, Google BigQuery, JSON, Snowflake, and ClickHouse.
File Type Datasource - CSV, Excel, and XML
Note: To access the File Type data sources in the Data Source dropdown list, File Extraction Setting must be added in the wyn.conf file of your Wyn application.
Note: The data source list displays the data sources with sufficient permissions only, i.e. Execute/Create, Read/Write, and Full Control.
Click the Next button to proceed further.
Select the tables and views you want to include in the Direct Query Model. You can limit the currently displayed tables or views in the list by clicking the Tables or Views button, respectively.
Uncheck the Include current relations option to exclude the existing relations in the selected tables and views. You can uncheck the Include related tables option to exclude the related tables in the selected tables and views.
Now, click the Done button.
Based on the defined settings, a Direct Query Model is created as shown below.
The Data Model Designer displays the mapped name of entities and attributes if the chosen data source uses table/column mapping.
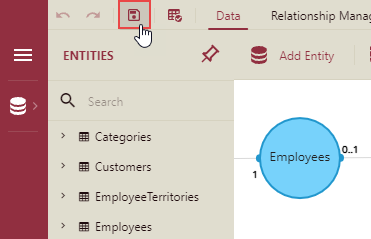
To Save Direct Query Model
Click the Save button to use the Direct Query Model for binding data in dashboards.
In the Save As dialog box, enter the Direct Query Model name and comment (if any) as shown.
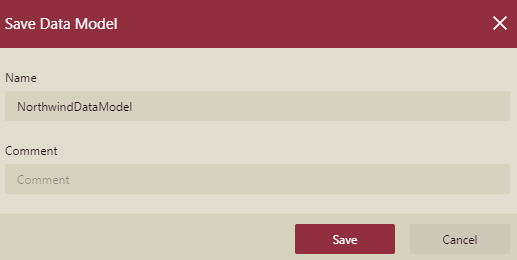
Then, click the Save button.
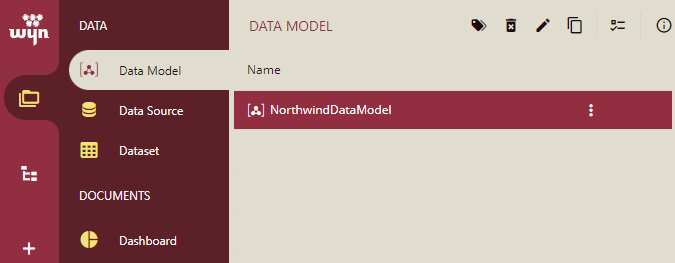
The saved direct query model will appear in the Data Model tab of Document Types.