-
Interactive DashboardsCreate interactive BI dashboards with dynamic visuals.
-
End-User BI ReportsCreate and deploy enterprise BI reports for use in any vertical.
-
Wyn AlertsSet up always-on threshold notifications and alerts.
-
Localization SupportChange titles, labels, text explanations, and more.
-
Wyn ArchitectureA lightweight server offers flexible deployment.
-
 Wyn Enterprise 7.1 is ReleasedThis release emphasizes Wyn document embedding and enhanced analytical express...
 -
 Choosing an Embedded BI Solution for SaaS ProvidersAdding BI features to your applications will improve your products, better serve your customers, and more. But where to start? In this guide, we discuss the many options.
-
Visual GalleryInteractive sample dashboards and reports.
-
BlogExplore Wyn, BI trends, and more.
-
WebinarsDiscover live and on-demand webinars.
-
Customer SuccessVisualize operational efficiency and streamline manufacturing processes.
-
Knowledge BaseGet quick answers with articles and guides.
-
VideosVideo tutorials, trends and best practices.
-
WhitepapersDetailed reports on the latest trends in BI.
-
 Choosing an Embedded BI Solution for SaaS ProvidersAdding BI features to your applications will impr...
 -

- Getting Started
-
Administration Guide
- Installing Wyn Enterprise
- Configuration Settings
- Account Management
- Security Management
- System Management
- Document Management
- How To and Troubleshooting
- User Guide
- Developer Guide
Email Settings
As an admin, you can modify the Email Settings for the server mailing service. The server automatically sends emails in response to user requests to reset their passwords on the Wyn Enterprise portal. These are essential to ensure the website error report functions correctly. The server also uses these settings to connect with the e-mail server to deliver scheduled reports. You can select from the following options:
SMTP
Google API
Microsoft Graph
Note: To execute a scheduled task without issues, you must allow third-party websites and apps to access your email account.
Accessing Email Settings
Navigate to: Administration Guide > Configuration Settings > Notification Center Settings > Email Settings.
SMTP
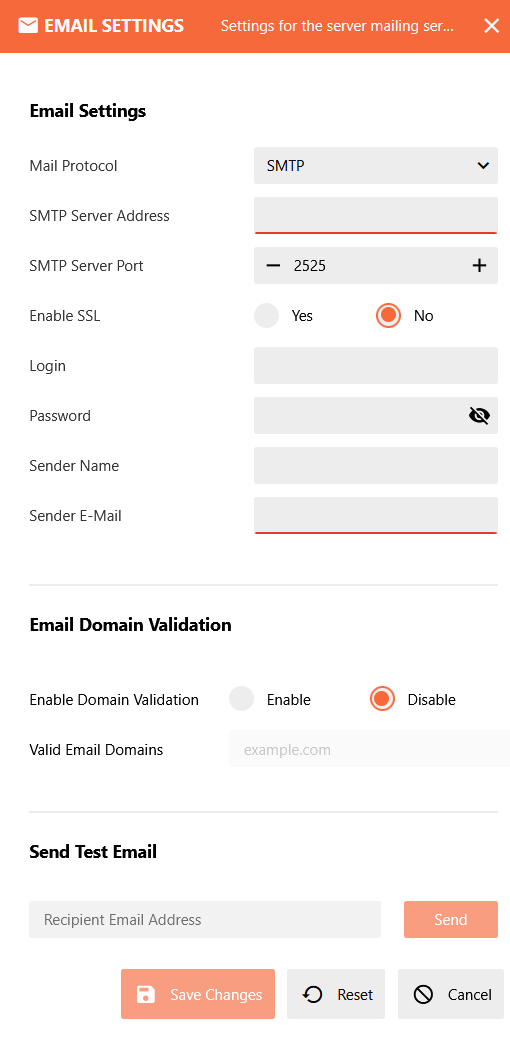
Options:
SMTPSMTP Server Address
Description: Enter the SMTP server address.
Example:
smtp.gmail.com
SMTP Server Port
Description: Port number for the SMTP server.
Default Value:
2525Other Common Values:
465(SSL)
Enable SSL
Description: Toggle SSL encryption for secure email transmission.
Options:
YesorNo.
Login
Description: Username for SMTP authentication (usually your email address).
Password
Description: Password or App Password for SMTP authentication.
Note: Hidden for security.
Sender Name
Description: Display name for outgoing emails.
Sender E-Mail
Description: Email address used as the sender.
Email Domain Validation
Enable Domain Validation
Description: Restrict emails to specific domains.
Options:
EnableorDisable.
Valid Email Domains
Description: Enter allowed domains (e.g.,
example.com).
Send Test Email
Recipient Email Address
Description: Enter an email address to test the configuration.
Action: Click Send to verify settings.
Save Changes: Apply the configuration.
Reset: Revert to previous settings.
Cancel: Discard changes.
Gmail SMTP Setup
Follow these steps to configure Gmail SMTP in Wyn Enterprise:
Enable SMTP in Gmail
Go to Google Account Settings → Security.
If 2-Step Verification is enabled:
Generate an App Password for SMTP.
SMTP Configuration in Wyn Enterprise
Navigate to Email Settings and select Mail Protocol: SMTP.
Enter the following details:
SMTP Server:
smtp.gmail.comPort:
465(SSL)Enable SSL: Yes
Login: Your Gmail address
Password: App Password (recommended)
Sender Details
Enter:
Sender Name (display name for outgoing emails)
Sender E-Mail (same Gmail address)
Test Email
Enter a recipient email address in Send Test Email.
Click Send to verify the configuration.
Wyn Enterprise should successfully send a test email using Gmail SMTP.
Once you have configured all the settings, click the Save Changes button to save your changes.
For an organizational administrator, an additional option is available to use the parent organization's email settings. By default, this option is checked. You can uncheck if you do not want to use the parent organization settings. For more information about an organization administrator, see Organizations.
Google API
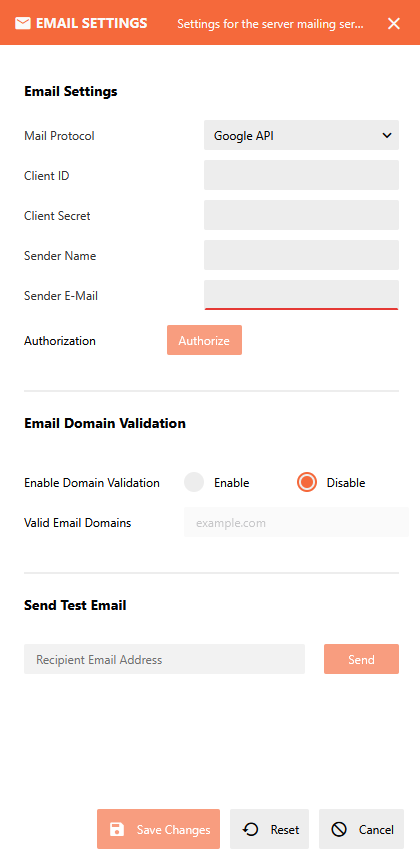
Client ID
Description: OAuth 2.0 Client ID from Google Cloud Console.
Client Secret
Description: OAuth 2.0 Client Secret.
Sender Name
Description: Display name for outgoing emails.
Sender E-Mail
Description: Email address used as the sender.
Authorization
Description: Click Authorize to grant access via Google OAuth.
Email Domain Validation
Enable Domain Validation
Description: Restrict emails to specific domains.
Options:
EnableorDisable.
Valid Email Domains
Description: Enter allowed domains (e.g.,
example.com).
Send Test Email
Recipient Email Address
Description: Enter an email address to test the configuration.
Action: Click Send to verify settings.
Save Changes: Apply the configuration.
Reset: Revert to previous settings.
Cancel: Discard changes.
Google API Setup
When using the Google API as the Mail Protocol, you need to first create a web application at the Google API and obtain the client ID and client secret fields. See Google Help for more details. Follow these steps to configure OAuth-based Gmail integration:
Create OAuth Credentials
Go to Google Cloud Console.
Create a New Project.
Enable Gmail API.
Create an OAuth 2.0 Client ID and Client Secret.
Configure Redirect URI
Add Wyn Enterprise callback URL in Authorized Redirect URIs.
Enter Credentials in Wyn Enterprise
Navigate to Email Settings and select Mail Protocol: Google API.
Enter:
Client ID
Client Secret
Sender Name
Sender E-Mail
Authorize Application
Click Authorize to grant access via Google OAuth.
Complete the Google sign-in and consent process.
Wyn Enterprise can send notifications using Gmail via the Google API.
The test email should confirm the setup.
Note: If you click 'Authorize' and see a message 'This app is not verified', you can ignore it and click 'Advanced', then select 'Go to xxx (unsafe)'. After successful authorization, you can use Google APIs to send emails.
Microsoft Graph
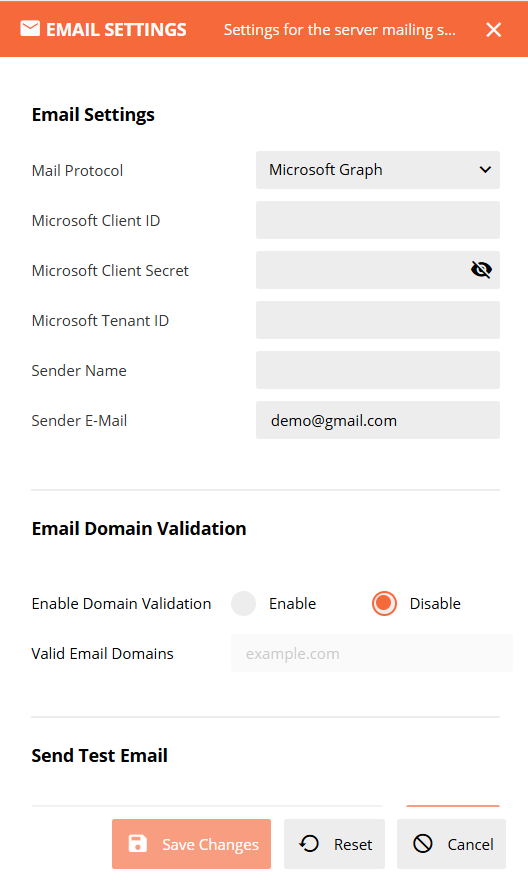
Microsoft Client ID
Description: Application (client) ID of the Azure AD application.
Microsoft Client Secret
Description: Secret generated in Azure AD. Masked with visibility toggle.
Microsoft Tenant ID
Description: Directory (tenant) ID of the Azure AD tenant.
Sender Name
Description: Display name for outgoing emails.
Sender E-Mail
Microsoft Graph: Must exist in an Azure AD tenant and be accessible by the application.
Email Domain Validation
Enable Domain Validation – Restricts outgoing emails to allowed domains.
Valid Email Domains – Enter allowed domains (e.g., example.com).
Send Test Email
Enter a recipient email address.
Click Send to test the configuration.
Azure AD Requirements
This document outlines all Azure Active Directory requirements for enabling an application to send emails using Microsoft Graph via the Client Credentials Flow.
Register an Application
Go to Azure Portal.
Navigate to: Azure Active Directory → App registrations.
Click New registration.
Fill in the required fields:
Name: Your application name.
Supported account types: Select based on your scenario.
Redirect URI:
Optional.
Not required for Client Credentials flow.
Click Register
Configure API Permissions
Open your registered application.
Go to API permissions → Add a permission.
Select:
Microsoft Graph.
Application permissions.
Add:
Mail.Send
Notes:
Application permissions always require admin consent.
Grant Admin Consent
Go to API permissions.
Click Grant admin consent for <tenant>.
Confirm the action.
Create a Client Secret (Authentication)
Go to Certificates & secrets.
Under Client secrets, click New client secret.
Enter a description and select expiration.
Click Add.
Copy the secret value immediately:
It will not be visible again.
Used for Microsoft Graph Client Credentials authentication.