-
Interactive DashboardsCreate interactive BI dashboards with dynamic visuals.
-
End-User BI ReportsCreate and deploy enterprise BI reports for use in any vertical.
-
Wyn AlertsSet up always-on threshold notifications and alerts.
-
Localization SupportChange titles, labels, text explanations, and more.
-
Wyn ArchitectureA lightweight server offers flexible deployment.
-
 Wyn Enterprise 7.1 is ReleasedThis release emphasizes Wyn document embedding and enhanced analytical express...
 -
 Choosing an Embedded BI Solution for SaaS ProvidersAdding BI features to your applications will improve your products, better serve your customers, and more. But where to start? In this guide, we discuss the many options.
-
Visual GalleryInteractive sample dashboards and reports.
-
BlogExplore Wyn, BI trends, and more.
-
WebinarsDiscover live and on-demand webinars.
-
Customer SuccessVisualize operational efficiency and streamline manufacturing processes.
-
Knowledge BaseGet quick answers with articles and guides.
-
VideosVideo tutorials, trends and best practices.
-
WhitepapersDetailed reports on the latest trends in BI.
-
 Choosing an Embedded BI Solution for SaaS ProvidersAdding BI features to your applications will impr...
 -

Custom Property
It may be possible that the properties provided by the Wyn Enterprise portal may not meet all the needs of the user. In such cases, the user can add custom properties. The custom properties automatically get added to the User Context interface and appear along with the Users interface headers. See User Context for more details.
Add Custom Property
Navigate to Account > Custom Property. Here, you can add, view, edit, or delete the custom properties.
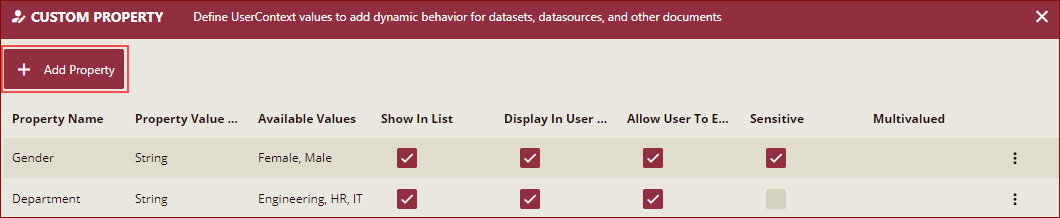
Click the Add Property button.
In the Add Property pane on the right, enter the Property Name, select the data type from the Property Value Type dropdown list, and enter Available Values.,
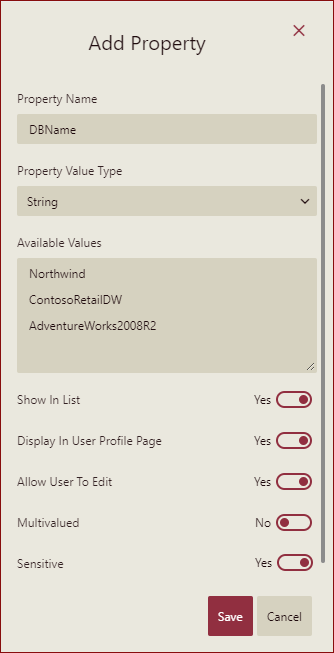
The data types supported by the field Property Value Type are:
String
Boolean
Integer
Float
Date
DateTime
The default type is String. When you create a new custom property(User/org), String is the default type and you can change it to other available options.
Note: Specifying data type for newly created custom properties is available from Wyn version 7.1 and properties added in the previous version are set to String by default which cannot be changed
Set the following options to Yes or No:
Show In List: Set it to Yes or No, depending on whether to display the property on other interfaces.
Display In User Profile Page: Set it to Yes or No, depending on whether to display the property on the user profile page.
Allow User To Edit: Set it to Yes or No, depending on whether to allow users to edit this property.
Multivalued: Set it to Yes or No, depending on whether it can have single or multiple values.
Sensitive: It is the way to hide values of context properties containing sensitive values in the admin portal. You can set it to Yes or No. When it is set to Yes, the context value will be displayed as **** in the admin portal and you can see the plain text by clicking the Show Value button next to it.
Click the Save button to save all the changes.
After adding the Custom Property, navigate to Account > Users. The newly created custom property appears alongside the other headers. You can also add the newly created custom property to a new user by clicking on the Add User button.
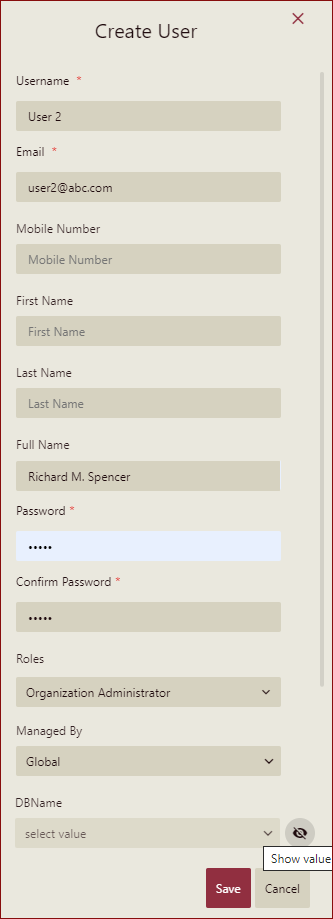
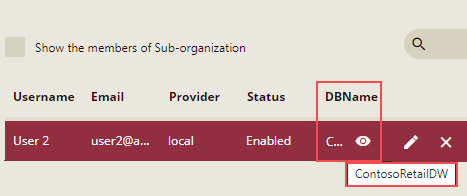
Scenario 1: When the Sensitive property is set to Yes, but no value is selected.
As we have set the Sensitive property to Yes, the dropdown list will be disabled and the DBName will not be visible.

Click the Show Value button to enable the dropdown list and available values will be displayed. Select the value from the list. The value will be selected and displayed.
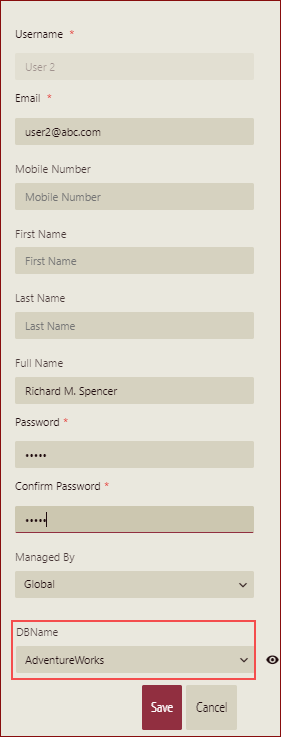
Scenario 2: When Sensitive property to Yes, and value is selected.
When the value is selected, you can see the Hide Value option.

Click the Hide Value option, the DBName will be displayed as ****.

Click the Save button to save the changes. Now, if you take a look at the list of users on the Users interface, you can see the user with the custom property and its available values.
Note: Sensitive property will impact the display of property value in the Admin portal only.
Edit or Delete Custom Property
Click the action overflow menu icon
 next to the custom property.
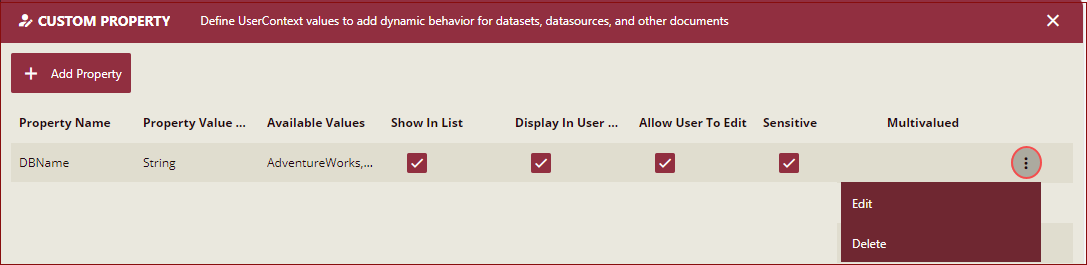
Select the Edit or Delete option to complete the desired action.