- Getting Started
- Administration Guide
-
User Guide
- An Introduction to Wyn Enterprise
- Document Portal for End Users
- Data Governance and Modeling
- Working with Resources
- Working with Reports
-
Working with Dashboards
- Dashboard Designer
- Selecting a Dataset
- Data Attributes
- Dashboard Scenarios
- Dashboard Templates
- Component Templates
- 3D Scene
- Explorer
- Visualization Wizard
- Data Analysis and Interactivity
- Dashboard Appearance
- Preview Dashboard
- Export Dashboard
- Dashboard Lite Viewer
- Using Dashboard Designer
- Animating Dashboard Components
- Document Binder
- Dashboard Insights
- View and Manage Documents
- Understanding Wyn Analytical Expressions
- Section 508 Compliance
- Subscribe to RSS Feed for Wyn Builds Site
- Developer Guide
Jump To
The Jump To add-on feature in the Wyn Enterprise application, creates shortcuts on one dashboard to another dashboard, report, or URL (internal or external) in a new window or a pop-up dialog. The Jump To feature helps you quickly find additional details of a particular data series by jumping to another document or a URL. The Jump To feature is supported in most of the dashboard scenarios such as Charts and KPIs, Tables, Maps, Advanced Charts, Images, and Rich Text.
In this section you will find the following:
Create a Jump To Scenario
To create a jump to another document or URL from a dashboard follow the below instructions,
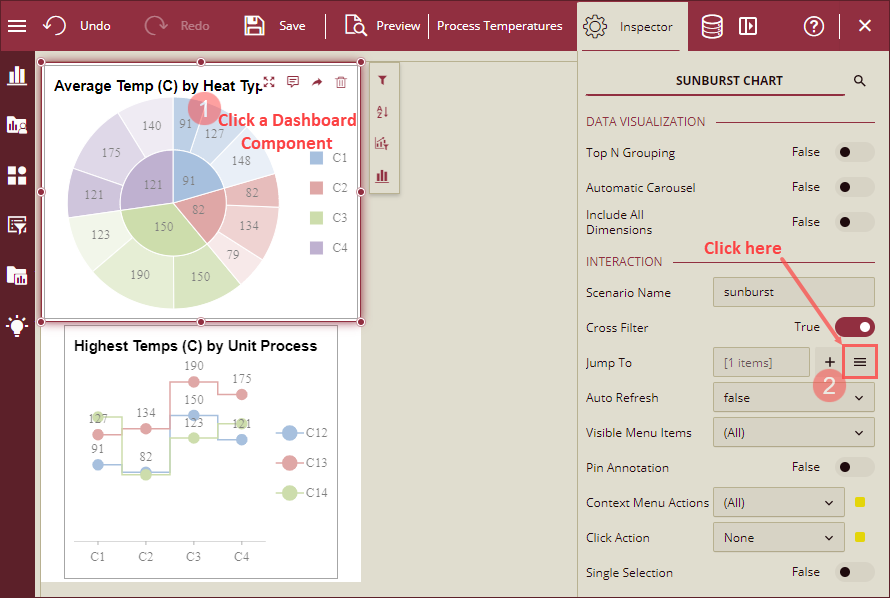
Navigate to the create or edit dashboard page and select a dashboard component.
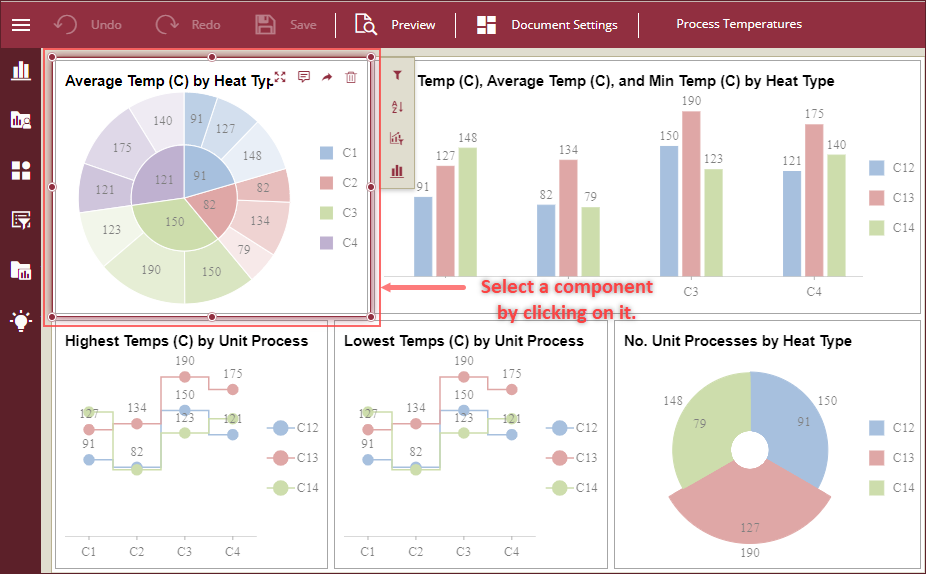
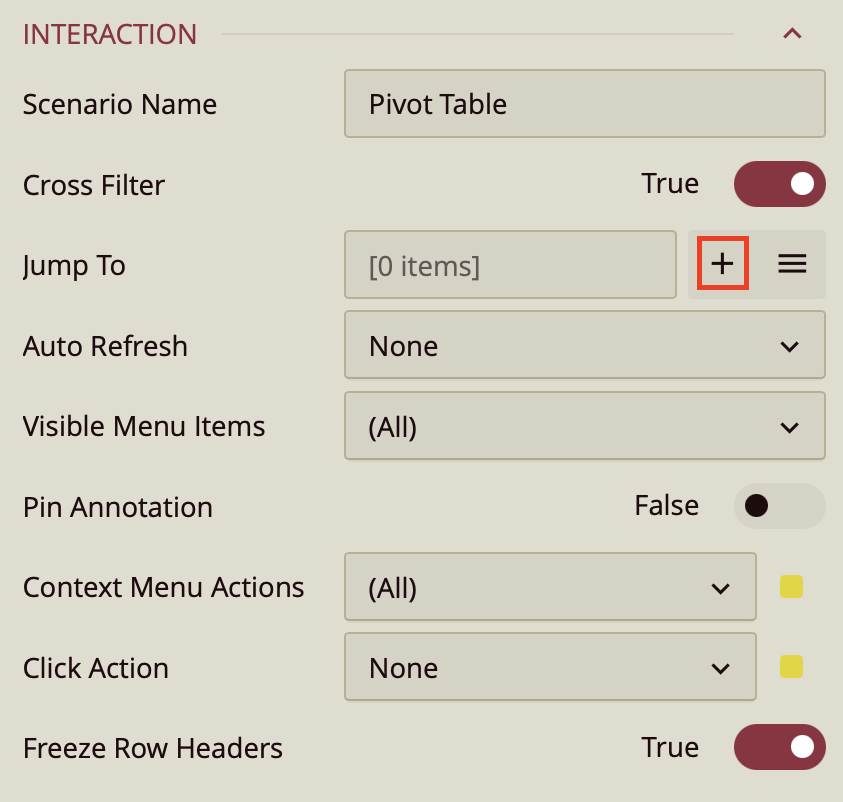
From the Inspector Panel on the right side of your screen, navigate to the Interaction section and click the + icon from the Jump To property.

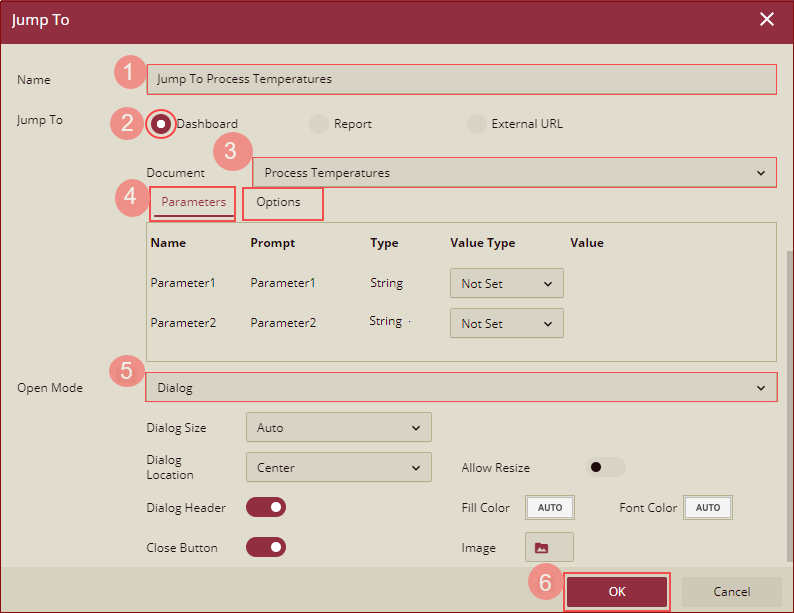
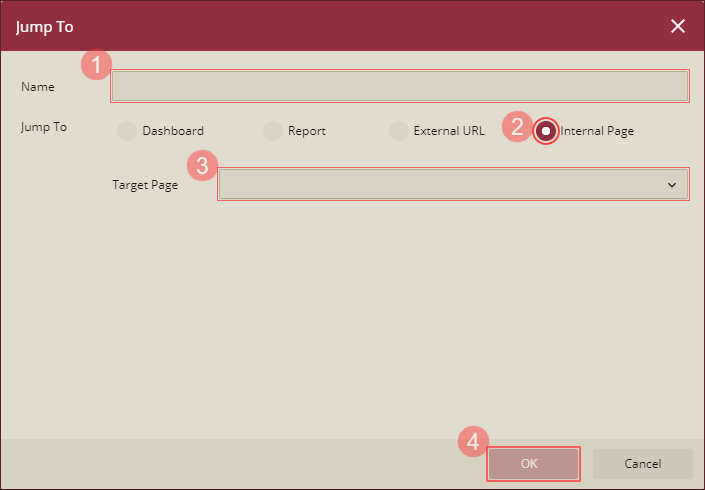
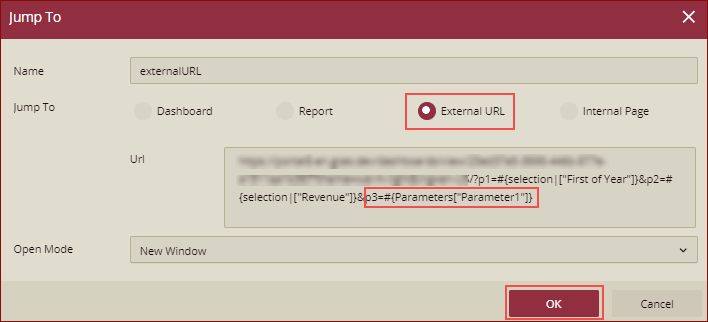
Jump To dialog will appear on your screen. Give a name to the Jump To scenario, select a scenario to jump to (Dashboard, Report, external URL, or internal URL). There are three scenarios when selecting a Jump To option as described below,
Dashboard or Report: Choose a target document from the Document drop-down. You can pass parameters to the target document from the Parameters tab and add various options like Show Toolbar, Page Size Mode, and Initial Page Number from the Options tab. Parameters and Options tabs are described in the Properties of Jump To Dialog section.
External URL: Enter a valid URL to a web link in the Url input box. Refer to section Jump To External URL for more details.
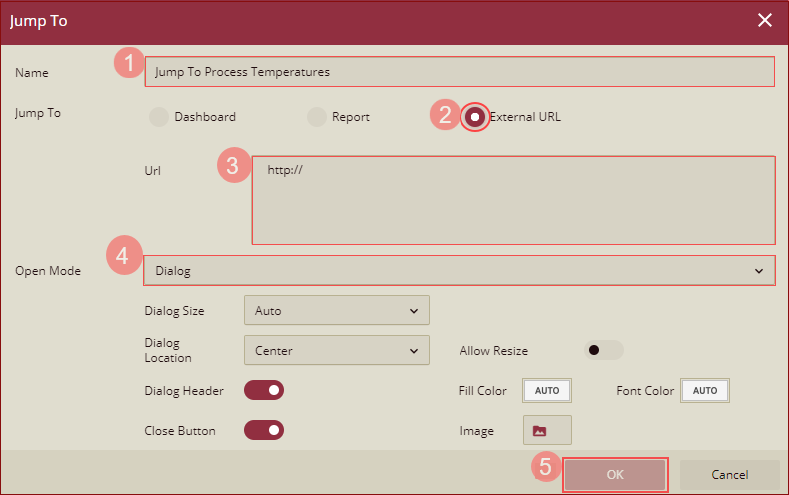
Note: The External URL can be an encrypted URL of the dashboard/report document. See Copy URL topic for more information.
Internal Page: Choose a page from the Target Page dropdown to create an internal jump to another page of the dashboard.
Note: Jump To - Internal Page can only be used in Rich Text, Annotations, and Images.
Now, select an option from the Open Mode dropdown to open the Jump To scenario in a - dialog, new window, embedded mode, redirect mode, or modeless dialog. Open Mode options are described in the Properties of Jump To Dialog section.
Note: For the Dialog mode, you can customize the appearance of the dialog by setting the size, location, allow resize option, header, fill color, and font color. Dialog settings are described in the Properties of Jump To Dialog section.
Click the Ok button to save.
Jump to a Document or URL
To view a Jump To scenario, follow the below instructions,
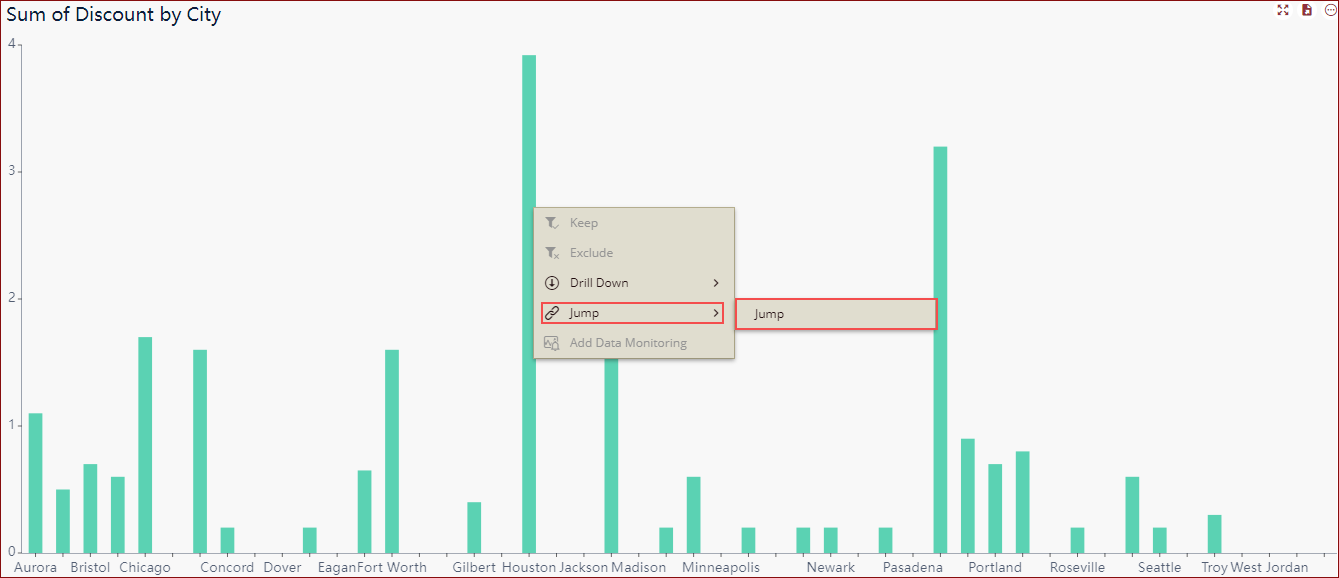
Open a dashboard in preview mode, right click on the dashboard component linked to the Jump To scenario of another document or URL, hover on the Jump option from the pop-out and click the appropriate Jump To scenario.

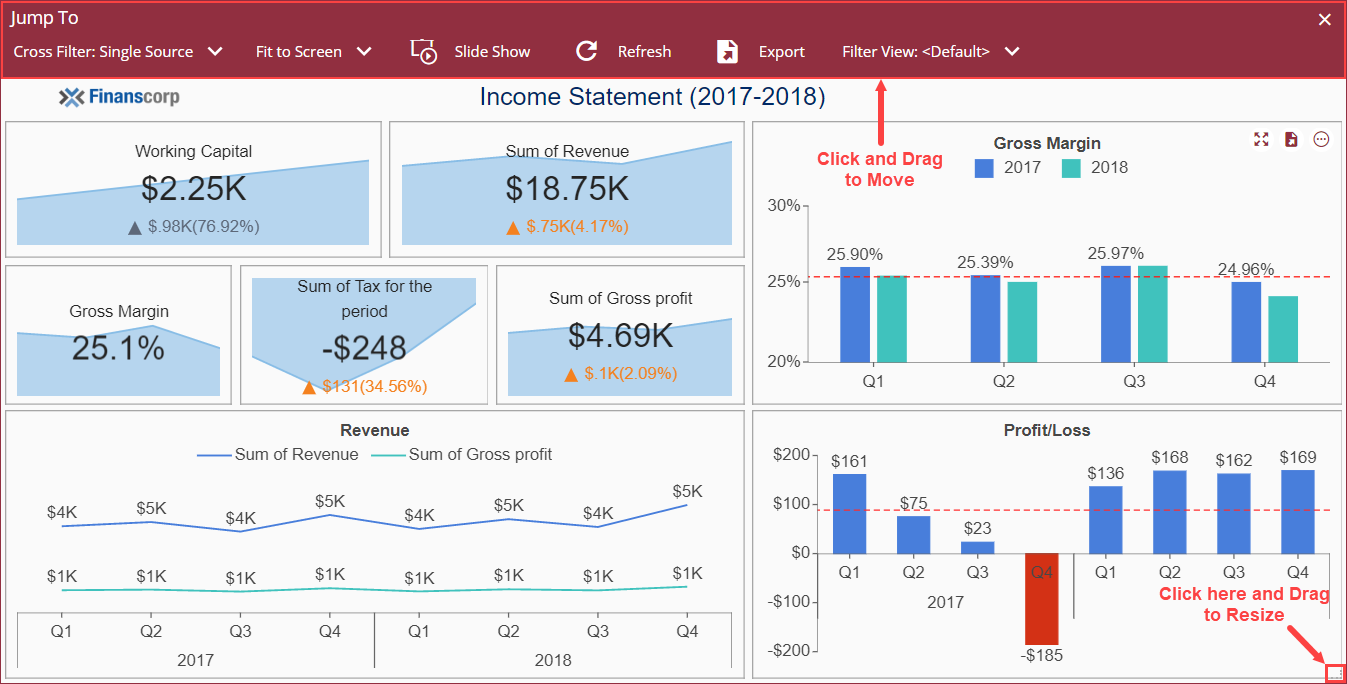
The Jump To scenario will appear on your screen in the mode selected from the Open Mode option while creating the Jump To scenario. To resize the Jump To dialog, click and drag the resize button on the bottom left corner of the dialog box. To move the Jump To dialog, click and drag the header section of the dialog box.
Note: You can put the Image component at any position into the jump dashboard, the jump will be closed when the image is clicked. For this, you need to set the Command setting of the Image to Close Jump Dialog For details refer Customize Using The Close Jump Dialog Command.
Parameter Binding When Jumping to Another Dashboard
While jumping to another dashboard, you can bind the parameter to a data column which is not in the data binding panel, using the component’s data Tooltip. In this scenario, in the Jump To dialog, we are sending a field in a parameter which is not bound to the component. For example, when you want to use a dataset field that is not bound to a scenario as a parameter value for Jump to a dashboard , you can create a scenario as described below: in the source dashboard, a chart is bound to the Temperature and Heat_Type, while in the Jump To dialog of the chart, we have used the field Unit_Process in the parameter and this Unit_Process value is what we are getting from the chart’s data tooltip.
Example:
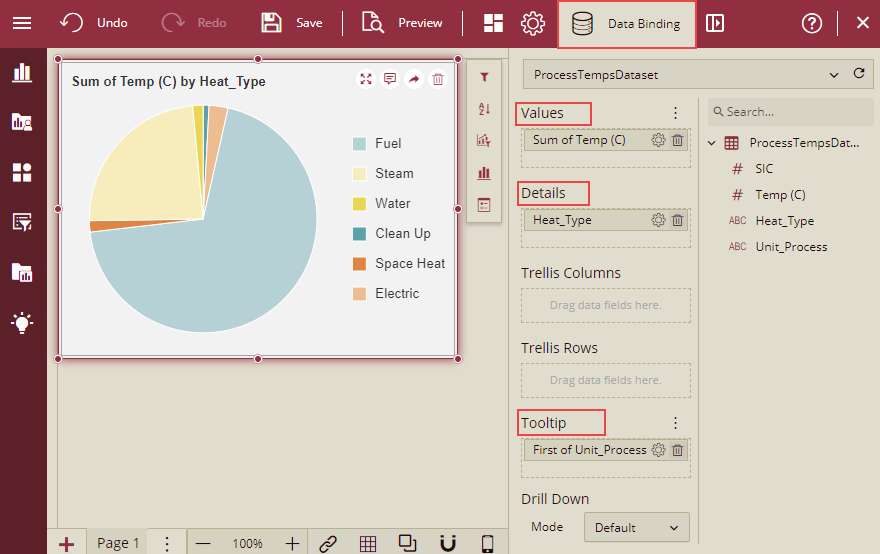
Create a source dashboard, for example, ParameterBinding_Dashboard and add the dataset ProcessTempsDataset. In the DataBinding tab, add fields Temp(C) in Values and Heat_Type in Details and Unit_Process in the Tooltip.
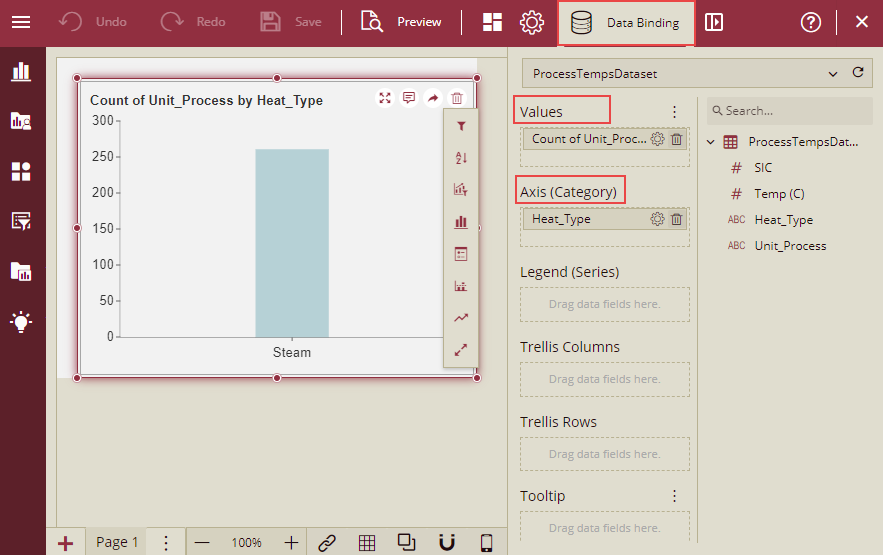
Create a target dashboard, for example, Target_Dashboard and add the dataset ProcessTempsDataset. In the DataBinding tab, add fields Unit_Process in Values and Heat_Type in Axis(Category) field.
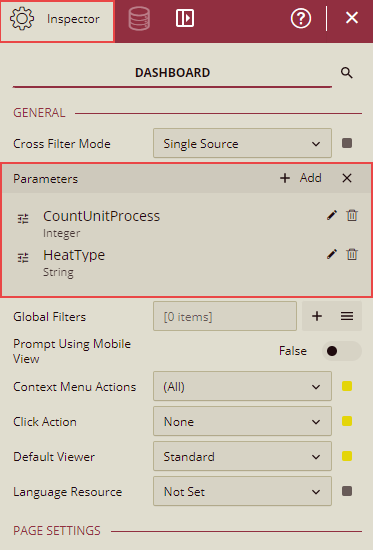
On the Inspector tab of the target dashboard, add the Parameters. We have added the field Unit_Process as a parameter which was added in a Tooltip in the source dashboard and was not bound to the data. Refer section Dashboard Parameters, for information about adding the parameters.
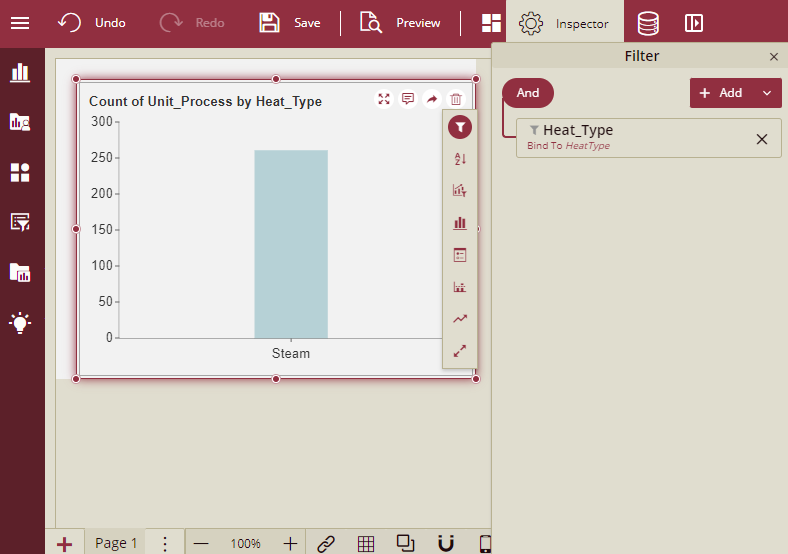
You can apply filters as well. We have applied filter based on the Heat_Type.
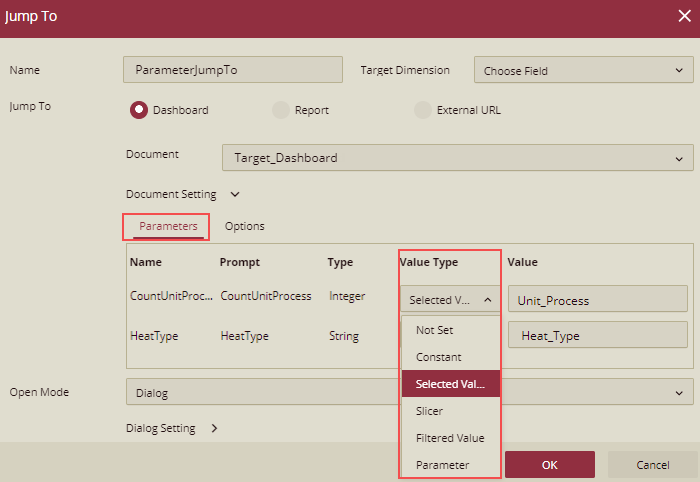
Now on the source dashboard, add a Jump To scenario and select the Value Type and Value for the parameters. The Value Type has the following options:
Constant
Selected Value
Slicer
Filtered Value
Parameter
Now Preview the source dashboard and click on a particular Heat Type.
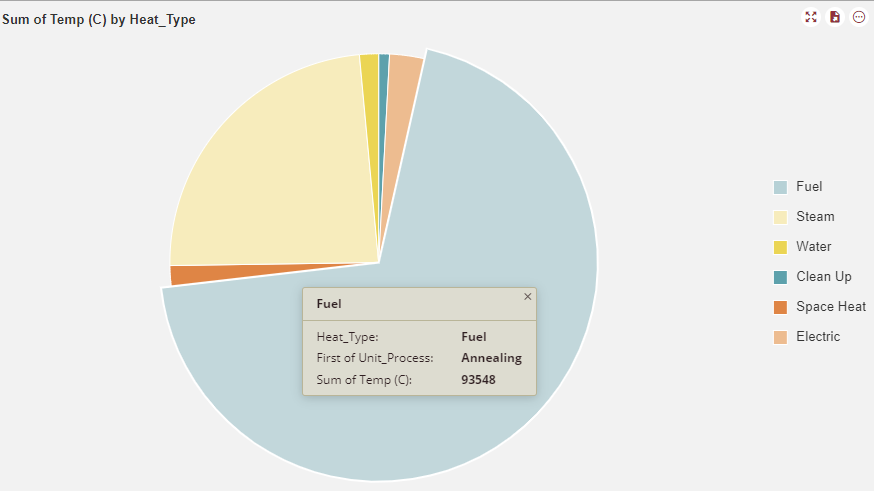
It will jump to the target dashboard and will display the details of count of the Process__Unit for the selected Heat_Type.
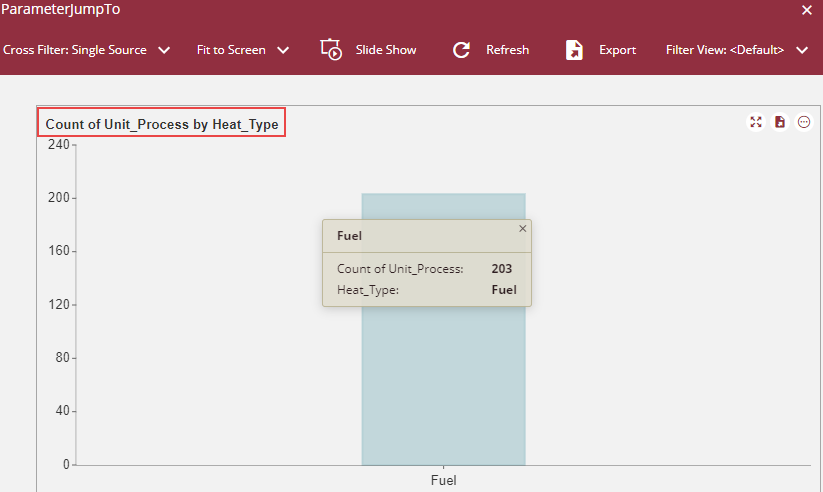
So, we can see from this example, that parameter Unit_Process that was not bound to the data on the source dashboard, is displayed on the target dashboard by adding the Unit_Process as tooltip in the source dashboard.
To Delete or Edit Jump To Scenario
To delete or edit a Jump To scenario, follow the below instructions,
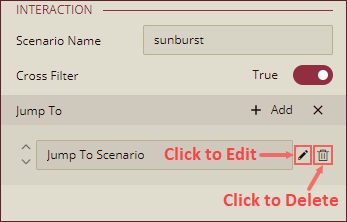
Navigate to the edit mode of the dashboard, click a dashboard component and click the menu icon from the Inspector Panel.
To edit the scenario, click the edit icon next to the scenario name.
To delete the scenario, click the delete icon next to the scenario name.
Properties of Jump To Dialog
Properties of the Jump To dialog box are described below,
Name - Name of the Jump To scenario you are creating is specified here.
Jump To - Select a Jump To type to open a document. You can choose one option from the following using the radio button - Dashboard, Report, External Url, or Internal Page.
Document - Document dropdown is available only when the Jump To - Dashboard or Report option is selected. Choose a document from the dropdown to open in the Jump To scenario.
Parameters - Parameters tab is available only when the Jump To - Dashboard or Report option is selected. Parameters of the target document are displayed in the Parameters tab. You can select a Value Type (Not Set, Constant, Selected Value, Slicer, Filtered Value and Parameter) and set the value of the parameter you want pass to the Jump To scenario.
Options - Options tab is available only when the Jump To - Dashboard or Report option is selected. Options to customize the appearance of the Jump To scenario are described below,
Show Toolbar - Select an option from the dropdown to either show, auto hide or hide the toolbar of the target document in the Jump To scenario.
Page Size Mode - Select an option from the dropdown to fit the target document in the Jump To dialog.
Initial Page Number - Set an initial page number to open when navigating to the Jump To scenario.
Open Mode - Open Mode option is available for the Jump To - Dashboard, Report or External URL options. Following options are available in the Open Mode dropdown,
Dialog: Jump To scenario will open in a dialog box. With this option, you cannot interact with the other features on the original document.
New Window: Jump To scenario will open in a new window.
Embedded: Jump To scenario will open in an embedded window with an option to navigate back to the original document.
Redirect: Jump To scenario will be redirected to a new page open in the same tab of your browser. You can navigate back to the original document using the Back button of the browser window.
Modeless Dialog: Jump To scenario will open in a dialog box and you can interact with the other features on the original document.
Dialog Settings - Customize the appearance of the Jump To dialog box using the following settings,
Dialog Size: Set the size of the Jump To dialog box. You can set the width and height of the dialog box in pixels or percentage.
Dialog Location: Set the location of the dialog on the screen. It has two options: Center and Mouse Position. Center is the default value.
Allow Resize: Use this toggle button to resize the dialog. The default value is False.
Dialog Header: Use the toggle button to display or hide the header of the dialog box. The default value is set to False. To set the Fill Color and Font Color of the header enable the Dialog Header button.
Fill Color: Set a fill color of the header background of the Jump To dialog.
Font Color: Set a font color of the header of the Jump To dialog.
Close Button: Use to toggle button to show or hide the Close button on the Jump To dialog box.
Image: Use an image on the Dialog Header which is also used to close the dialog box by clicking on it. You can set an image only when the Close Button is enabled.
Note: When the selected Open Mode is Dialog and the Dialog Header is enabled, only then you can move the Jump To dialog box. When the Dialog Header is disabled, then you can set the position using the Dialog Location option. You can resize the Jump To dialog box using the Allow Resize option.
Jump To External URL
You can jump to an external web app (with the filtered data) from a dashboard using the option External URL. The external web app will consume the jump-to variables defined in the URL and get the raw data.
For creating this URL, there is a variable Databinding and it has 3 sub-properties: "datasetId", "pivotModel", "rawModel".
datasetId: It will return the dashboard's datasetId to the jump URL.
pivotModel: It will return the dashboard's pivotModel to the jump URL. The pivotModel is used to get the aggregation data that was displayed on the dashboard.
rawModel: It will return the dashboard's rawModel to the jump URL.
The Jump URL contains "#{Databinding["pivotModel"]}", "#{Databinding["rawModel"]}" and "#{Databinding["datasetId"]}",
Example:
If there is a dashboard with a Column chart, and you want to jump to some external web application and have all the non-aggregated filtered values from the data, you need to create an External URL for the Jump To.
This URL will give the information to the target application to identify the document, scenario, and any filter/other info needed to recreate the data behind a given dashboard that was jumped from.
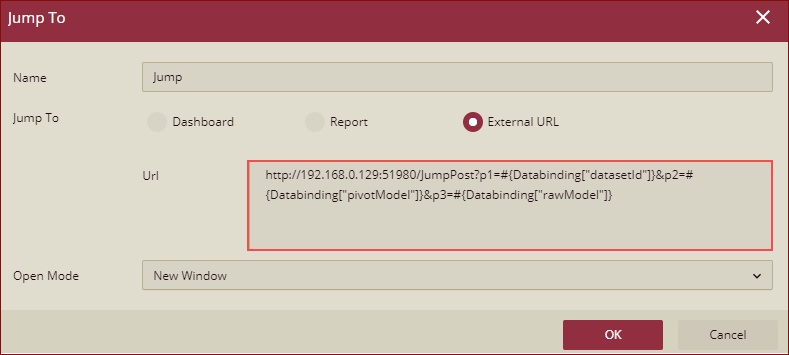
(In this we have taken the target web app as "http://192.168.0.129:51980", parameter 1 as dataset, parameter 2 as pivotModel, and parameter 3 as rawModel).
Preview the dashboard and right click on the chart and select Jump.
It will navigate to the target external web app and from this target web page you will get parameter1(p1), parameter2(p2), and parameter3(p3)(datasetId, pivotModel, and rawModel) and these can be used to request Wyn API to get the transactional non-aggregated data in the form of a list of values for a given data set column that correlates with all the filters, etc. that the scenario had before jumping.
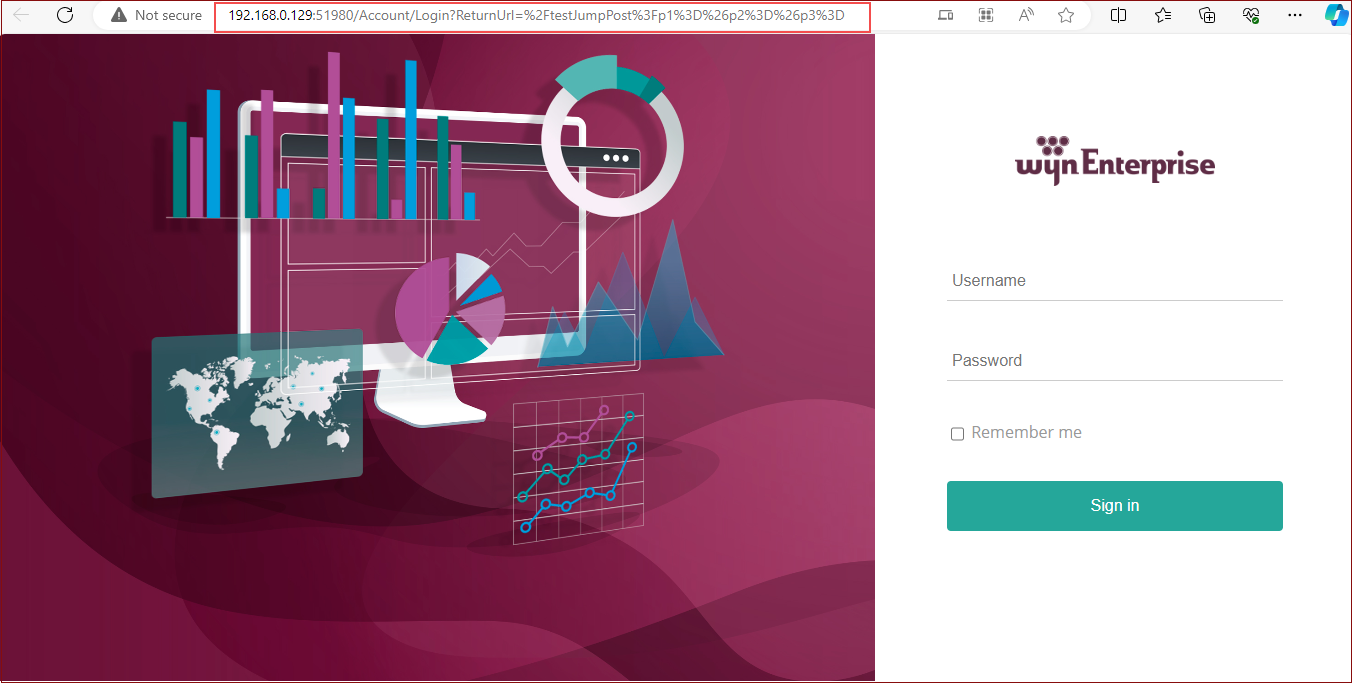
Note: This jump will be made as the Post request, and it will avoid the too-long URL issue.
Pass Parameter Value for Jump To on the Image Component
You can pass the selected parameter value to jump to the URLs of the image component. By clicking on the image to jump to, the parameter value can select the data column, and the data column can choose any field added in Image [Source] and [Value].
Example: We will add a slicer on the dashboard and bind the field Year. Add an image component and add the Jump To on the image. You can click on the slicer to select a Year (here we have selected the year as 2016) and pass the field value 2016 to jump to the target dashboard when clicking on the image to jump to via parameter.
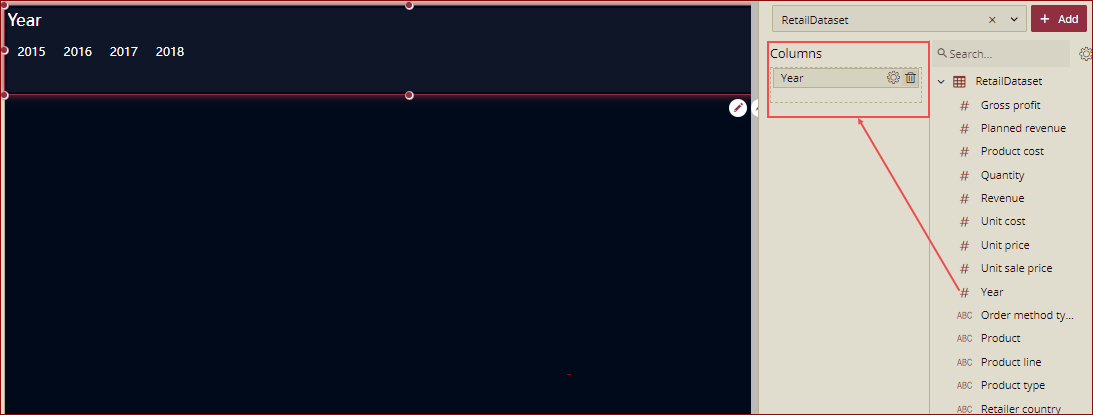
Add a Slicer, and bind data to the Columns field. In this example, we have taken Year as the Columns field.
Add a parameter as Parameter1 for the dashboard.

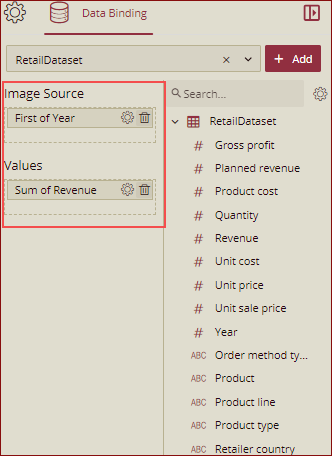
Add an Image and bind it to the data.
Add Jump To on the image for the External URL, using Parameter1.
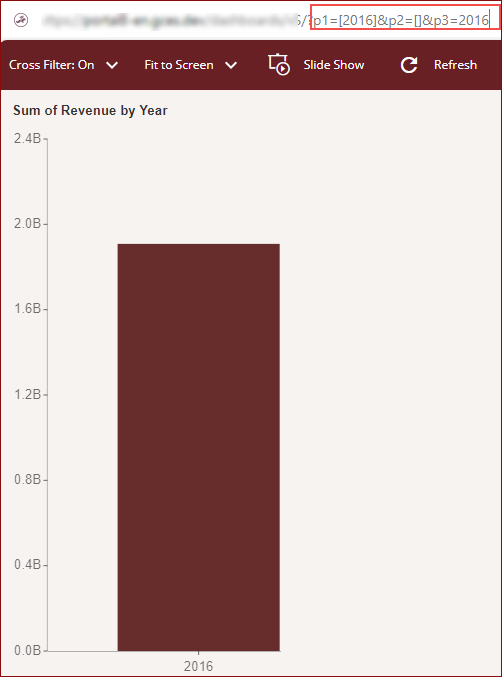
Preview the dashboard and click on the slicer to select Year as 2016 and click the image.
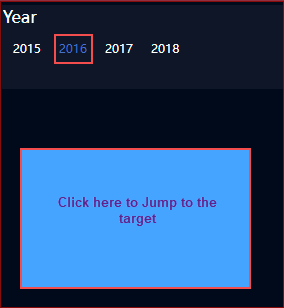
The field value 2016 will be passed to jump to the target external URL when clicking on the image to jump to using Parameter1.
Bind Jump To Scenario to Table Column
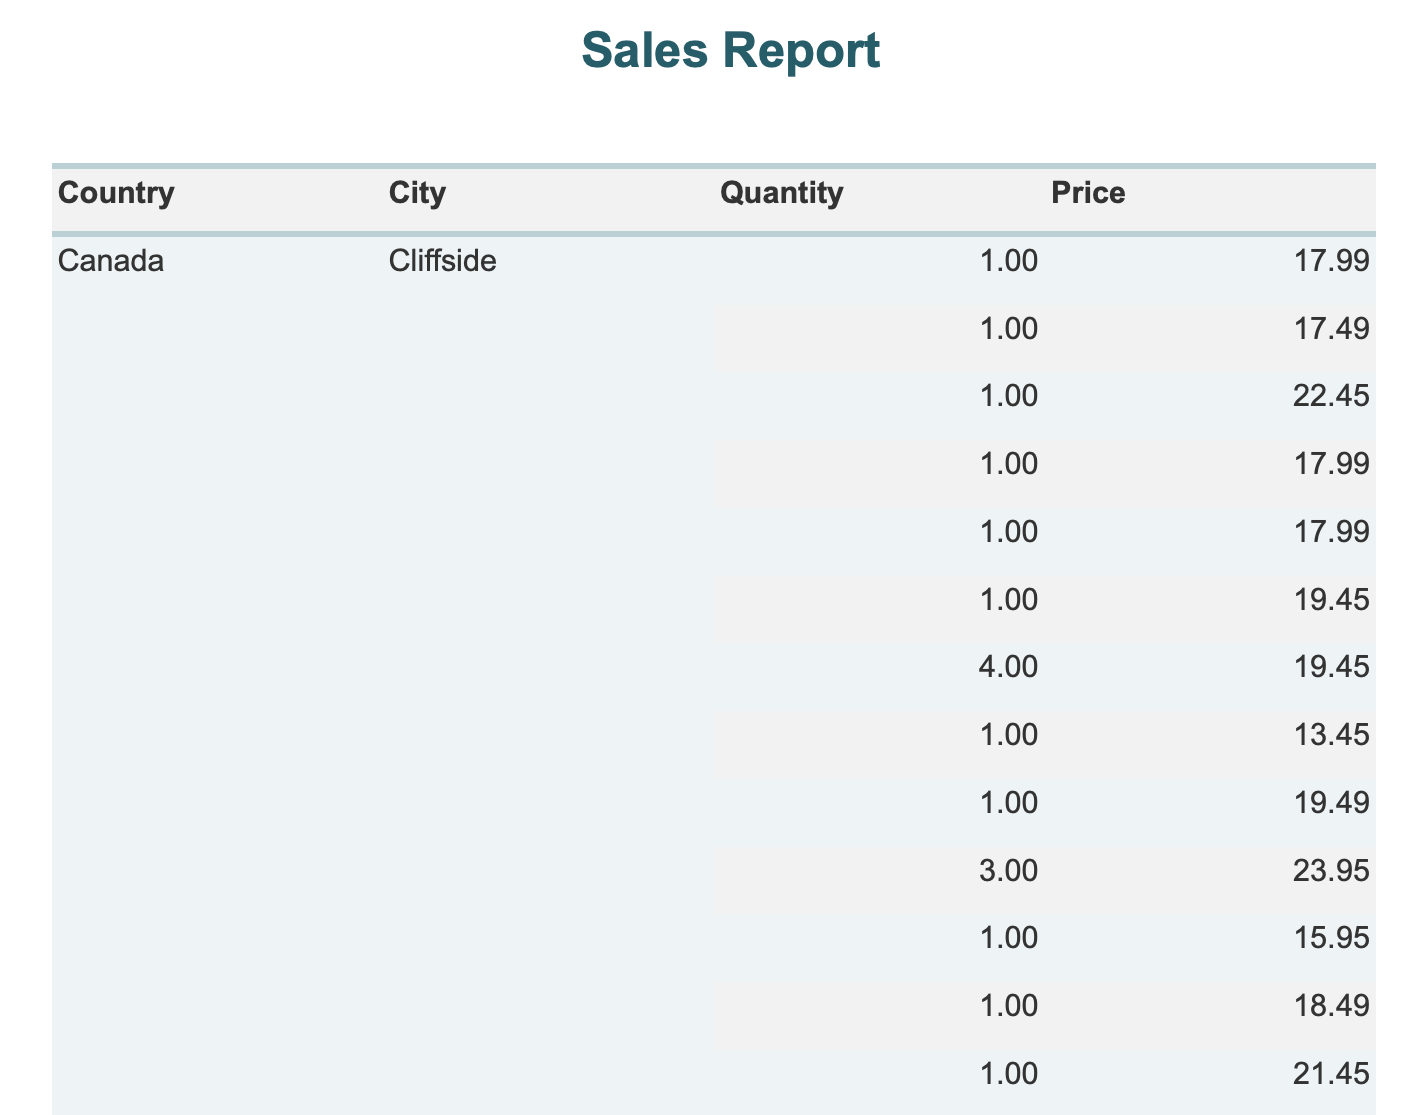
Wyn Enterprise supports binding Jump To scenarios to data tables as well as pivot table columns. Any cell of the bound column can allow you to open a dashboard, report, or external URL. The following is an example of a Jump To scenario applied to the column of a pivot table.
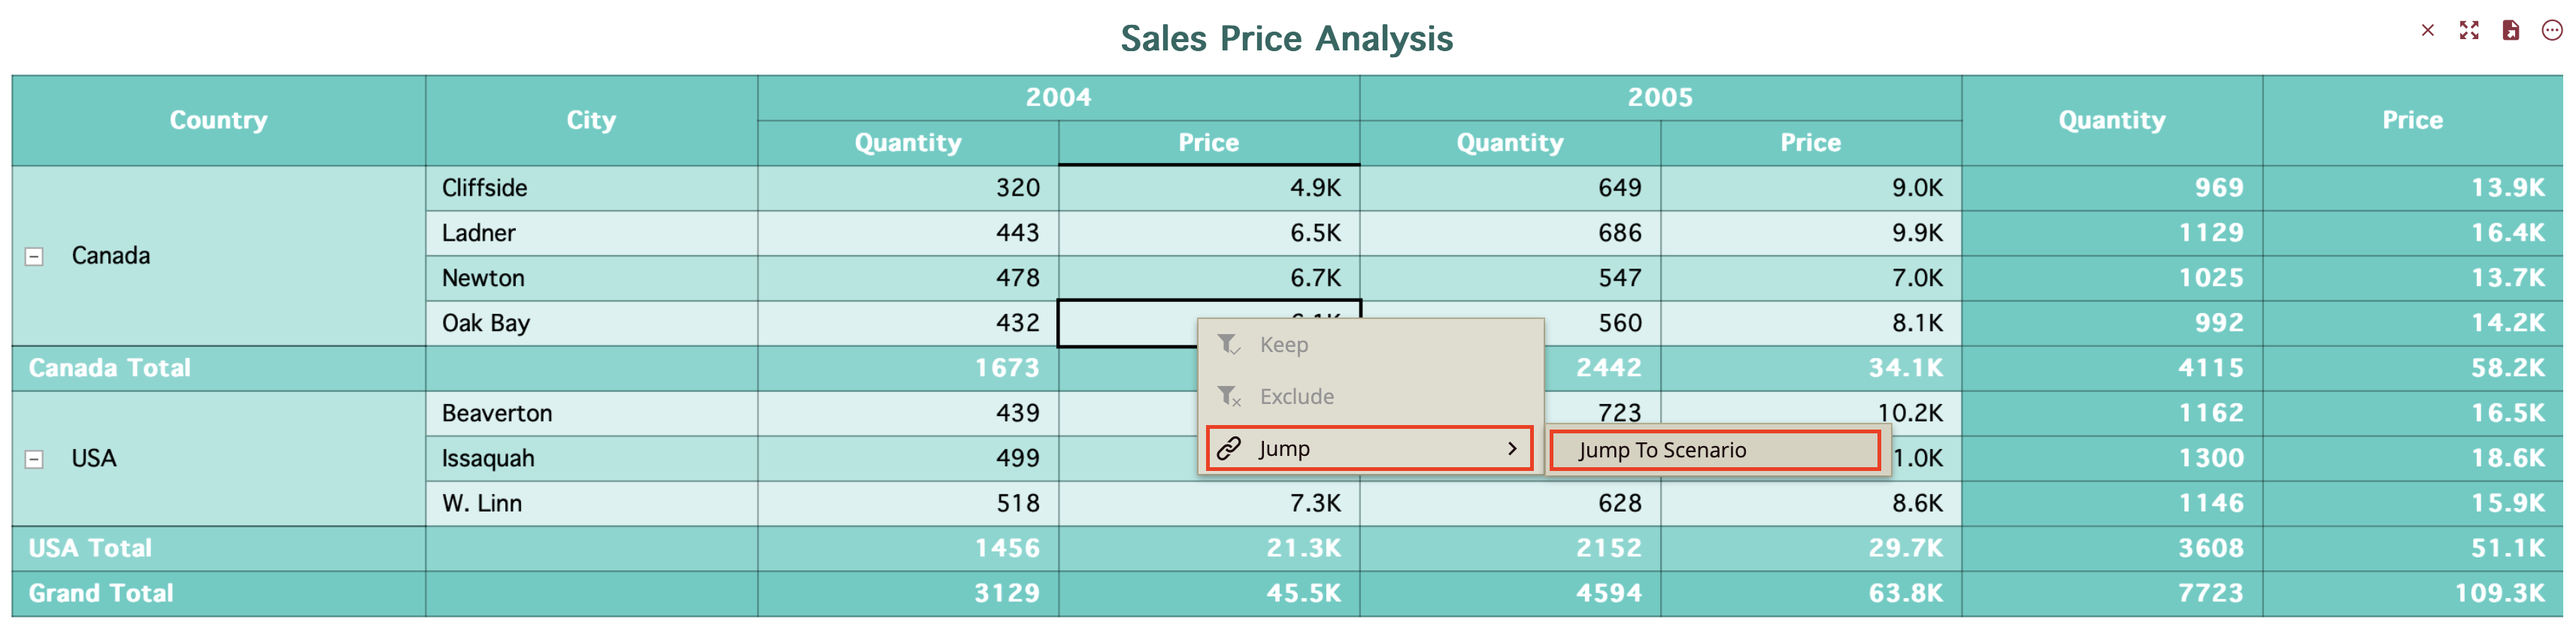
The pivot table has been created using the Customer Orders dataset, with the Quantity and Price values bound to the Values binding slot, Country and City to the Rows binding slot, and year to the columns binding slot. For more information on creating a table set refer to the Tables page. The following steps describe how to bind a jump to scenario to your table or pivot table.
Create a Jump To Scenario
First select your table by clicking anywhere on it. The table properties should appear on the right-hand side of the inspector tab. Click on the gear icon to open the Inspector tab.

Navigate to the Interaction properties and click the + icon next to the Jump To property to open the Jump To window.
Give your Jump To scenario a name. In the Target Dimension slot click to open the dropdown. Bind your Jump To scenario to the value corresponding to your table column. In this example, it has been bound to Price.
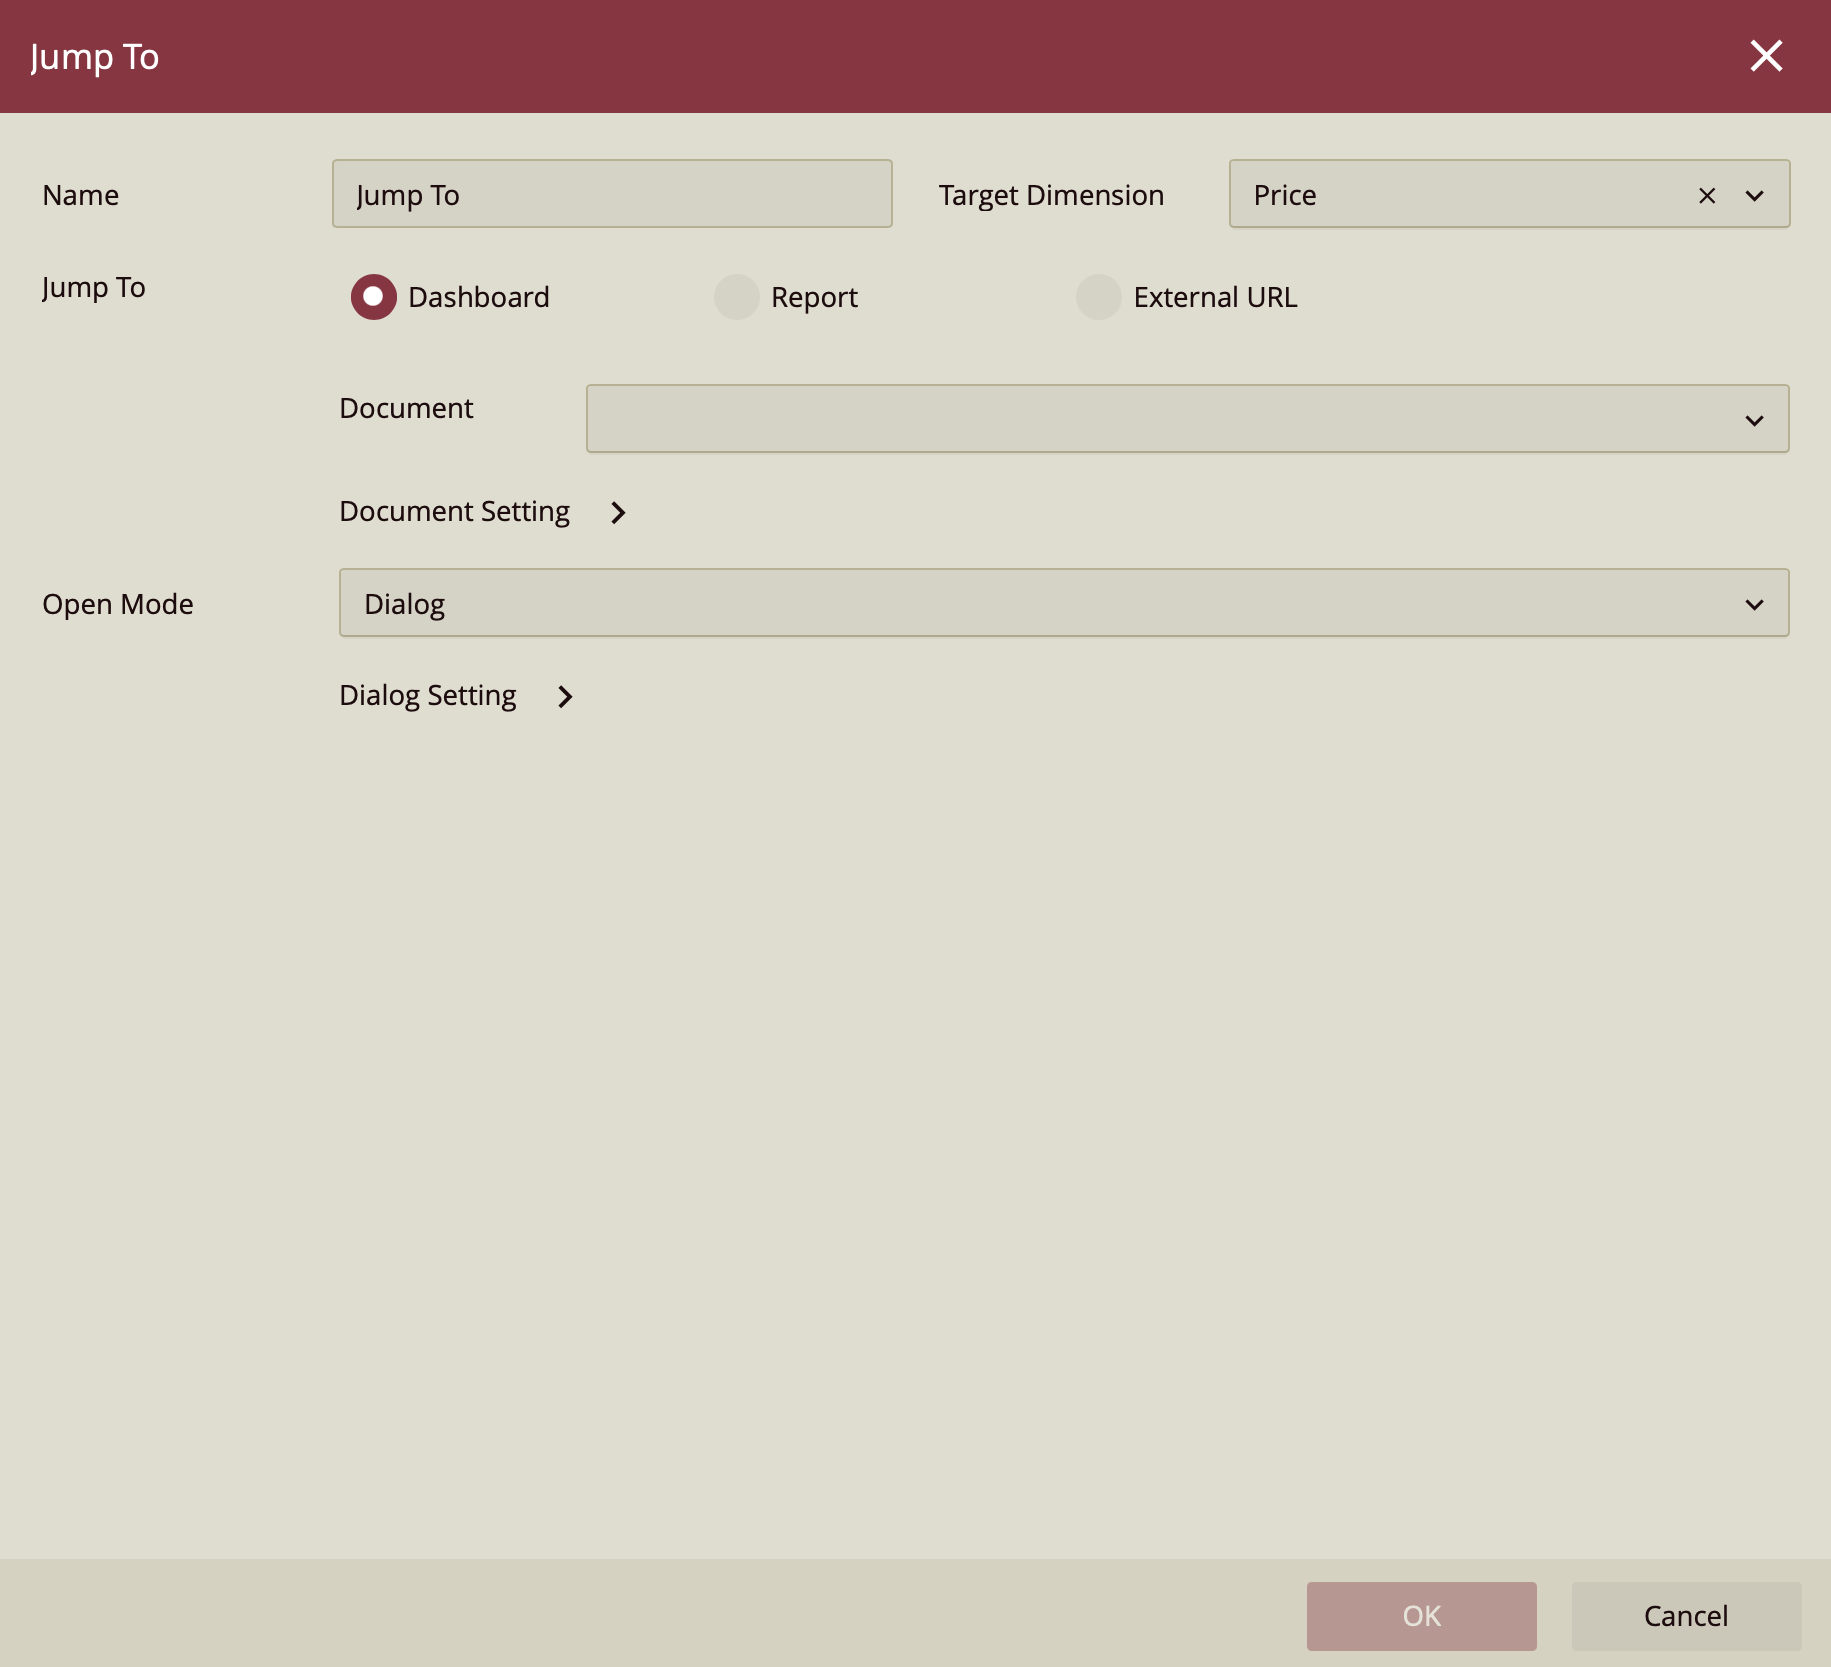
Select whether you would like to jump to a dashboard, report, or external URL when clicking on the column cells. In this example, you will be redirected to a report entitled "Sales Report". Select how you want your report to be opened. In this example the report will open in a new window. Click OK.

Click Preview on the dashboard designer ribbon to preview your dashboard.

Select the cell of the column you have bound your scenario to.

Right-click to open the menu. Hover over Jump To to find your scenario. Click on the Scenario you have created.
The document or URL you have chosen will open.