- Getting Started
- Administration Guide
-
User Guide
- An Introduction to Wyn Enterprise
- Document Portal for End Users
- Data Governance and Modeling
- Working with Resources
- Working with Reports
- Working with Dashboards
- View and Manage Documents
- Understanding Wyn Analytical Expressions
- Section 508 Compliance
- Subscribe to RSS Feed for Wyn Builds Site
- Developer Guide
Create a Cached Model
The procedure for creating a cached model for a dashboard is composed of four steps - choose the data source/dataset, select and edit tables, select and edit columns, and load the data.
In a cached model, you use data from the existing data sources/datasets available on the server. The data from these data sources can be added one by one to the data model. Also, note that only one user can edit a cached model at a time.
To Create a Cached Model
Follow the below steps to create a cached model for a dashboard:
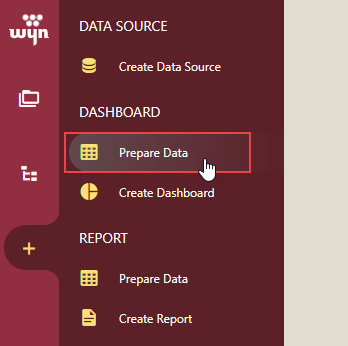
On the Resource Portal, navigate to the Create tab and then select Prepare Data under the Dashboard section.
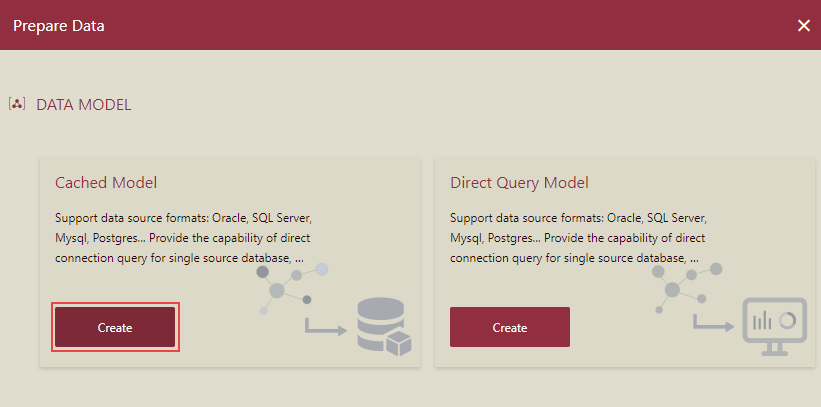
To create a new cached model, click the Create button.
Enter the name for the cached model in the Input Cached Model Name dialog box, and click OK.
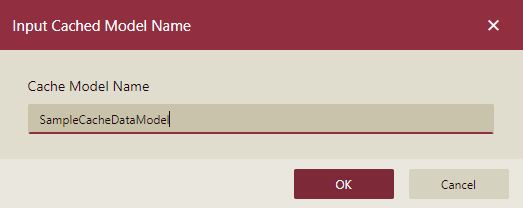
Note: The model is created and saved as soon as you click OK after providing the model name.
A Data Model Designer appears. Currently, there is no data added to the data model.
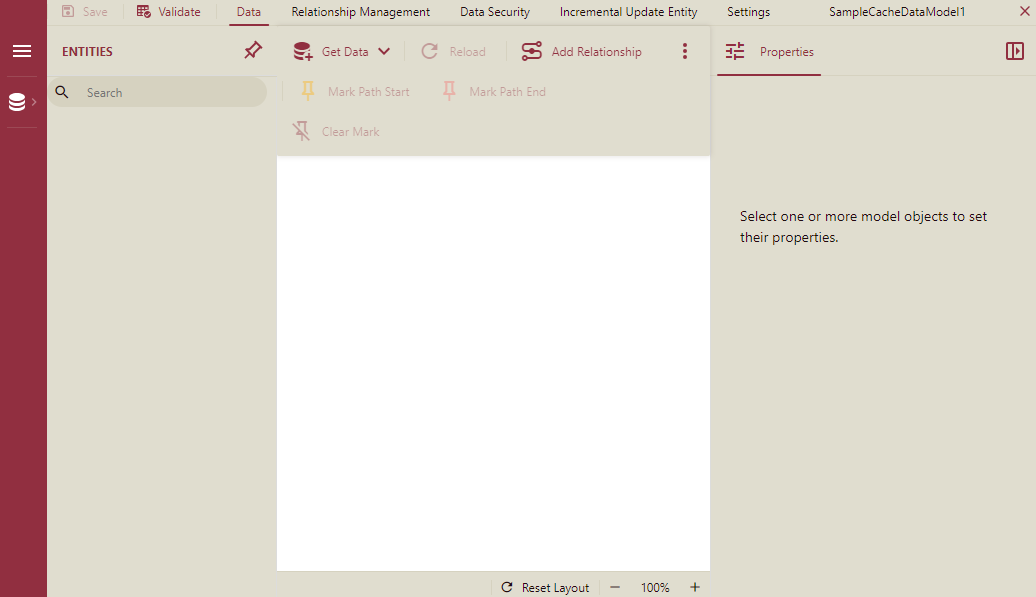
You can add the data from a data source or a dataset. Click the Get Data dropdown list on the top of the designer, it will display two options as shown below. You can also add data from multiple data sources, one after another, using the following steps.
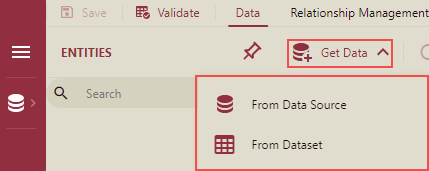
When a DataSource is selected, then follow the below steps:
Here we are selecting DataSource. So, in the Get Data window that appears, choose a data source from the list.
The list shows the available data sources available on the server.
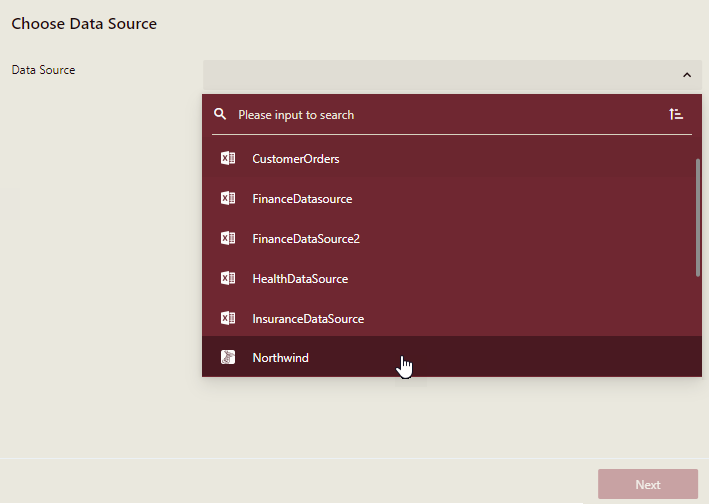
Click the Next button to proceed further.
Select the tables and views you want to include in the cached model. You can choose to display tables or views in the list by clicking the Tables or Views button, respectively.
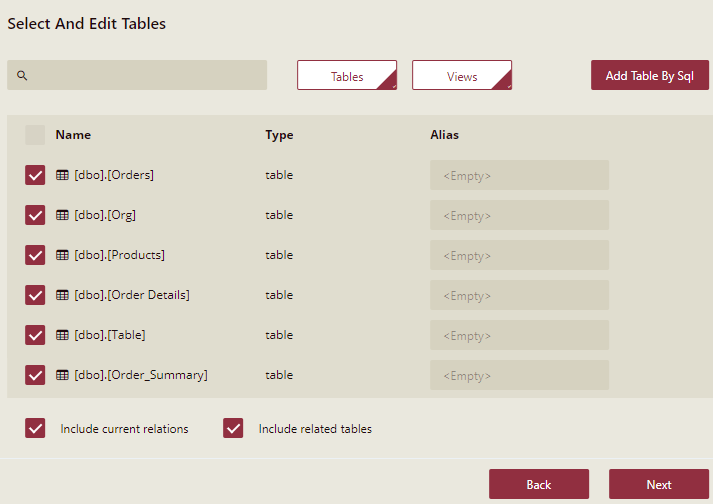
You can also create custom tables using SQL expressions if the existing tables do not meet your requirements. Click the Add Table by SQL button and enter the SQL expression.
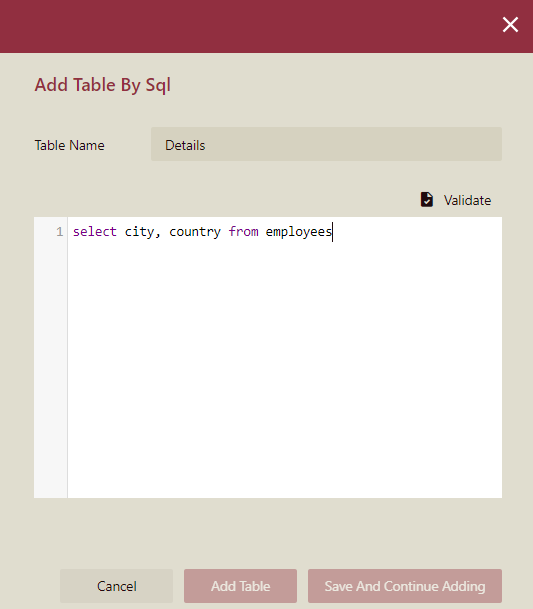
Click the Validate button to verify the SQL expression. Once validated, click the Add Table button to return to the Get Data wizard. If you want to add more tables using SQL expressions, click the Save and Continue Adding button.
Note: Use the Edit button in the Select and Edit Tables window to reconfigure the custom table.
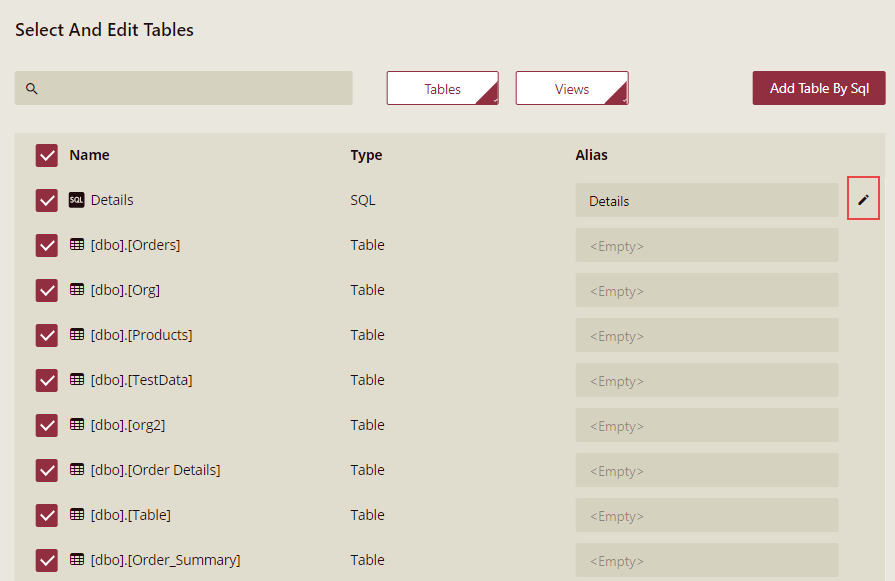
If the selected data source uses table/column mapping, you can see the mapped table names in the Alias column. You can add aliases or modify the existing aliases for the table names.
Uncheck the Include current relations option to exclude the existing relations in the selected tables and views. You can uncheck the Include related tables option to exclude the related tables in the selected tables and views.
Click the Next button to proceed further.
Select the columns that you want to include in the cached model, and change the data types for the columns.
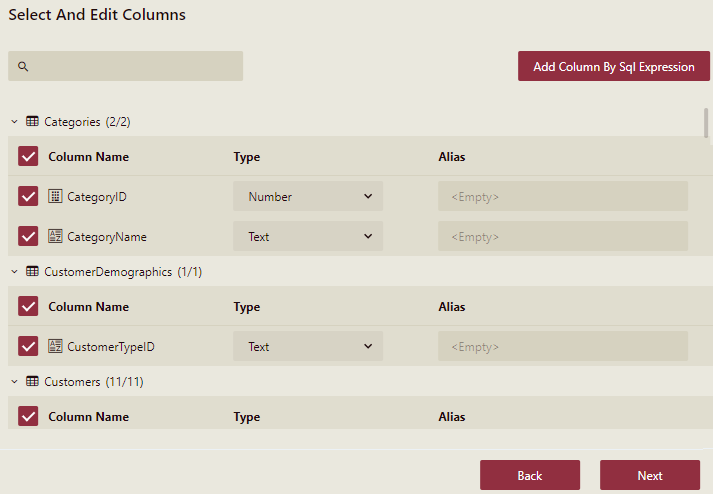
You can also create custom columns using SQL expressions if the existing columns do not meet your requirements. Click the Add Column By Sql Expression button and enter the following details -
Table Name - The name of the table where you want to add the column.
Column Name - The name of the column.
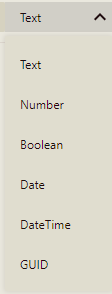
Type - The data type of the column. It can be set to Number, Text, Boolean, Date, and DateTime. If you do not specify the type, the data type is automatically determined based on the SQL expression.
SQL Expression - A valid SQL expression for the column.
Note: You cannot add a new column to a custom table.
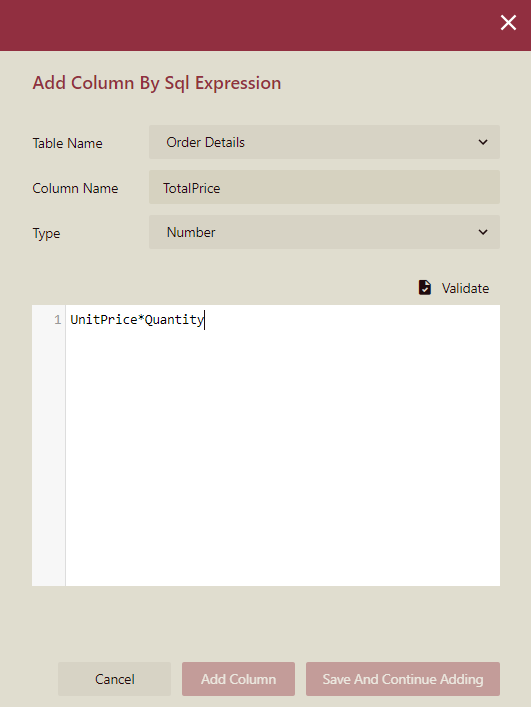
Click the Validate button to verify the SQL expression. Once validated, click the Add Column button to return to the Get Data wizard. If you want to add more columns using SQL expressions, click the Save and Continue Adding button.
Note: Use the Edit button in the Select and Edit Columns window to reconfigure the custom table column.
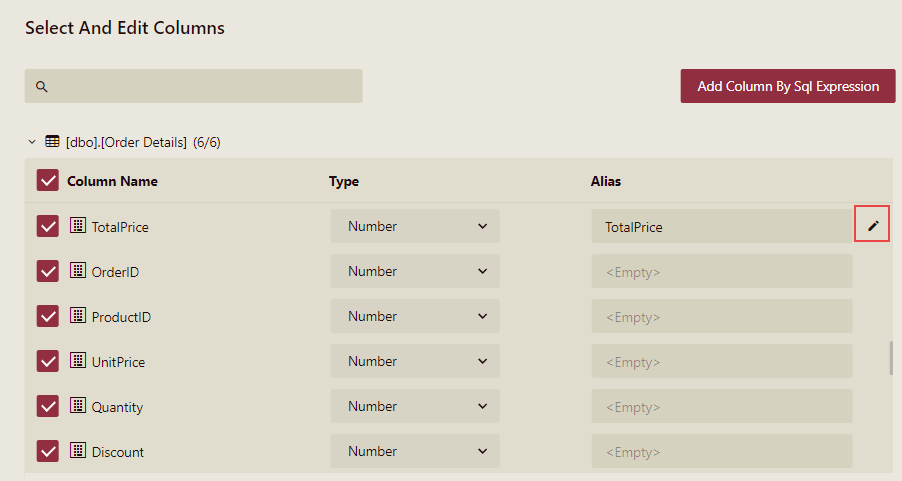
If the selected data source uses table/column mapping, you can see the mapped table names in the Alias column. You can add aliases or modify the existing aliases for the column names.
Click the OK button to proceed further.
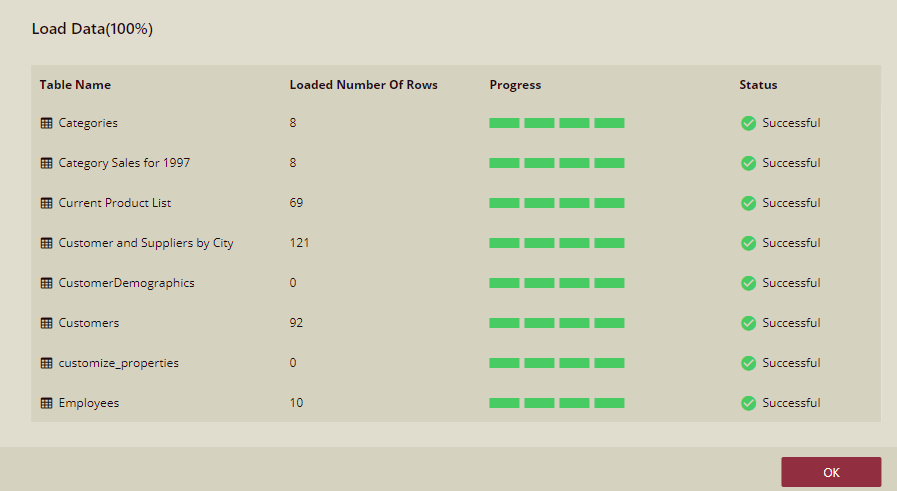
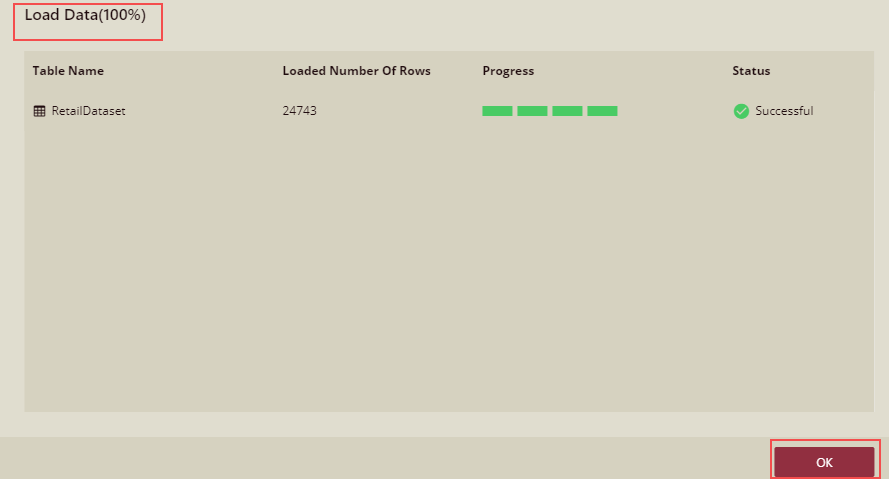
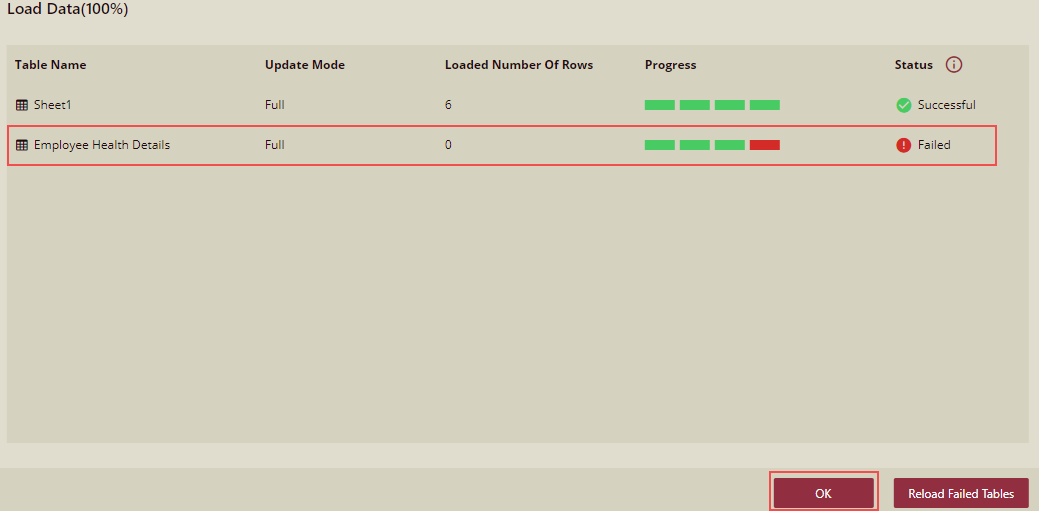
Now, the data from the data source will begin to load. You can see the loading progress for each table under the Progress header.
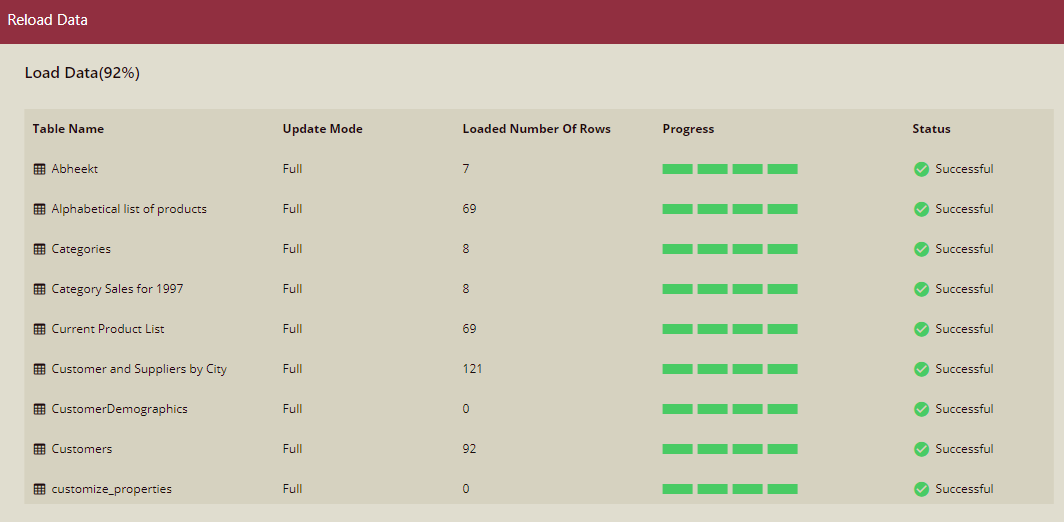
Once the data is completely loaded, you will see the load status for each table under the Status header, and the number of rows loaded in each table under the Loaded Number of Rows header.
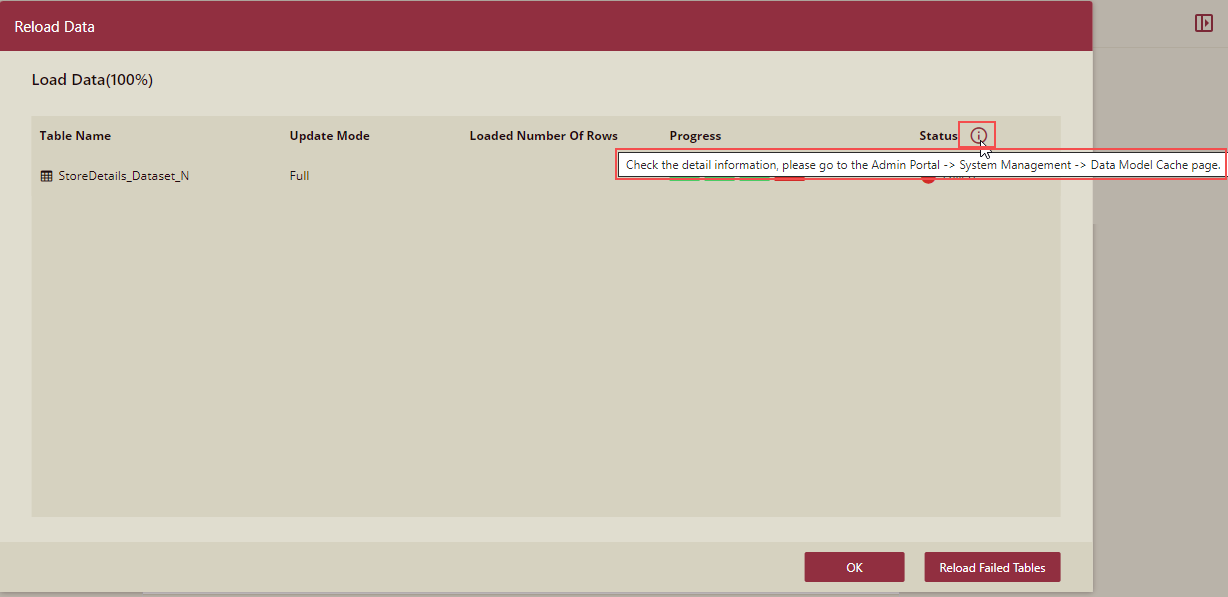
If you face a failure during the loading of data, you can click the Reload button to load the data again for the failed entities, until they get successfully loaded. The Status column header icon will show a hint message to check the details of the message in the admin portal.
Now, click the OK button.
Based on the defined settings, a cached model is created as shown below.
The Data Model Designer displays the aliases for the entities and attribute names defined while editing tables and columns in the Get Data dialog box.
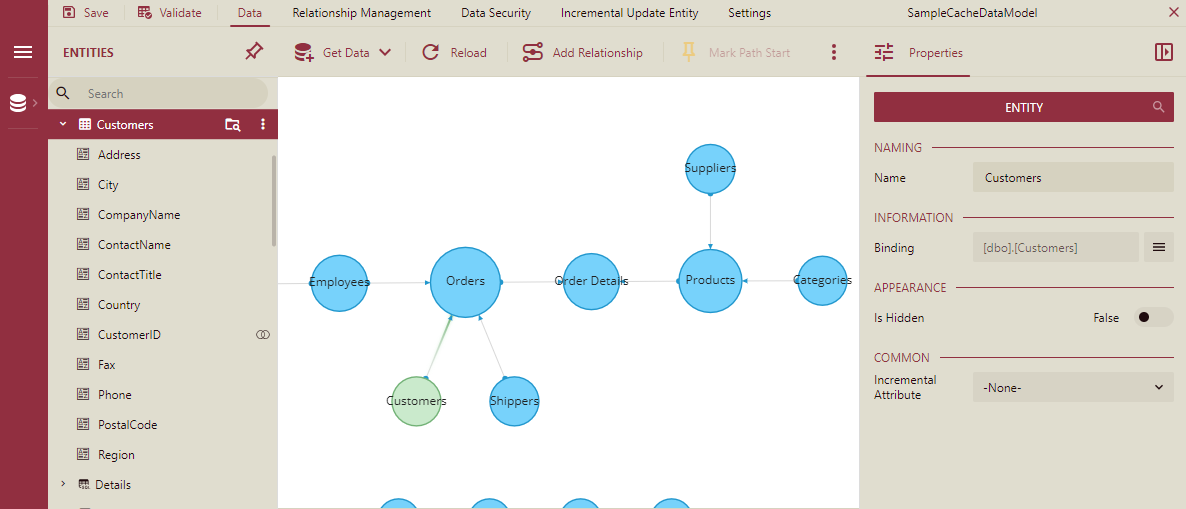
Use the Reload button in the designer to manually refresh the cached data for the selected entities in the model.

When a DataSet is selected, then follow the below steps:
Here we are selecting a DataSet. So, in the Get Data window that appears, choose a data set from the list.
The list shows only the available Cached dataset and Direct dataset.
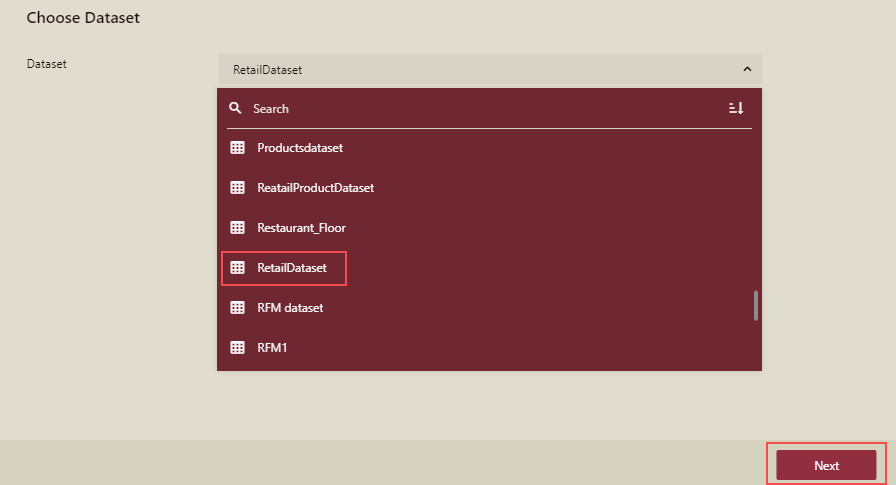
Note: You can only select the Dataset for which you have read permission.
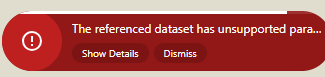
If you select a dataset, it will check whether the dataset is referenced, and the referenced dataset needs to meet the following requirements:
The referenced dataset cannot contain "User Input", "User Context" and "Organization Context" type parameters, else it will give an error message.
The data source of the referenced dataset cannot contain "User Context" and "Organization Context" type parameters, else it will give an error message.
Click the Next button to proceed further to the Select and edit columns page.
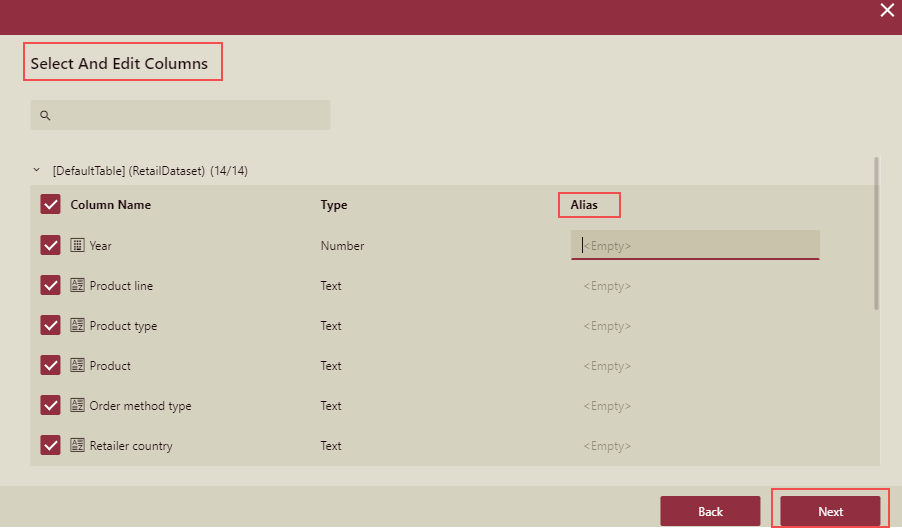 .
.You can change the Alias of the column here if required.
Click the Next button, to proceed further.
Now, the data from the data set will begin to load. You can see the loading progress under the Progress header.
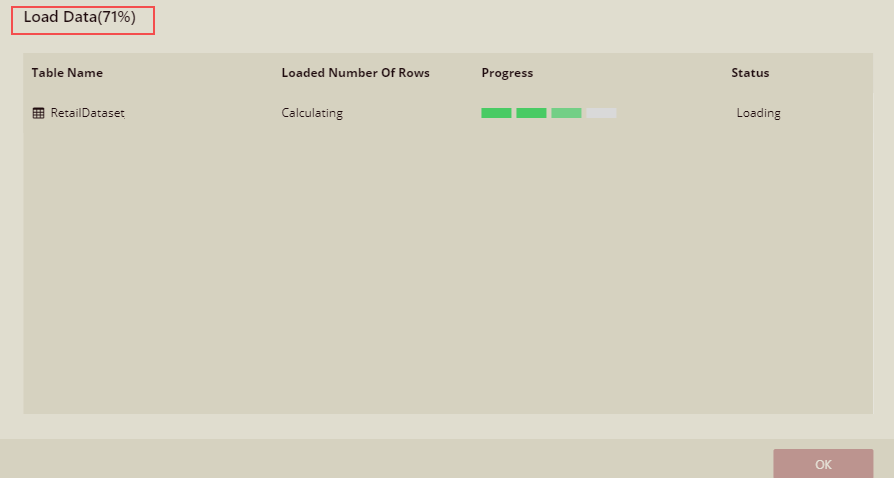
Once the data is completely loaded, you will see the load status under the Status header, and the number of rows loaded in each table under the Loaded Number of Rows header.
Tip: If you face a failure during the loading of data, a Reload button will appear next to the failed entities. Click the Reload button to load the data again for the failed entities, until they get successfully loaded.
Now, click the OK button.
Based on the defined settings, a cached model is created as shown below.
Referenced DataSet
Listed below are a few important points related to the referenced dataset.
The selected referenced dataset cannot contain "User Input", "User Context" and "Organization Context" type parameters. So, when a referenced dataset selected has these parameters, then an error message is displayed.
When the referenced dataset has been deleted, a warning will be issued to remind the user that the entity is not found.
When the referenced dataset has changed, and the dataset is invalid, a warning will be issued to remind that the dataset is invalid.
When the referenced dataset has changed, and the dataset is valid, then there is no warning.
If the user clicks "Sync Data", the data will be synchronized according to the latest dataset.
Incremental Update Entity: If the data model is created by referencing a dataset, then it does not support incremental updates.
Add Data Security Filters for Entities
You can configure security filters for entities with multiple conditions in the cache model designer. From Wyn version 7.0 onwards, the filter supports multiple conditions, and are added to the entity of the cache model. Before Wyn 7.0,only userContext and orgContext were supported to filter attributes. To add the data security filters, follow the steps given below.
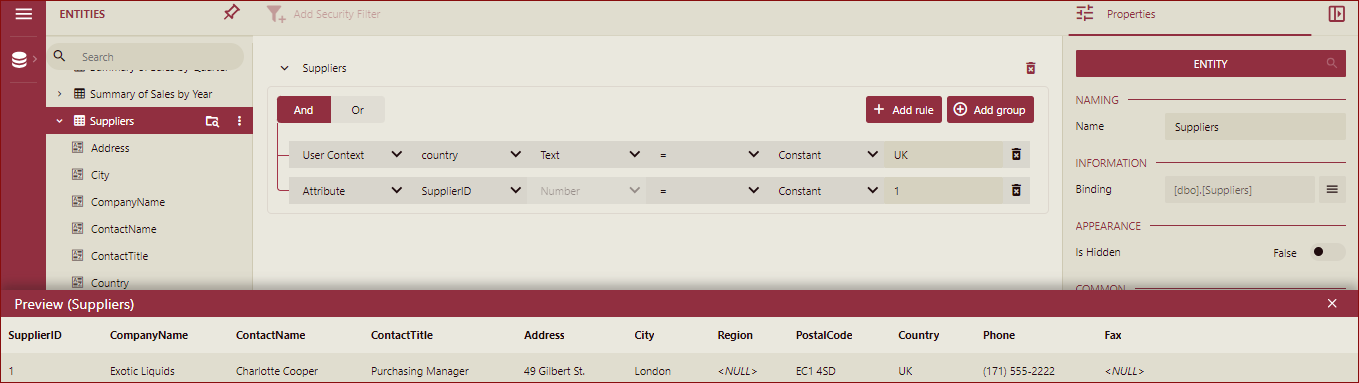
On the model designer, select the entity for which you need to add the data security filters and click the Data Security tab.
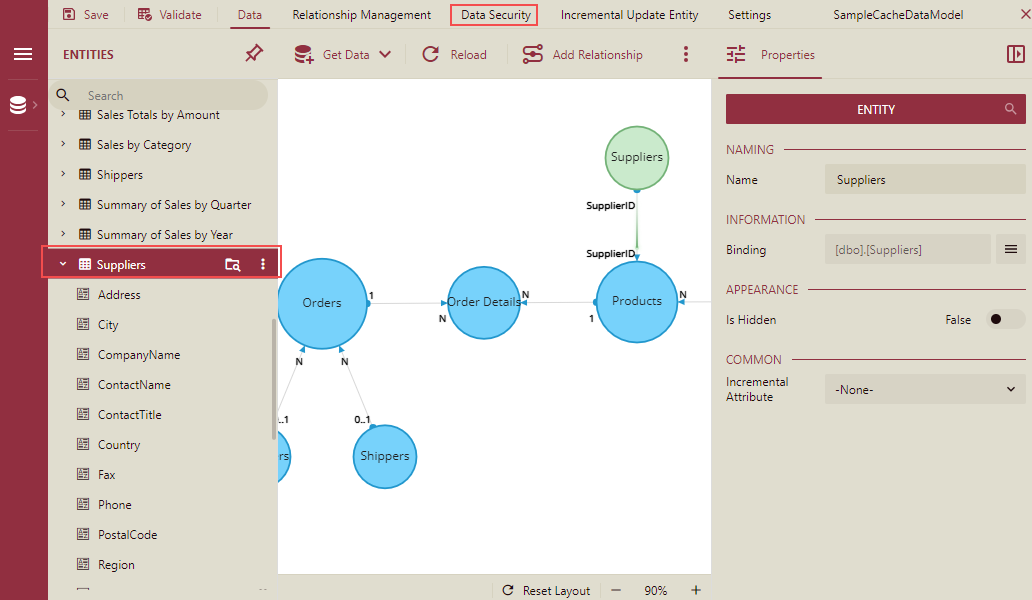
Add Security Filter option is displayed.
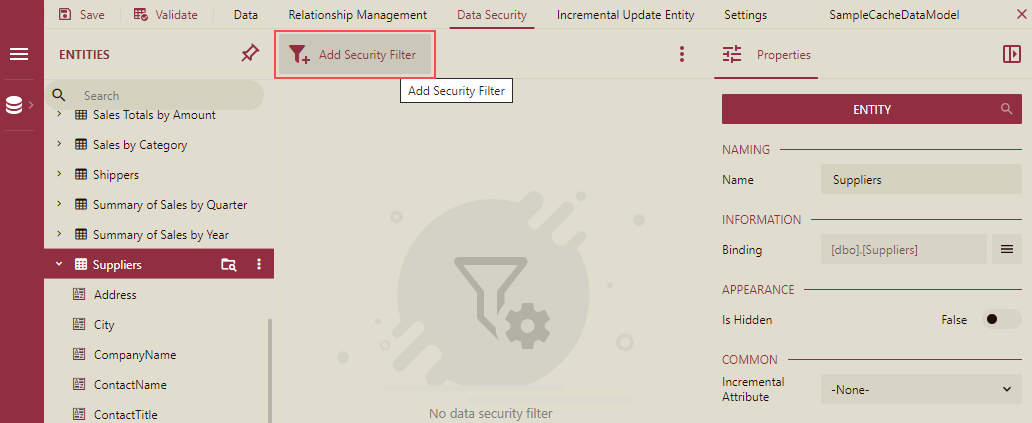
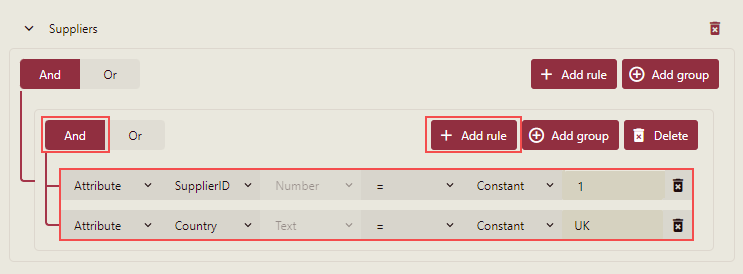
Click the Add Security Filter option. The configuration of Groups and Rules is displayed. These configurations have the conditions like AND or OR.

Add the security filters. In this example, we will add 2 Rules in a Group.
Click the Add Group button.
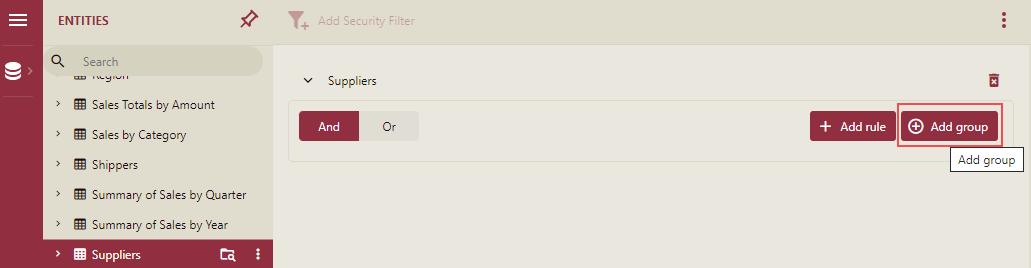
A group will be added with the option to add more groups or rules as shown below.
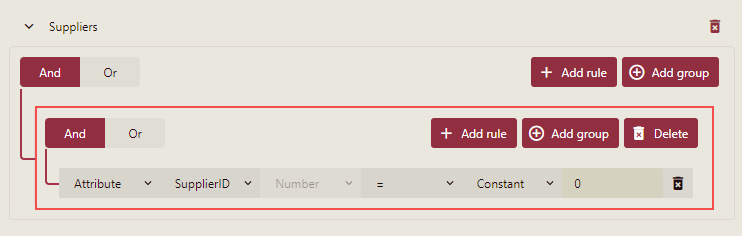
By, default a rule with And condition is added. You can modify the rule. In this example, we have added two rules with And conditions in this group as shown below.
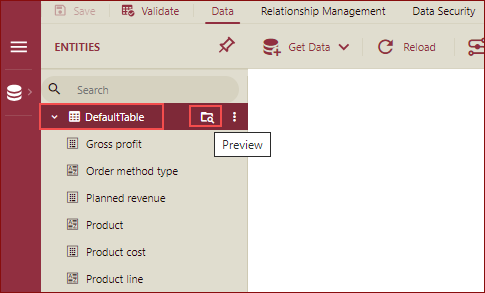
When you preview the entity in the model designer, you will be able to see the filtered data, based on the data security filters applied in this model.
Once the data model is saved, you can use this model to create a dashboard and the dashboard will display the filtered data, based on the data security filters applied in this model.

Set Filter Value(s) when previewing Entity in the model designer
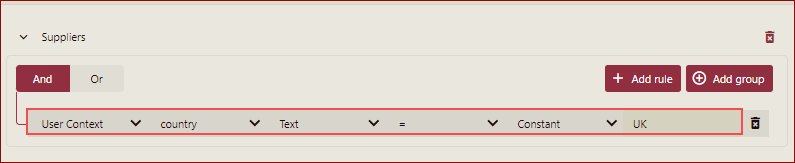
If you set the rules using the User Context value as shown below:
You can set the Filter Value(s) when you Preview the Entity in the model designer as shown below:
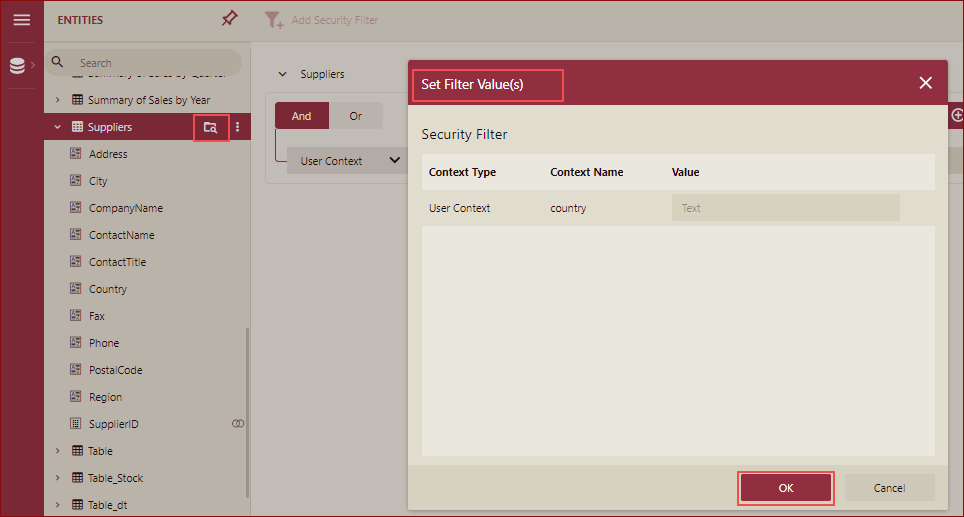
Click OK. You will be able to preview the result based on the filter condition.
Note: Only the Context Value needs to be entered for the preview. For duplicate Contexts, only one is displayed, and this value will be used in all places where that Context is used.
Structure of Security Filters
Left Type
Operator
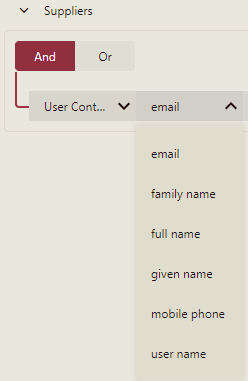
User Context
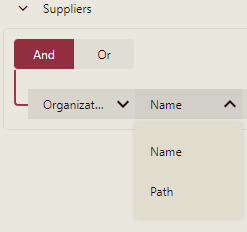
Organization Context
Data Type

Group and Rules Conditions
You can configure Groups and Rules, using 'AND' or 'OR' conditions.
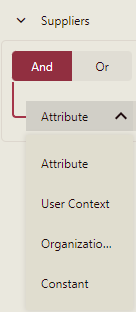
Each Rule contains the following: Left Type, Left Value, Data Type, Operator, Right Type, and Right Value.
Left Type value options: Attribute, User Context, Organization Context, Constant.
When the Left Type option selected is Context, the Left Value is a single-valued Context Value.
Data Type value options: Text, Number, Boolean, Date, DateTime, Guid.
When the Left Type option selected is Attribute, then Data Type is not allowed to be modified and the value of Data Type will be Data Type of the selected Field.
The optional Operator values corresponding to the Data Type are listed in the following table.
Data Type | Optional Operator |
|---|---|
Text | =, !=, Is, NotIs, In, NotIn, Contains, NotContains, StartsWith, NotStartsWith, EndsWith, NotEndsWith. |
Number | =, !=, <, <=, >, >=, Is, NotIs, In, NotIn. |
Boolean | =, !=, Is, NotIs. |
Date | =, !=, <, <=, >, >=, Is, NotIs. |
DateTime | =, !=, |
Guid | =, !=, Is, NotIs, In, NotIn. |
Right Type value options: User Context, Organization Context, Constant.
A few important points to be considered while adding the data security
When an Attribute is deleted, the security filter that uses the attribute is automatically deleted.
When the Add group button is clicked, an And group is added and a default Rule is added.
When all Rules and Groups in a Group are deleted, the Group is deleted and the root Group is not deleted.
The depth of the Group is capped at 20.
Note: Security filters created in models from the previous versions will keep the existing logic, however, they will now be listed under the Security filter page in Model Designer after the upgrade.
Limitations
Data Type | Old Operator | New Operator |
|---|---|---|
Text | Equals, In, Not Equals, Not In | =, !=, Is, NotIs, In, NotIn, Contains, NotContains, StartsWith, NotStartsWith, EndsWith, NotEndsWith. |
Number | Equals, In, Not Equals, Not In. | =, !=, <, <=, >, >=, Is, NotIs, In, NotIn. |
Boolean | Equals, In, Not Equals, Not In. | =, !=, Is, NotIs. |
Date | Equals, In, Not Equals, Not In. | =, !=, <, <=, >, >=, Is, NotIs. |
DateTime | Equals, In, Not Equals, Not In. | =, !=, <, <=, >, >=, Is, NotIs. |
Guid | Equals, In, Not Equals, Not In. | =, !=, Is, NotIs, In, NotIn. |
For Boolean, Date and DateTime types, configuring In and NotIn for Boolean, Date and DateTime types will not be supported in the new SecurityFilterConditions
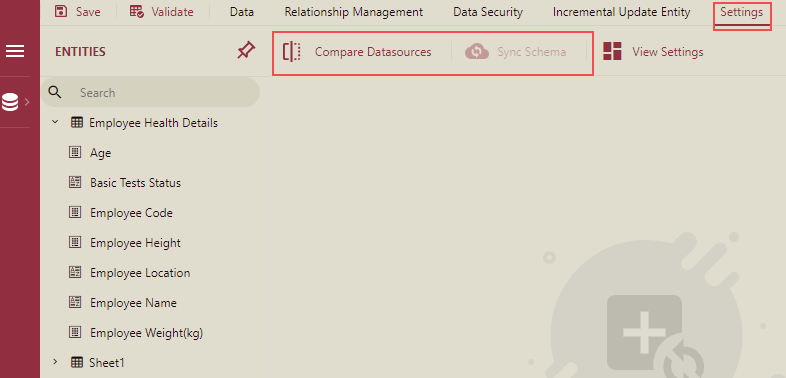
Synchronize Data Source Changes with the Data Model
If the data source is changed, then the data model designer will notify you and reload/refresh changes and you can continue to edit the changed tables instead of deleting them from the data model. So, you can synchronize the data source changes with the data model using the Compare Datasources and Sync Schema options under the Settings tab.
Scenarios that can change the data source are listed below.
Column Changed: Delete a column, Add a new column, Rename a column, and Change the type of the column.
Table Changed: Delete a table, Rename a table, and Add a new table.
Customized Table (SQL Query): Edit the SQL directly.
Steps to Synchronize the data source changes
Create a Cache Data Model using a data source.
Change the data source. In this example, we have deleted a column in our data source.
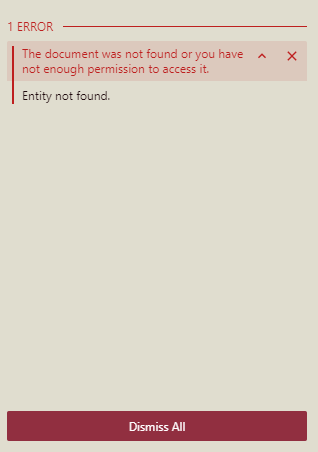
Reload the data model. An error is displayed. Click OK on the error message.
Click the Settings tab and click the Compare Data sources button.
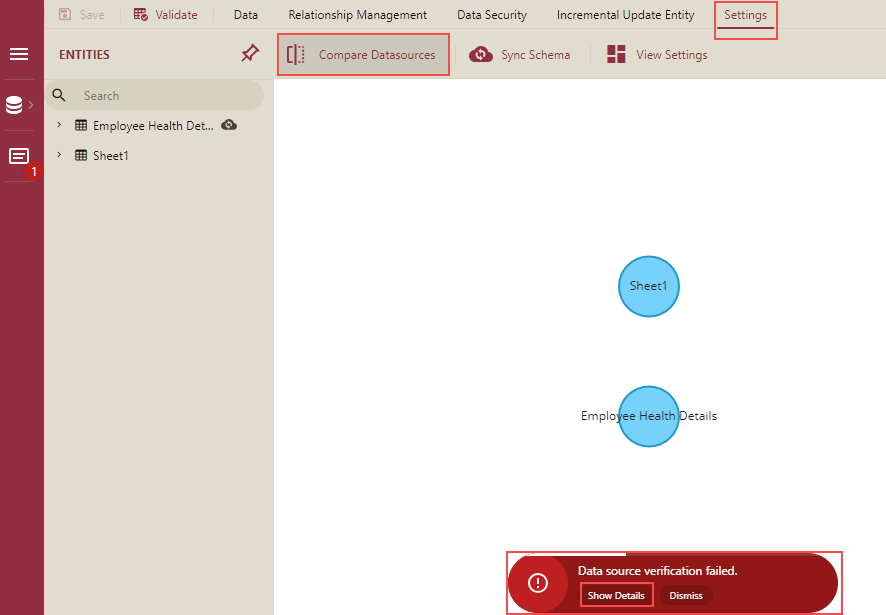
An error message is displayed.
Click the Show Details button. The error details will be displayed as shown below.
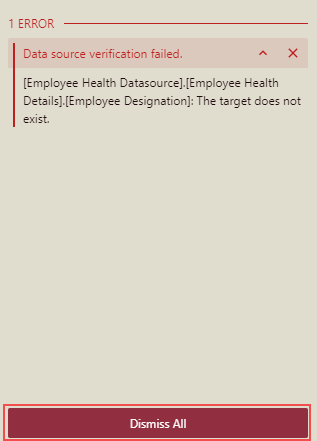
Click Dismiss All on the error message to close the dialog box.
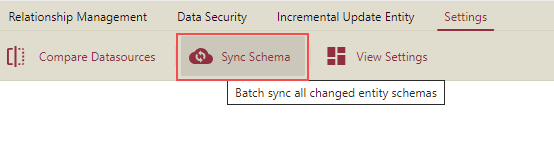
Click the Sync Schema button to synchronize the data source changes.
The Synchronize Table Structures and Reload Data screen is displayed.
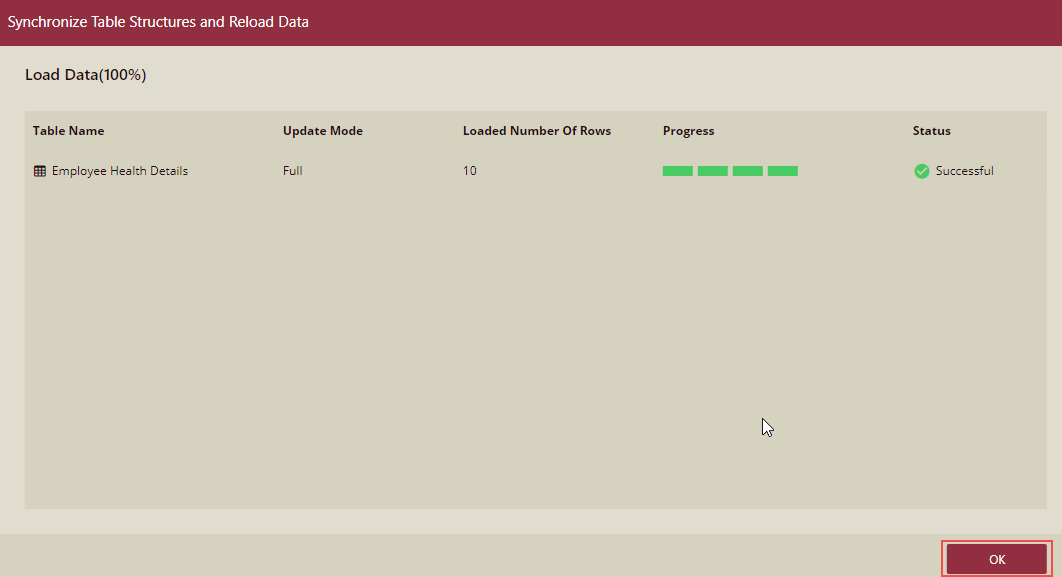
Click OK.
If all entities are loaded successfully, then the data changes are synchronized with the data model and the Sync Schema button is disabled.
There is a Sync table data and structure option on the Entity tree node as well.
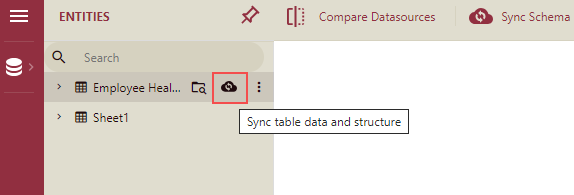
Click this button to sync the current entity. If the data is loaded successfully, the sync button of the current entity will be removed. If the current successfully reconfigured entity is the last entity in the model that can be synchronized, then the batch synchronization button will be disabled.
Editing SQL statements of custom tables and custom columns
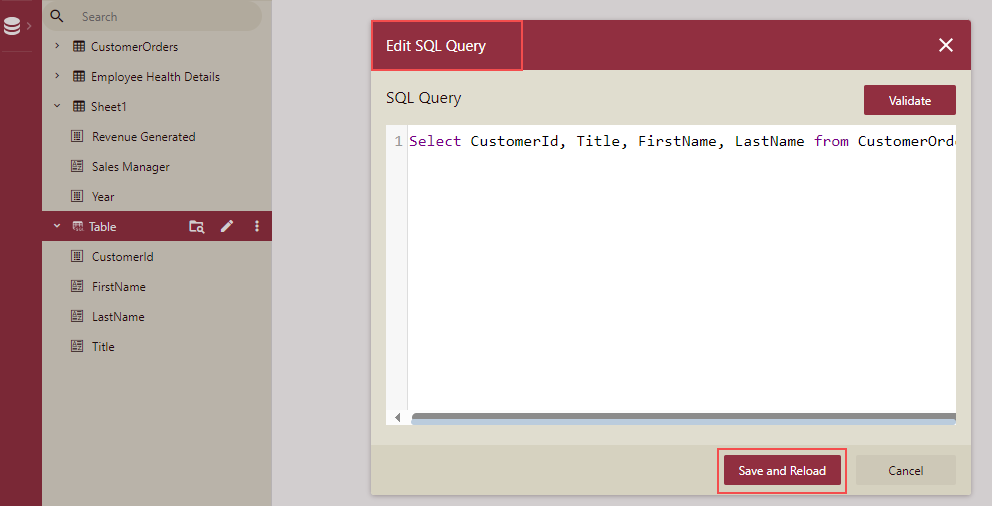
You can directly edit the SQL statement for custom entities or custom attributes by clicking the Edit Sql Queries button.
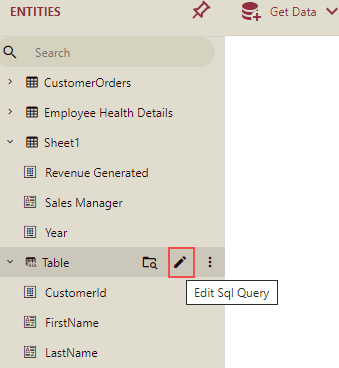
The sql statement edit box will pop up. Click the Save and Reload button to start loading the data.
The Synchronize Table Structures and Reload Data screen is displayed. Click OK and the data will be loaded.
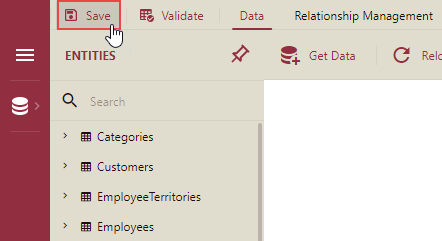
To Save a Cached Model
Follow the below steps to save a cached model in Wyn Enterprise.
Click the Save button to use the cached model for binding data in dashboards.
In the Update dialog box, enter the comment (if any) for the cached model as shown.
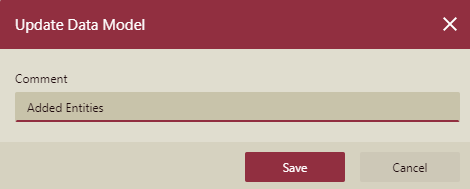
Then, click the Save button to save the cached model to the latest version.
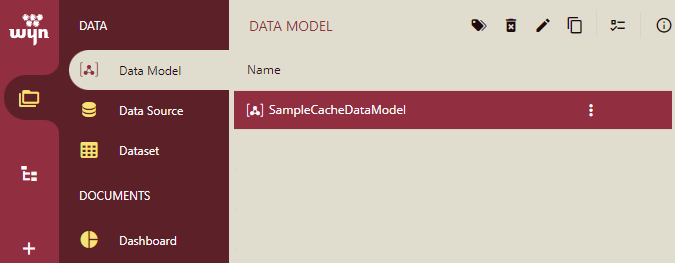
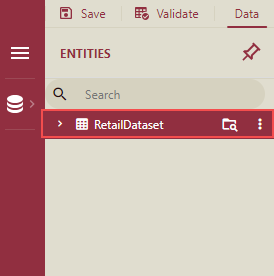
The saved cached model will appear in the Data Model tab of Document Types.