- Getting Started
- Administration Guide
-
User Guide
- An Introduction to Wyn Enterprise
- Document Portal for End Users
- Data Governance and Modeling
- Working with Resources
- Working with Reports
- Working with Dashboards
- View and Manage Documents
- Understanding Wyn Analytical Expressions
- Section 508 Compliance
- Subscribe to RSS Feed for Wyn Builds Site
- Developer Guide
Schedule a Refresh Task
A refresh task defines the frequency and time slots to refresh the cached data in the model. When a Cached Model extracts the data from multiple data sources and types, you should configure the refresh data strategy for each entity based on business requirements.
For example, a company works on different types of data like product data, sales data, and employee data stored in different database entities. It is also possible that these data might come from different software models, such as sales data from ERP systems, employee data from OA systems, and production data from CRM systems, deployed in different types of databases, such as Oracle, MySQL, SQL Server, and so on.
Here, data like product data and employee data does not need to be cached daily, however in the case of sales data that changes frequently will require a high-caching frequency, let's say, once in every 10 minutes.
Note: You can also manually refresh the cached data for the selected entities in the model using the Reload button located on top of the designer.
Task Execution Modes
The different refresh modes for task execution supported in Wyn Enterprise are elaborated below.
Note: An entity can bind to a single task at a time.
One-Time: Refreshes the data cache at the specified time. This type of scheduling executes the task only once. It provides you the flexibility to specify the date and time to schedule the task.
Scheduled: Refreshes the cache at fixed intervals of time. For example, you can use a template to refresh the cache every Monday at 5:10 am or manually enter the date and time settings. A schedule template uses predefined date and time settings for the task.
Note that the following settings should be configured correctly in the Admin Portal else the scheduled task would not work properly.
1. Check whether the correct 'Portal URI' has been specified in the UI Settings.
2. Check whether the correct email settings are provided in the Email Settings.
To Schedule a Refresh Task
Follow the below steps to schedule a refresh task for a Cached Model.
On the Resource Portal, select the cached model for which you want to schedule a refresh task.
With the document selected, click the Info button on the top-right corner of the Document Portal.
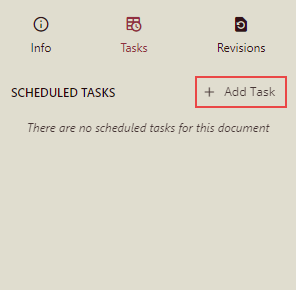
In the window that appears on the right side of the Document Portal, navigate to the Tasks tab and click the + Add Task button to create a new scheduled task.
Enter the task description in the Details field as shown.

Select the entities for which you want to schedule a cache refresh, or use the search box to find the specific entities. The list displays all the entities available in the cached model.
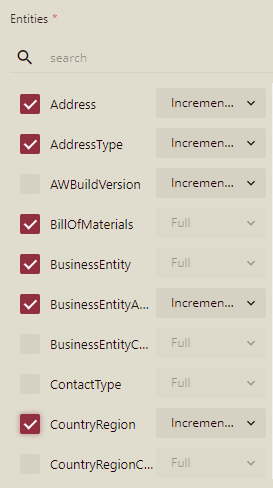
Specify the Update Mode for each entity i.e. whether to extract the data from the data source fully or incrementally.
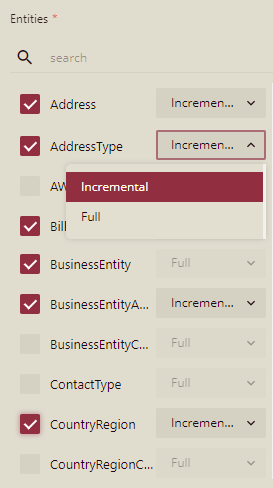
Note: If the Incremental Update property for an entity in the data model designer is specified, then by default the Update Mode for that entity is set to 'Incremental', else it is set to 'Full' and disabled. For more information on incremental data load, please visit this article.
By default, the refresh tasks are scheduled to run only once. So, in order to create a task that runs at fixed intervals of time, set the Execution field to 'Scheduled'.
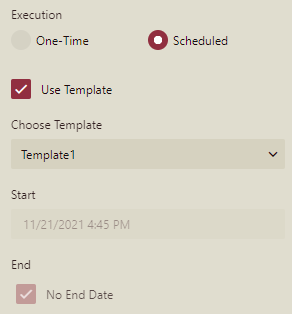
Check the Choose Template option to use predefined date and time settings for the task. For more information on schedule templates, visit this page.
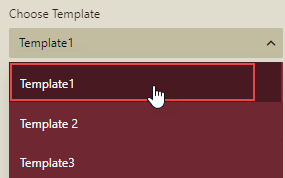
The Start and the End fields pick up the default values specified in the chosen schedule template.
Enter a valid email address in the Email Notification field.
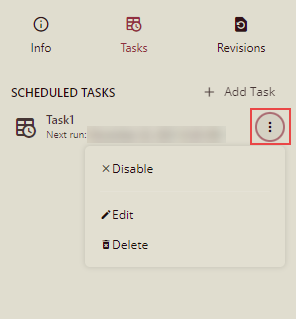
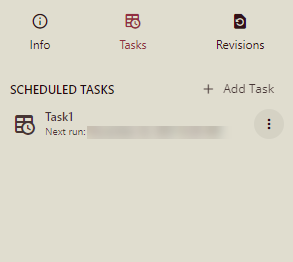
Click the Create Task button to save the settings. Note that the task is listed in the scheduled tasks as shown.
To Manage a Scheduled Task
To manage a scheduled task, click the Actions button  in the Tasks tab. You can use this button to disable, edit, or delete a scheduled task.
Disable - Deactivates all the future scheduled executions for that task. You can resume the task execution once you enable the scheduled task by clicking the Actions button.
Edit - Enables you to modify the existing information for that task like its name, entities, execution type, date and time settings, and so on.
Delete - Discards the scheduled task. Note that once you delete a scheduled task, it is gone forever.
