-
Interactive DashboardsCreate interactive BI dashboards with dynamic visuals.
-
End-User BI ReportsCreate and deploy enterprise BI reports for use in any vertical.
-
Wyn AlertsSet up always-on threshold notifications and alerts.
-
Localization SupportChange titles, labels, text explanations, and more.
-
Wyn ArchitectureA lightweight server offers flexible deployment.
-
 Wyn Enterprise 7.1 is ReleasedThis release emphasizes Wyn document embedding and enhanced analytical express...
 -
 Choosing an Embedded BI Solution for SaaS ProvidersAdding BI features to your applications will improve your products, better serve your customers, and more. But where to start? In this guide, we discuss the many options.
-
Visual GalleryInteractive sample dashboards and reports.
-
BlogExplore Wyn, BI trends, and more.
-
WebinarsDiscover live and on-demand webinars.
-
Customer SuccessVisualize operational efficiency and streamline manufacturing processes.
-
Knowledge BaseGet quick answers with articles and guides.
-
VideosVideo tutorials, trends and best practices.
-
WhitepapersDetailed reports on the latest trends in BI.
-
 Choosing an Embedded BI Solution for SaaS ProvidersAdding BI features to your applications will impr...
 -

- Getting Started
-
Administration Guide
- Installing Wyn Enterprise
- Configuration Settings
- Account Management
- Security Management
- System Management
- Document Management
- How To and Troubleshooting
- User Guide
- Developer Guide
Task Templates
As an admin at the Wyn Enterprise portal, you can create and manage scheduled tasks using Task Templates. Task templates allow you to specify a recurring interval at which to run the task. Each schedule has a name, an optional description, and a list of roles that defines which users have permission to assign reports to it.
Once you add a shared schedule, all users in each role with the schedule permission can assign tasks to run on it.
To Add a New Template
On the Admin Portal, navigate to Configuration Settings > Schedule Templates and click Add Template.
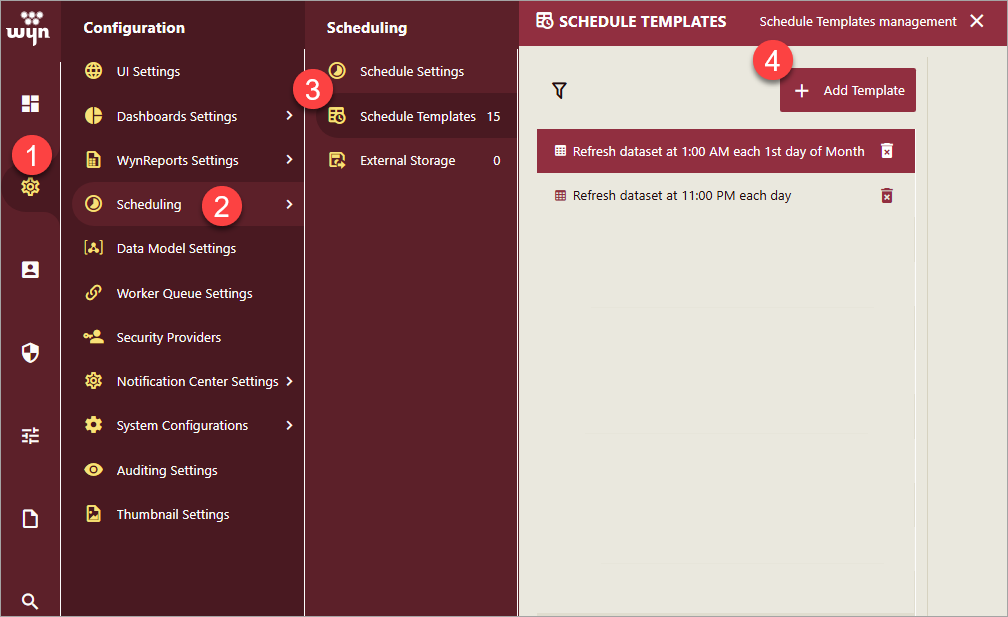
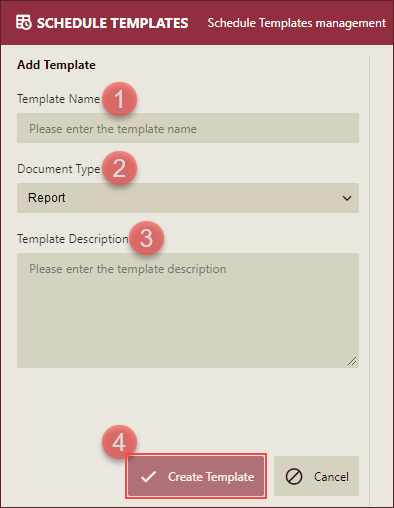
Add a Template Name, select the Document Type (Datasource, Dataset, Cached Model, Report, or Dashboard), and describe the template. Click the Create Template button to create the template.
The new template is added to the Schedule Templates section, where you can edit the basic information, recurrence, and delivery settings of the template.
To Edit a Schedule Template
On the Admin Portal, navigate to the Schedule Templates section and select a scheduled template to edit. The template editor will open on the right side of the page.

Note: Schedule Template settings for Datasource, Dataset, and Cached Models (Data Models) vary from the settings for Reports and Dashboards.
Under the Basic Information tab, you can modify the following properties of the scheduled template.
Assign Permission: Select the checkbox next to each role to allow users to schedule tasks.
Task history expiration time - Set an expiration time for the history of the scheduled task.
Note: Task history expiration time and Assign Permission options are available for the Schedule Templates of Reports and Dashboards only.
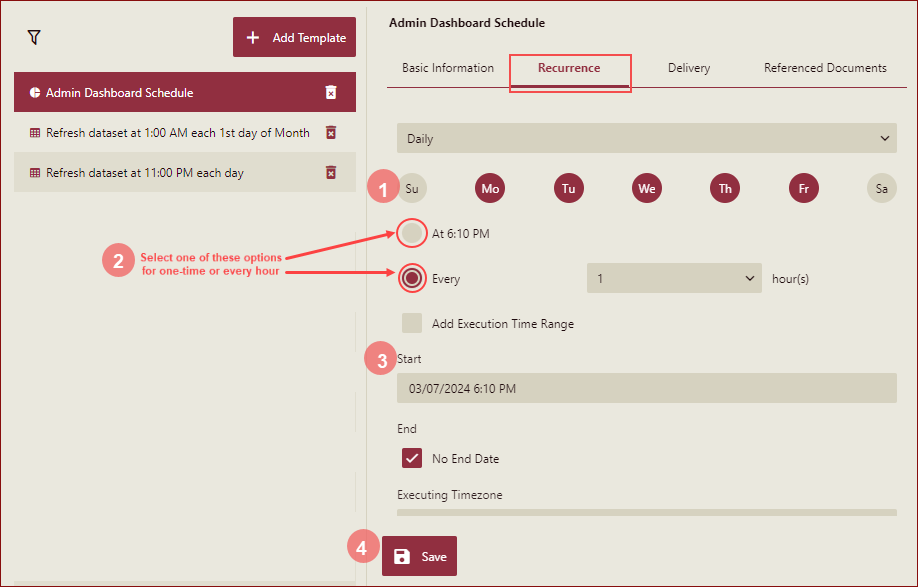
Under the Recurrence tab, you can schedule a task for reports, dashboards, data sources, datasets, and data models as described below,
For Reports and Dashboards - In this instance, the Daily option is selected.
(i) Select a daily or monthly frequency to repeat the task. For Daily, you can also select the weekdays to run the task on.
(ii) To set the frequency of the scheduled task, select either At or Every (Hours or Minutes) option to run the task at a specified time or hourly intervals.
Note: From Version 6.1 of the Wyn enterprise application, the minimum recurrence frequency supported by scheduled tasks is 5 minutes instead of 1 second as it was in earlier versions. However, tasks created in versions before 6.1 with a recurrence frequency of less than 5 minutes will continue to work at the recurrence frequency set earlier.
(iii) Set the Start and End time of the scheduled task.
(iv) Click the Save button to save the changes.
Add Execution Time Range option allows specifying the time range for daily recurring tasks within which the task should only execute. To select the time range:
Select Daily for REPEAT and select Every hour(s) for the execution time.
The Add Execution Time Range check box will appear.
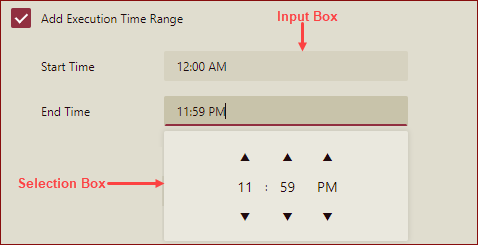
Select Add Execution Time Range, and the Start Time and End Time selectors will appear to select the time range during which the task is executed in a day.
The default value of Start Time is "12:00 AM".
The default value of End Time is "11:59 PM."
After adding the execution time range, the description of the execution time range will be displayed in the task description.

There are two ways to modify the Start Time and End Time:
Selection box
Input text
The Start Time and End Time must have a value.
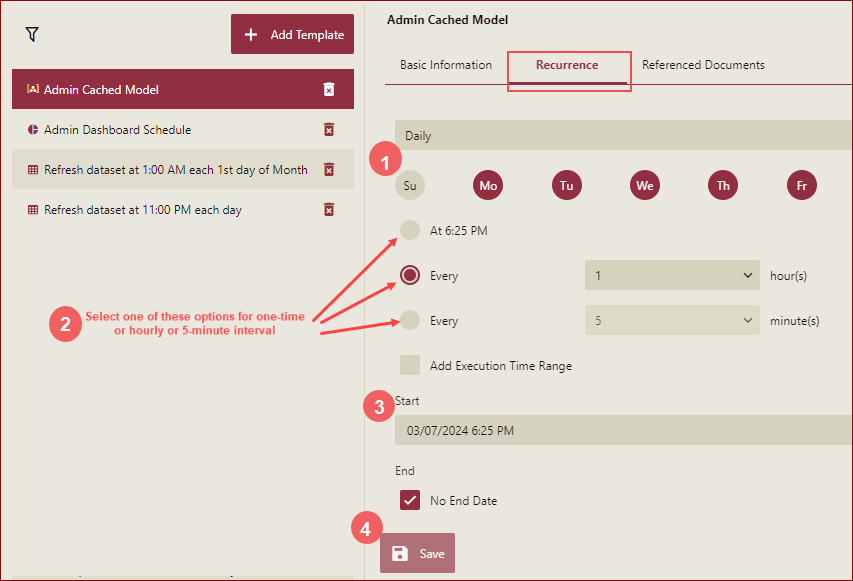
For Datasource, Datasets, and Cached Models - Scheduled tasks can run once or at hourly or 5-minute intervals.
(i) Select a daily or monthly frequency to repeat the task. For Daily, you can select the weekdays to run the task on.
(ii) To set the frequency of the scheduled task, select either At or Every (Hours or Minutes) option to run the task at a specified time or hourly intervals.
(iii) Set the Start and End time of the scheduled task.
(iv) Click the Save button to save the changes.
Note: For the Monthly option, we can set the frequency of monthly repetition under the Every option and select one of the three ON options to set the day or date to repeat the scheduled task.
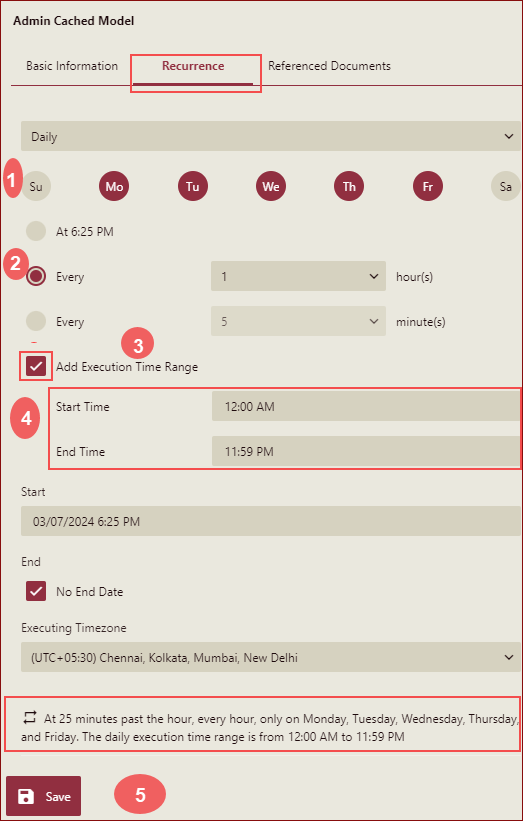
Add Execution Time Range option allows specifying the time range for daily recurring tasks within which the task should only execute. To select the time range:
Select Daily for REPEAT and select Every hour(s) or **Every minute(s)**for the execution time.
The Add Execution Time Range check box will appear.
Select Add Execution Time Range, and the Start Time and End Time selectors will appear to select the time range during which the task is executed in a day.
The default value of Start Time is "12:00 AM".
The default value of End Time is "11:59 PM."
After adding the execution time range, the description of the execution time range will be displayed in the task description.
There are two ways to modify the Start Time and End Time:
Selection box
Input text
The Start Time and End Time must have a value.
Please note the following for Add Execution Time Range:
When the start time and end time are set incorrectly, the Create Task button cannot be clicked. Requirements for correct execution time range setting:
The start time and end time cannot be empty.
The time should be correct, and the format should be "hh: mm AM”.
The start time must be earlier than the end time.
If there is an Execution Time Range in the task template when creating the task by this template, the Execution Time Range information of the template will be displayed in the description of the task. The description is the same as the description of the Execution Time Range on the daily schedule task.
When creating tasks for reports, dashboards, cached models, cached datasets, data sources (Excel data source can support tasks), and creating schedule templates, if the user selects REPEAT as Daily, the user is allowed to add the Execution Time Range on the day.
Option | Description |
|---|---|
Repeat | Select the Daily or Monthly options to set the repetition frequency. |
At | Set the time to start the task. |
Every | Enter the number of Hours or Minutes to set the frequency of the report or dashboard execution. |
Start | Set the date and time to start the task. |
End | Set the date and time to end the task. |
No End Date | Select this if you want your task to be a never-ending process. |
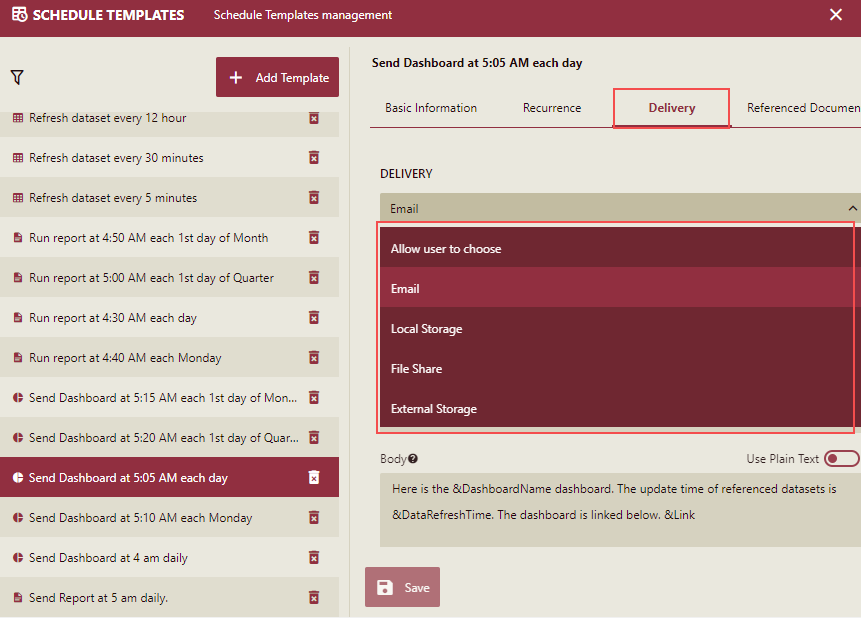
Under the Delivery tab, modify the delivery options of the scheduled template. See various delivery options illustrated in this table.
(i) Delivery: Select one of the following options from the drop-down list: Email, Local Storage, File Share, or External Storage.
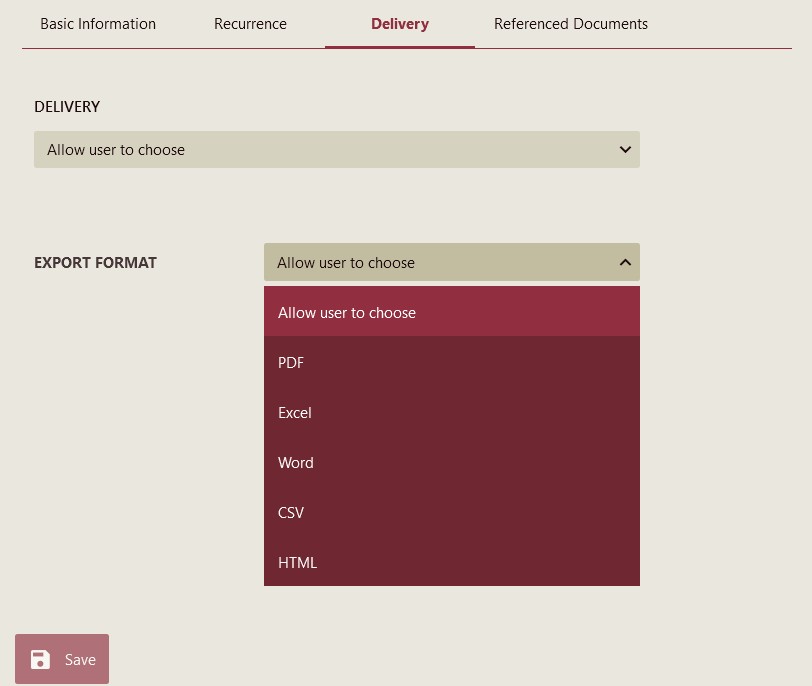
(ii) Export Format for the Report template: Select one of the following options from the drop-down list for the Report template: PDF, Excel, Word, CSV, HTML, Image, JSON, or TXT. You can set various parameters for the selected export file format.
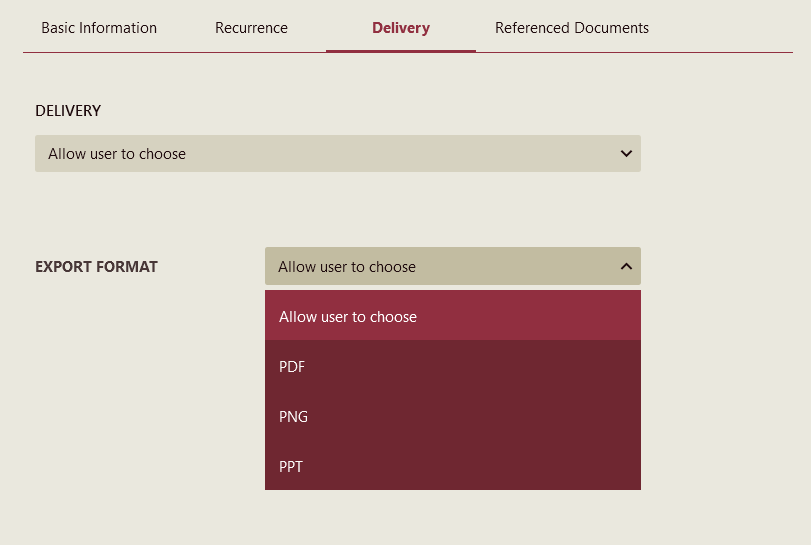
(iii) Export Format for the Dashboard template: Select one of the following options from the drop-down list: PDF, PNG, or PPT. You can configure the Security Settings when selecting the PDF Export Format.
(iv) The Delivery tab is available for scheduled templates of Reports and Dashboards. For Dashboards, you can only use the Email delivery option.
The Referenced Documents tab shows the documents that are linked to the selected Schedule Template.
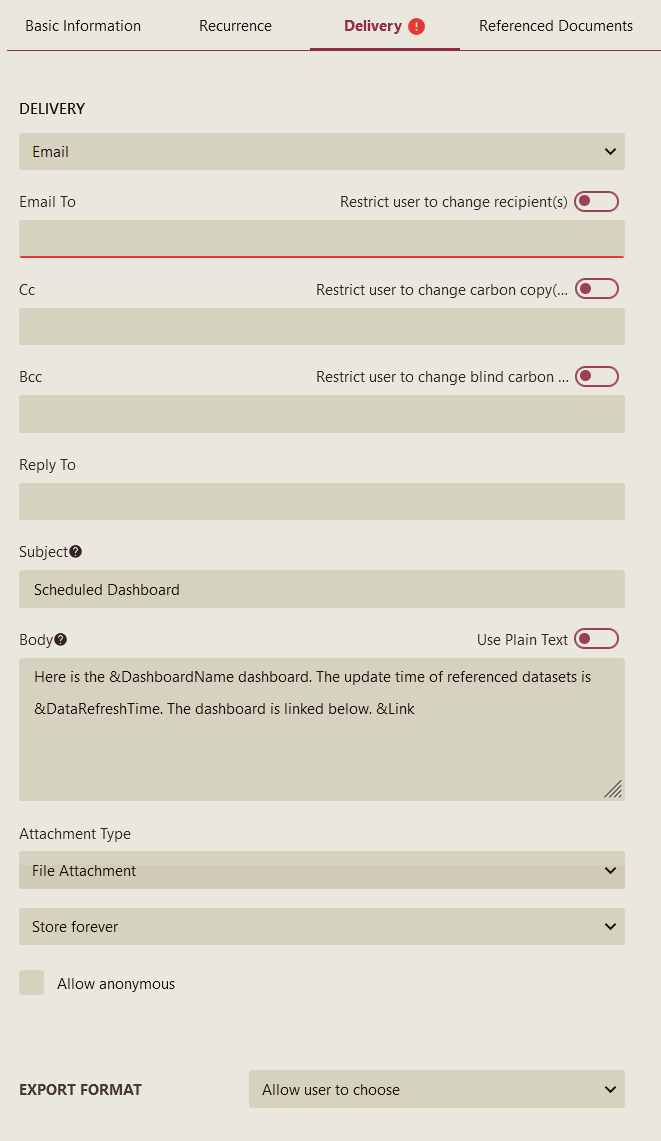
Delivery
For Dashboard Template
Option | Description |
|---|---|
Email To | Enter one or more e-mail addresses where the report is to be sent. Separate multiple e-mail addresses with commas. The default toggle switch is disabled, and it restricts the user from changing recipient(s). Enable the toggle switch if you want to allow the user to change recipient(s). |
Cc | Enter one or more e-mail addresses where the report is to be sent. Separate multiple e-mail addresses with commas. The default toggle switch is disabled, and it restricts the user from changing the carbon copy (cc). Enable the toggle switch if you want to allow the user to change the carbon copy (cc). |
Bcc | Enter one or more e-mail addresses where the reply is to be sent. Separate multiple e-mail addresses with commas. The default toggle switch is disabled, and it restricts the user from changing the blind carbon copy (bcc). Enable the toggle switch if you want to allow the user to change blind carbon copy (bcc). |
Reply To | Enter one or more e-mail addresses where the reply is to be sent. Separate multiple e-mail addresses with commas. |
Subject | Enter the text to use for the e-mail's subject line. You can use the following syntax in the subject:
|
Attachment Type | Select from File Attachment, Online Link, or Download Link. |
Store forever | Select from Store forever, Store until..., or Expiry Duration... to specify the storage period. |
Body | Enter text to use in the body of the e-mail. You can use the following syntax in the e-mail body:
|
Export Format | Select the format to which you want to export the dashboard. You can choose from Allow user to choose, PDF, PNG, or PPT. |
For Report Template
Option | Description |
|---|---|
Delivery | Select a delivery method from Allow user to choose, Email, Local Storage, External Storage, or File Share. |
(Email) Email To | Enter one or more e-mail addresses where the report is to be sent. Separate multiple e-mail addresses with commas. |
(Email) Cc | Enter one or more e-mail addresses where the report is to be sent. Separate multiple e-mail addresses with commas. The default toggle switch is disabled, and it restricts the user from changing the carbon copy (cc). Enable the toggle switch if you want to allow the user to change the carbon copy (cc). |
(Email) Bcc | Enter one or more e-mail addresses where the reply is to be sent. Separate multiple e-mail addresses with commas. The default toggle switch is disabled, and it restricts the user from changing the blind carbon copy (bcc). Enable the toggle switch if you want to allow the user to change blind carbon copy (bcc). |
(Email) Reply To | Enter one or more e-mail addresses where the reply is to be sent. Separate multiple e-mail addresses with commas. |
(Email) Subject | Enter the text to use for the e-mail's subject line. You can use the following syntax in the subject:
|
(Email) Body | Enter text to use in the body of the e-mail. You can use the following syntax in the e-mail body:
|
(Email) Attachment Type | Select from File Attachment or Download Link. |
(Email) Store forever | Select from Store forever, Store until..., or Expiry Duration... to specify the storage period. |
(Email) Export Format | Select Allow User to Choose to attach the report to the message in the format specified above. |
(Local Storage) Store forever | Select from Store forever, Store until..., or Expiry Duration... to specify the storage period. |
(File Share) File Name | Enter the name of the report file. |
(File Share) Path | Enter the fully qualified UNC path of the location at which to share the report. |
External Storage | Select the external storage option from the dropdown list. |
(External Storage)Storage Type | Select the storage type from the dropdown list. It has three options: AWS_S3, FTP, SFTP, and SharePoint. |
(External Storage)Storage Name | Select the name of the storage type from the dropdown list. This will list the names of the external storage created in the Wyn application. |
Export Format | Select the format to which you want to export the report. You can choose from Allow user to choose, PDF, Excel, Word, CSV, HTML, Image, JSON, or TXT. |