-
Interactive DashboardsCreate interactive BI dashboards with dynamic visuals.
-
End-User BI ReportsCreate and deploy enterprise BI reports for use in any vertical.
-
Wyn AlertsSet up always-on threshold notifications and alerts.
-
Localization SupportChange titles, labels, text explanations, and more.
-
Wyn ArchitectureA lightweight server offers flexible deployment.
-
 Wyn Enterprise 7.1 is ReleasedThis release emphasizes Wyn document embedding and enhanced analytical express...
 -
 Choosing an Embedded BI Solution for SaaS ProvidersAdding BI features to your applications will improve your products, better serve your customers, and more. But where to start? In this guide, we discuss the many options.
-
Visual GalleryInteractive sample dashboards and reports.
-
BlogExplore Wyn, BI trends, and more.
-
WebinarsDiscover live and on-demand webinars.
-
Customer SuccessVisualize operational efficiency and streamline manufacturing processes.
-
Knowledge BaseGet quick answers with articles and guides.
-
VideosVideo tutorials, trends and best practices.
-
WhitepapersDetailed reports on the latest trends in BI.
-
 Choosing an Embedded BI Solution for SaaS ProvidersAdding BI features to your applications will impr...
 -

- Getting Started
- Administration Guide
-
User Guide
- An Introduction to Wyn Enterprise
- Document Portal for End Users
- Data Governance and Modeling
- View and Manage Documents
- Working with Resources
- Working with Reports
- Working with Dashboards
- Working with Notebooks
- Wyn Analytical Expressions
- Section 508 Compliance
- Subscribe to RSS Feed for Wyn Builds Site
- Developer Guide
Manage Data Layers
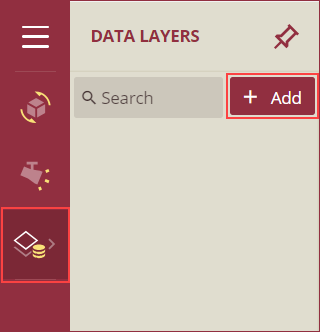
To bind data to a data layer, navigate to the Data Layers section of Scene Explorer and follow the instructions below,
Click the + Add button. A new data layer will be added to the list.
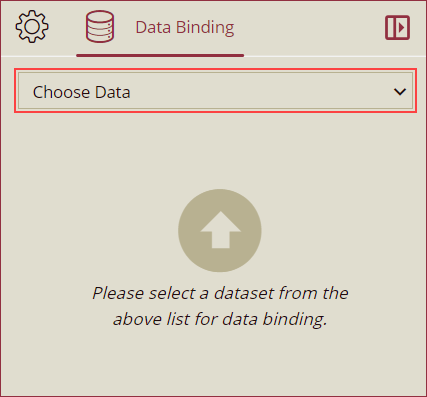
Choose a dataset from the Choose Data dropdown, under the Data Binding panel on the right side.
Drag and drop the data fields on the Value, Mesh Name, and Tooltip data roles to bind data.
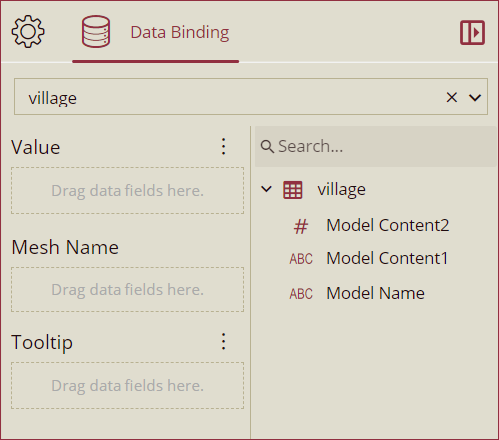
Note: The data associated with the models is presented as data tags. To ensure the visibility of the data tags, the Mesh Name data role in the Data Binding panel must match the 3D object name.
Data labels support rich text customization. Open the Kebab menu of the Tooltip data role and click the Settings option to access the Tooltip Settings pop-up.

Modify the font family, size, weight, and color using the rich text editor. To insert data fields bound to the 3D scene, click the Data Field button and select the field.
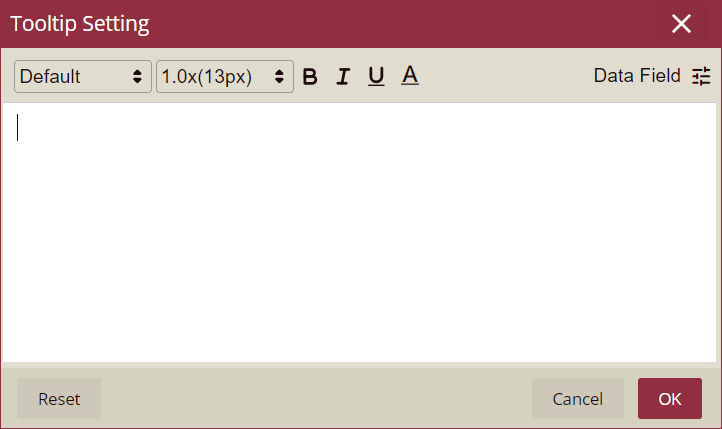
Note: In case of a conflict between the attribute settings and the data layer style, rich text customization will override them.
To set the appearance of the data labels, navigate to the Inspector Panel and modify the properties explained in the tables below.
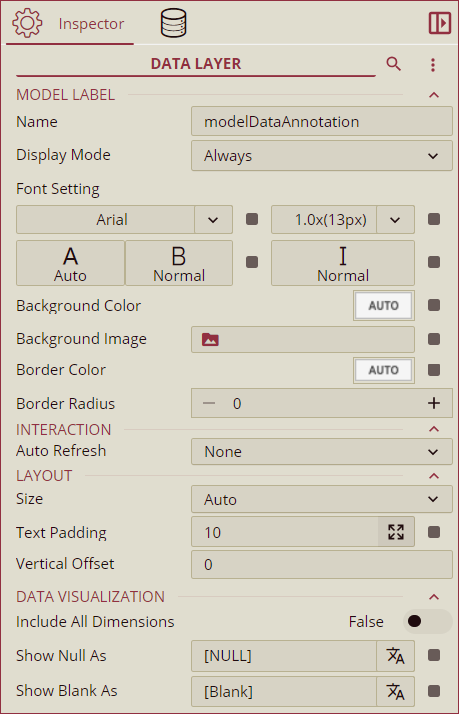
MODEL LABEL
Option | Description |
|---|---|
Name | Use this property to change the name of the selected data layer. |
Display Mode | Select a display mode for the data layer using the dropdown. The available options are Always, Click, Hover, and Hidden. |
Font Setting | Set the font family, size, color, weight, and style of the model labels using this property. |
Background Color | Use this property to change the background color of the data labels. |
Background Image | Use this property to set a background image for the data labels. |
Border Color | Use this property to set the border color of the data labels. |
Border Radius | Use this property to set the corner radius of the data label borders. |
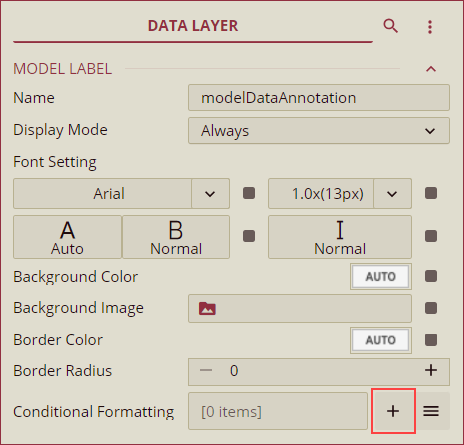
Conditional Formatting | Use this property to set the conditional formatting with conditions and styles to the data labels. See the Conditional Formatting section for more details. |
INTERACTION
Option | Description |
|---|---|
Auto Refresh | Select an option from the dropdown to set the auto-refreshing of the data labels. The available options are None, Polling, and Real Time.
|
LAYOUT
Option | Description |
|---|---|
Size | Use this property to set the size of the data labels to automatic and fixed using the dropdown. |
Text Padding | Use this property to set the padding of the data label text. |
Vertical Offset | Use this property to set the vertical offset of the data labels. |
DATA VISUALIZATION
Option | Description |
|---|---|
Include All Dimensions | To include all dimensions of the data labels, set the Include All Dimensions to True. By default, this property is set as False. |
Show Null As | Set the content to display in place of null data in the data labels using this property. |
Show Blank As | Set the content to display in place of blank data in the data labels using this property. |
Conditional Formatting
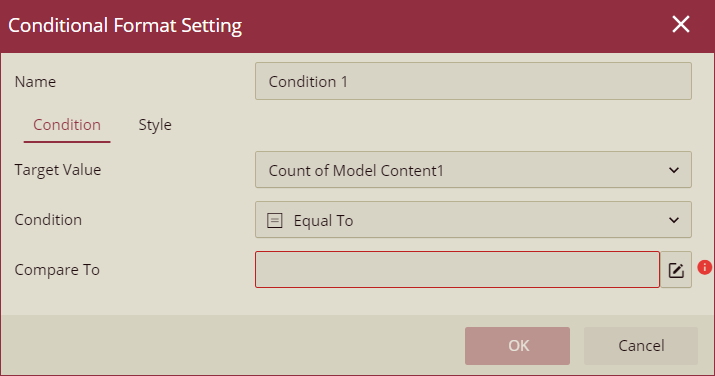
Select a data layer from the Data Layers section of the Scene Explorer.
Click the + (Add Item) button of the Conditional Formatting property from the Model Label section of the Inspector Panel. The Conditional Format Setting pop-up will appear on your screen.
Note: You can add multiple conditional format settings to a data layer.
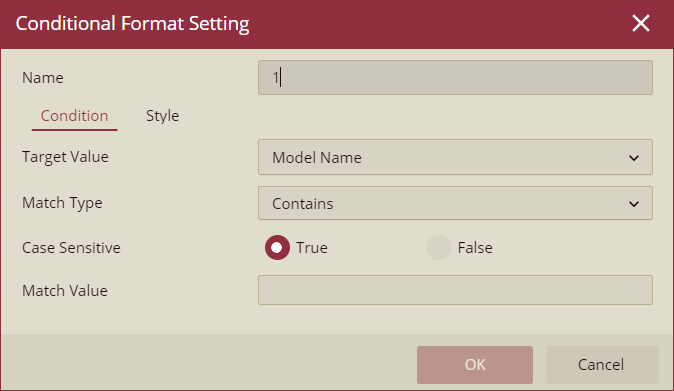
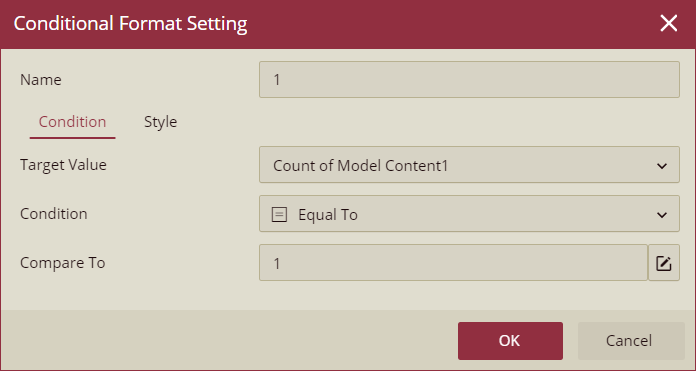
Enter a name for the conditional format setting. Select the Target Value and Condition from the Condition tab, and enter the Compare To value in the input box..
Target Value: This dropdown contains the data fields bound to the Value, Mesh Name, and Tooltip data roles of the data layer. The target value can be numeric or a string. The conditional setting options are explained below.
When the value is a string
Match Type: This dropdown appears when the selected Target Value is a string. Select an option (Contains, Start With, End With, or Exactly Match) from the dropdown to set the match type.
Case Sensitive: Choose the False radio button to disable case sensitivity. By default, True is selected.
Match Value: Enter the text value to match in the input box.
When the value is numeric
Condition: Select a condition from the dropdown. (Equal To, Not Equal To, Greater Than, Not Greater Than, Less Than, Less Than or Equal To, Between, Not Between)
Compare To: Enter a constant value in the input box to compare. You can also use an aggregated value or a data field bound to the data roles for comparison by clicking the edit button. On clicking the Use a new aggregated value option, the Aggregation Setting pop-up appears on your screen. The pop-up setting options are described below.
Value Field: Select a data field from the dropdown.
Aggregation Method: Select an aggregation method (Count, Distinct Count, or First) from the dropdown. Click Ok to apply.
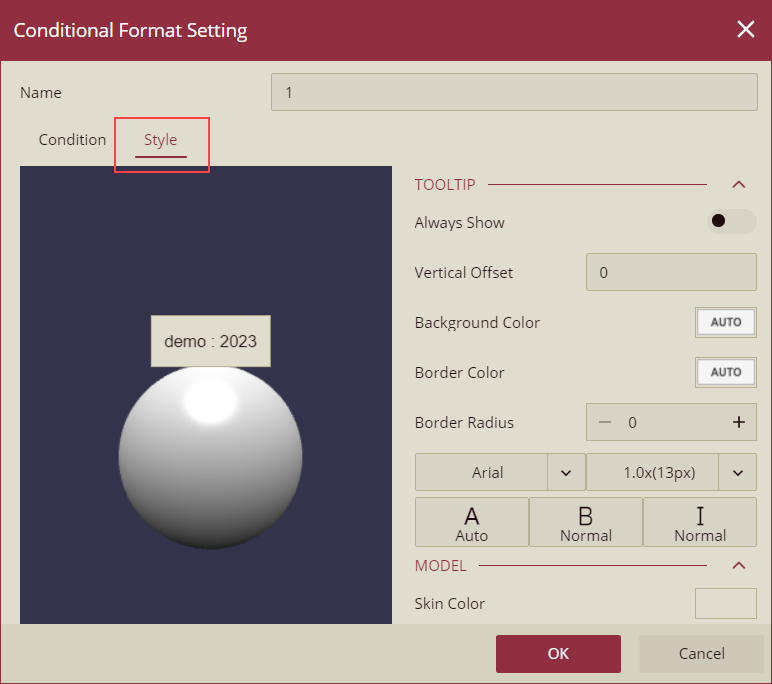
Manage the Tooltip and Model skin color settings from the Style tab.