- Getting Started
-
Administration Guide
- Get Started with Administering Wyn Enterprise
- Configuration Settings
- Account Management
- Security Management
- System Management
- Document Management
-
How To and Troubleshooting
- Change Default Password
- Set Language Preference
- Set Time Zone
- Slack Integration
- MS Teams Integration
- Create Custom Language Packages
- Configure Identity Server
- Configure Single Sign-on
- Convert Crystal Reports/MS Access Reports to Wyn Reports
- Using ClickHouse as OLAP Database
- Hide Download Link in Scheduled Tasks
- Configure Redis Cluster using Username and Password
- Deploy and Configure a Custom Data Source
- User Guide
- Developer Guide
Create Custom Language Packages
Language packages enable users to interact with the Wyn Enterprise application in different languages. By changing the language package, text in the application gets translated into the selected local language. Wyn Enterprise offers four official language packages including English (en), Polish (pl), Chinese Simplified (zh), and Chinese Traditional (zh-TW), and lets you create Custom Language Packages to deliver a high-quality experience to your users.
In Wyn Enterprise, you can view and manage the language packages through the System Languages tab of the UI Settings page of the Admin Portal. For more information, please see the System Languages help topic.
Note: The trial license includes the custom language package feature. However, in the case of a subscription license, you need to purchase the feature separately. For more information, please contact Wyn Enterprise Sales.
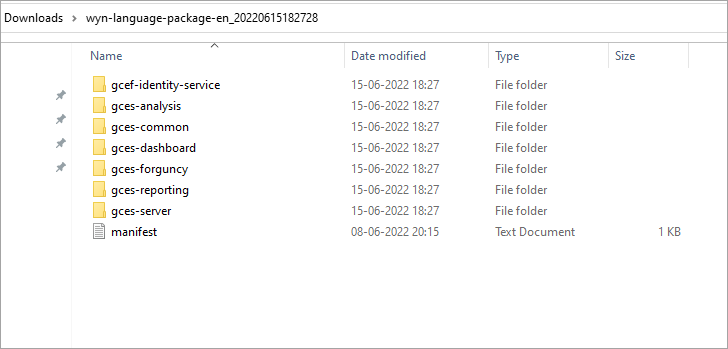
Typically, a language package is a zip file with the following structure:

The gcef-identity-service folder contains the login page, reset password page, and serial number registration-related pages.
The gces-analysis folder contains the data model-related pages.
The gces-common folder contains pages related to data sources, datasets, users, organizations, roles, and generated tokens.
The gces-dashboard folder contains the dashboard-related pages.
The gces-forguncy folder contains the input form pages.
The gces-reporting folder contains the report-related pages.
The gces-server folder contains the portal pages, background management pages, document details pages, and others.
The manifest file is a declaration file that contains the edition, language code, name, author, publish time, created time, created by, modified time, modified by, version number, Wyn Enterprise version, and reference language for the Custom Language Package.
You can create your own Custom Language Package using the Official Language Packages available under the System Languages tab. For example, you can create a German language package based on the official Polish package. This article explains how to create a Custom Language Package in Wyn Enterprise.
Step 1: Download the Official Language Package
A Custom Language Package is based on an Official Language Package. Navigate to the System Languages tab of the UI Settings page, and download an Official Language Package of your choice. The downloaded package is saved as a zip file on your system.
Note: Download the Language Package with the same Product Version number as that of the Wyn Enterprise application.
Unzip the file to view its content.
Step 2: Modify Content of The Language Package
Change the Language Code in the manifest.txt file and make sure it follows the RFC4646 specifications. The Language Code is typically used to identify the Language Package when used in the query URL. Have a look at the below image,
Caution: In the manifest.txt file, information related to the edition, Wyn Enterprise version, and reference language should not be modified.

Then, translate all the items in the zip file except for the language-resources.json files. The language-resources.json files describe the structure of the Language Package.
When modifying the contents of a Language Resource Package, ensure the following;
The language code in the manifest.txt file must be unique.
The Wynversion and edition in the manifest.txt file should be the same as that of the installer.
The file structure of the Language Package should match the contents of the language-resources.json file.
Step 3: Compress and Upload to Wyn Enterprise
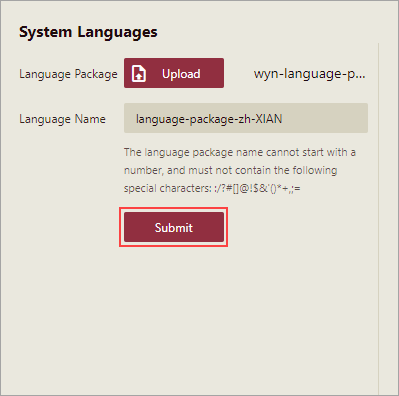
After modifying the Language Package to suit your requirements, compress the folder. Then, upload the zip file on the System Languages tab of the UI Settings page using the Upload button with a unique name. The name of the Language Package name cannot start with a number, and must not contain the following special characters:
"/", "?", "#", "[", "]", "@", "!", "$", "&", "'", "(", ")", "*", "+", ",", ";", and "=".

Note: Make sure that the language package version corresponds to the Wyn Enterprise version. Otherwise, the language package will not work properly.
The uploaded Language Package appears in the Custom Language Package section. You can now use the Custom Language Package as the preferred language for Wyn Enterprise by modifying the user profile settings or using the lng parameter in the URL. The lng parameter equals the Language Code specified in the Language Package.
For instructions on how to modify user profile settings, please see the Set Language Preference help article.
For instructions on how to use a parameter in the query URL, please see Using Integration URLs help article.
Limitations
The file structure of the Language Package should match the contents of the language-resources.json file.
If the Language Package corresponds to a different product version other than the current product version, the product UI is not properly internationalized. This is because the localization items that are different among the two versions are shown in EN.
Export/Import Custom Language Pack
To import a custom language pack, you first need to export an existing language pack to an Excel file, modify it locally, and then import it into the system.
Steps to import a custom language pack.
Click the Export button to export the official language pack.

On the Export page, select the modules that you want to export. In this example, we have selected All Files.

The file is exported as an Excel as shown below.

Please note that Language packs having Wyn versions 8.0 and above will follow a fixed sequence of sheets depending on the plugin. The Order of sheets with respective plugins is as below:
Server
Identity-Service
Account & Dataset
Analysis
Dashboard
Report
Forguncy
js-common
Open the Excel file, select the module that you want to edit, and save the file.

The first Sheet in the exported Excel file is the Manifest file. You can only modify the LanguageCode and DisplayName in this file. To modify the LanguageCode in the manifest.txt file you should follow the RFC4646 specifications. In this example, we have edited the LanguageCode.

Note: If you add any new sheet in Excel, then that new sheet will always be added at the last.
After editing, you can Import the file into the system. To import the updated Excel file, click the Upload button.

Click the Upload button, select the modified Excel file, and click the Submit button.

The language pack is displayed in the Custom Language Pack column. You can edit, publish, and use it.

You can also update an existing custom language pack using Excel export and upload options.
Note: If you want to delete any localization file, you must set the obsolete field value to True for the corresponding item in the language resource config file.


