Using Integration URLs
An integration URL allows a user to embed Wyn documents, datasets, data sources, images, and other resource items available on the server database into his web application. A user can specify the URL for the Wyn resource within the iFrame of his web application. Apart from this, a user can use the integration URL directly in the web browser for accessing the respective portals without entering any login details and for customizing the viewing experience of the end-users.
This topic describes the structure of the integration URL, the steps to embed a Wyn resource into a web application, and the usage of parameters for customizing the interface.
Integration URL Structure
The structure for the integration URL is as follows:
server/module/command/documentid?[dp]&[others]server is the customer-installed URL of the Wyn Enterprise Portal
module takes the following values -
data sources
datasets
dashboards
reports
web pages
templates
floor plans
images
themes
command takes the following values -
create - opens a new document in the designer for designing
view - opens the document in the document viewer
edit - opens the document in the designer for editing
documentID refers to the document identity, which is unique for every document
dp is the short name for document parameters which can be of 'string', 'integer', 'float', 'datetime', and 'multidimension' type. The syntax for dp is:
&dp={"parameter 1 name":["parameter 1 value 1","parameter 1 value 2","parameter 1 value 2"],"parameter 2 name":["parameter 2 value 1","parameter 2 value 2","Parameter 2 value 3"]}`Ensure the following;
Separate the parameter name and value with a colon (:). For example, dp={"Parameter1":[2000.111]}
Enclose the parameter name and value in double quotes (" "). For example, dp={"Parameter1":["Japan"]}.
Separate multiple parameters using commas (,). For example, dp={"Parameter1":[2000], "Parameter2":["Wyn Dashboard"], "Parameter3":["2020-01-01T00:00:00"]}.
others contains additional parameters such as:
token -
it is the token id generated by the admin.
lng -
it is the language code and accepts values like en, zh, zh-tw, pl, and es.
theme -
it supports values such as default, ars, blue, red, forest, dark-forest, light, warm-light, and green.
size -
it can be set to fitheight, fittoheight, fitwidth, fittowidth, fitscreen, fittoscreen, and auto (when 'Fixed Size' property for the dashboard is set to 'true', the key would be ineffective).
toolbar -
it controls the visibility of the toolbar on preview; it can be set to auto, hide, and show.
hideActions -
set it to 'true' to hide the interface options that appears on clicking the More button or are available in the Workspace toolbar.
The supported hide actions are logout, rename, openInNewWindow, refresh, preview, delete, download, copyUrl, copyReport, copyDashboard, copyDataset, copySemanticModel, reporting:exportReport, reporting:editReport, reporting:copyAsTemplate, reporting:createReportWithTemplate, reporting:editTemplate, reporting:previewRevision, reporting:editRevision, dashboards:editDashboard, dashboards:createWith, semantic:editSemanticModel, modifyDataSource, modifyDataset, refreshDataset, modifyTheme, batchCheckBox, reconfigDataSource, appendData, and modifyFloorPlan.
hideErrors -
it controls the visibility of warning and error messages that appear while previewing a dashboard in the viewer. Set it to 'true' to hide the warning and error messages, and 'false' to show these messages.
hideavatarmenu -
set it to 'true' to hide the Avatar menu displayed on the bottom-left corner of the portal.
hidewelcomescreen -
set it to 'true' to hide the Welcome screen when integrating the Document portal.
hidenav -
set it to 'true' to hide the Navigation menu on the left of the Document and Resource portals.
hidenavlogo -
set it to 'true' to hide the Wyn logo on the left menu bar of the Document and Resource portals.
onlyinfo -
set it to ‘true’ to display the Info panel separately on the Document and Resource portals.
scenario -
it is the name of the dashboard scenario (case sensitive). This parameter is only valid for dashboards.
lite -
it specifies the dashboard viewer mode as standard or lite (when set to 'true' it enables the lite viewer mode and 'False' enables the standard viewer mode). This parameter is only valid for dashboards.
loadChart -
it controls the load animation effect when a chart is initially loaded in the Viewer. This effect can also be seen when you forcibly reload a chart or refresh the data while previewing the report. Set it to 'true' to enable the load animation effect, and 'False' to disable the load animation effect. This parameter is only valid for reports.
hoverChart -
it controls the hover effect on charts on mouse hover. Set it to 'true' to enable the hover effect, and 'False' to disable the hover effect. This parameter is only valid for reports.
hoverTable -
it controls the hover effect on table and tablix rows on mouse hover. Set it to 'true' to enable the hover effect, and 'False' to disable the hover effect. This parameter is only valid for reports.
hoverTableBackgroundColor -
it specifies the background color on mouse hover over the table and tablix rows, and supports the following values like $theme (background color depends on the portal theme background color), $origin (background color remains unchanged), red (background color is based on the specified color value), or %2330a0a0 (background color is based on the specified hex value). This parameter is only valid for reports.
hoverTableTextColor -
It specifies the text color on mouse hover over the table and tablix rows, and supports the following values, like $theme (text color depends on the portal theme text color), $origin (text color remains unchanged), red (text color is based on the specified color value), or %2330a0a0 (background color is based on the specified hex value). This parameter is only valid for reports.
actions -
a list of actions that are available to the end-users and are separated by a comma (,).
openfulldashboardmode -
it can have anyone value from these two values, either newwindow or redirect. This parameter is only valid for dashboards.
pageNumber -
it is the page number of the resource to be displayed.
Examples for Integration URLs
The below table lists some basic examples of integration URLs.
Module | Command | Integration URL |
|---|---|---|
data source | create | http://localhost:51980/datasources/create?token={token} |
view | http://localhost:51980/datasources/view/{datasourceID}?token={token} | |
edit | http://localhost:51980/datasources/edit/{datasourceID}?token={token} | |
dataset | create | http://localhost:51980/datasets/create?token={token} |
view | http://localhost:51980/datasets/view/{datasetID}?token={token} | |
edit | http://localhost:51980/datasets/edit/{datasetID}?token={token} | |
dashboard | create | http://localhost:51980/dashboards/create?token={token} |
view | http://localhost:51980/dashboards/view/{dashboardID}?token={token} | |
edit | http://localhost:51980/dashboards/edit/{dashboardID}?token={token} | |
report | create | http://localhost:51980/reports/create?token={token} |
view | http://localhost:51980/reports/view/{reportID}?token={token} | |
edit | http://localhost:51980/reports/edit/{reportID}?token={token} | |
web page | create | http://localhost:51980/webpage/create?token={token} |
view | http://localhost:51980/reports/view/{webpageID}?token={token} | |
edit | http://localhost:51980/reports/edit/{webpageID}?token={token} | |
floor plan | create | http://localhost:51980/floorPlans/create?token={token} |
view | http://localhost:51980/floorPlans/view/{floorplanID}?token={token} | |
edit | http://localhost:51980/floorPlans/edit/{floorplanID}?token={token} | |
theme | view | http://localhost:51980/theme/view/{themeID}?token={token} |
image | view | http://localhost:51980/images/view/{imageID}?token={token} |
Embed using Integration URL
The following steps describe how to embed a Wyn document (or any other resource item) into a web application using the integration URL.
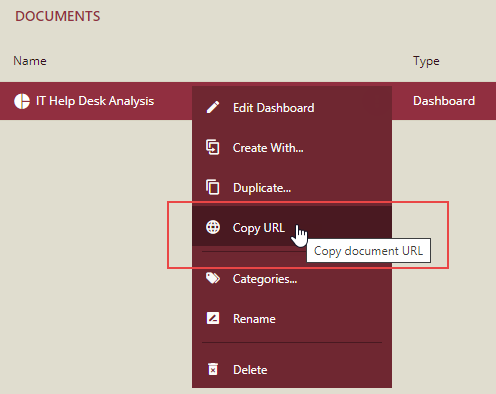
Use the Copy URL option available in the Document (or Resource) Portal of Wyn Enterprise to extract this segment of URL, i.e. 'server/module/command/documentid'. For more information on 'Copy URL', visit this topic.
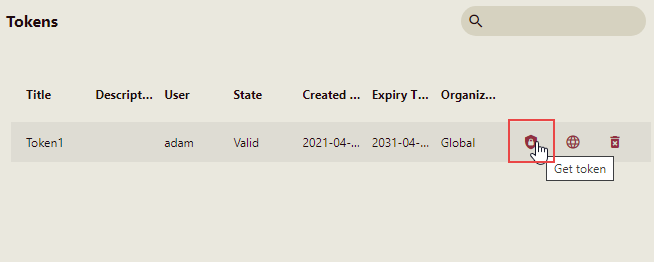
Obtain the token from your Admin. The admin will generate the token from the Generate Token page of the Admin Portal.
Append the token to the document URL generated in step 1. This is what your resultant integration URL will look like:

You can now use this integration URL in your web application.
Set the src attribute of the iFrame to the integration URL as shown.

You can now run your web application to see the results.
Customize Integration Token Name
At times, when there is a conflict in authenticating the token Id from the Integration URL of the Wyn Enterprise application, you might see an error message stating failure to open the document.
To resolve this issue, Wyn Enterprise provides you with the ability to customize the name of the Integration Token used for authentication. Follow the below steps to customize and use the integration token,
Configure the Integration Token Name in the wyn.conf file.
Caution: The Integration Token Name is composed of upper and lower case letters, -, _, and numbers, does not accept special characters. If the validation fails, use the default value - 'token'.
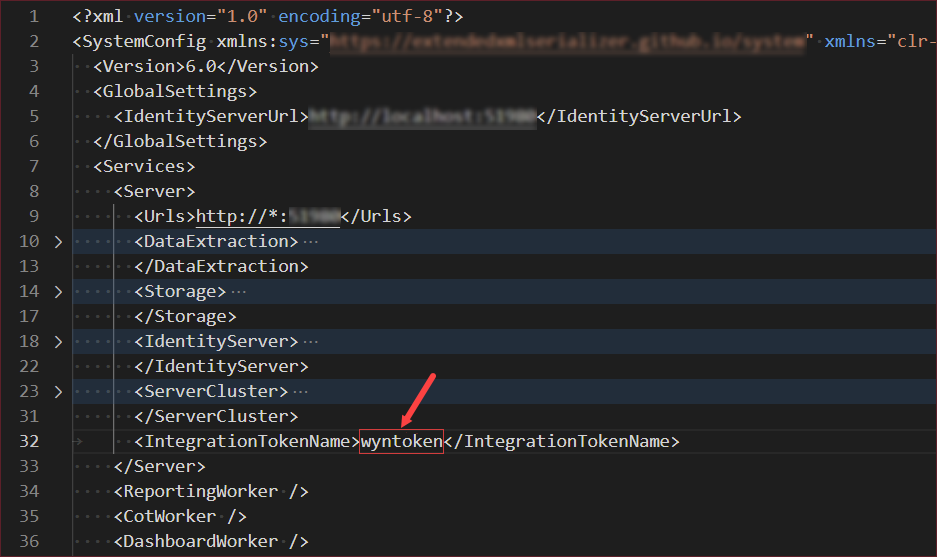
To get the Integration Token Name you can either use the integrated Div or iFrame. Following sample codes are used to fetch the integration token name using Div and iframe:
Div
window.grapecity.wyn.dataset.preview.init
({
      backendServer: null,
      language: portal.i18n.language,
      parentSelector: () => attachedDom,
      theme: portal.CurrentTheme,
      documentId: document.id,
      siteTitle: document.name + '-' + portal.SiteName,
      customLngResources
      integrationTokenName: 'wyntoken'
});
iFrame
http://10.32.5.241:51980/languageResources/view/fb1616cf-5cf0-4351-87f7-2475c6d52e5a?theme=blue&lng=en-US&wyntoken=3C181901C42C13C064387C4590D2907F4667920AL8BOD1I31FAD527B0D9863B8
Note: In case of a multi-server environment, the Integration Token Name needs to be manually configured in the wyn.conf file of each server.
Portal Customization using Parameters
The integration URLs can be used to customize the Admin, Resource, and Document portals' interface using the following parameters.
hideActions parameter
Use hideActions parameter in the Document and Resource portals' integration URL to hide the interface options that appear on clicking the More button or are available in the Workspace toolbar.
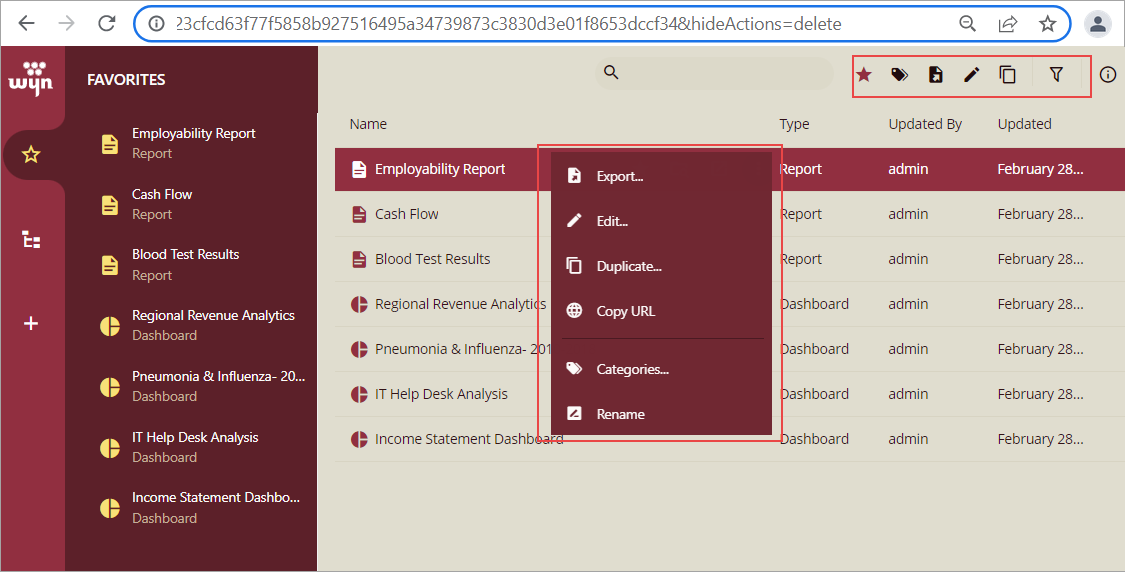
The supported values are logout, rename, openInNewWindow, refresh, preview, delete, download, copyUrl, copyReport, copyDashboard, copyDataset, copySemanticModel, reporting:exportReport, reporting:editReport, reporting:copyAsTemplate, reporting:createReportWithTemplate, reporting:editTemplate, reporting:previewRevision, reporting:editRevision, dashboards:editDashboard, dashboards:createWith, semantic:editSemanticModel, modifyDataSource, modifyDataset, refreshDataset, modifyTheme, batchCheckBox, reconfigDataSource, appendData, and modifyFloorPlan.
Note:
1. You can also manage the hide actions for the integration URLs in the UI settings of the Admin Portal.
2. You can even specify multiple parameter values in the integration URL, and separate them using a comma.
Examples
Following are some common examples for 'hideActions':
Hide 'Filter' option:
http://localhost:51980/integration/favorites/{documentID}?token={token}&hideActions=filterHide 'Preview' option:
http://localhost:51980/categories/{categoryID}/documents/{documentID}?token={token}&hideActions=previewHide Report 'Editing' and 'Export' options:
http://localhost:51980/categories/{categoryID}/documents/{documentID}?token={token}&hideActions=reporting:exportReport,reporting:editReport
hideavatarmenu parameter
The Avatar menu that shows the user's avatar, name, and organization can be hidden from the end-users using the hideavatarmenu parameter.
![]()
Examples
Following are some common examples of 'hideavatarmenu':
http://localhost:51980/integration/?token={token}&hideavatarmenu=truehttp://localhost:51980/integration/resource/?token={token}&hideavatarmenu=truehidenav parameter
The Navigation menu, Avatar menu, and Welcome screen can be hidden from the end-users using the hidenav parameter on the Document and Resource portals.
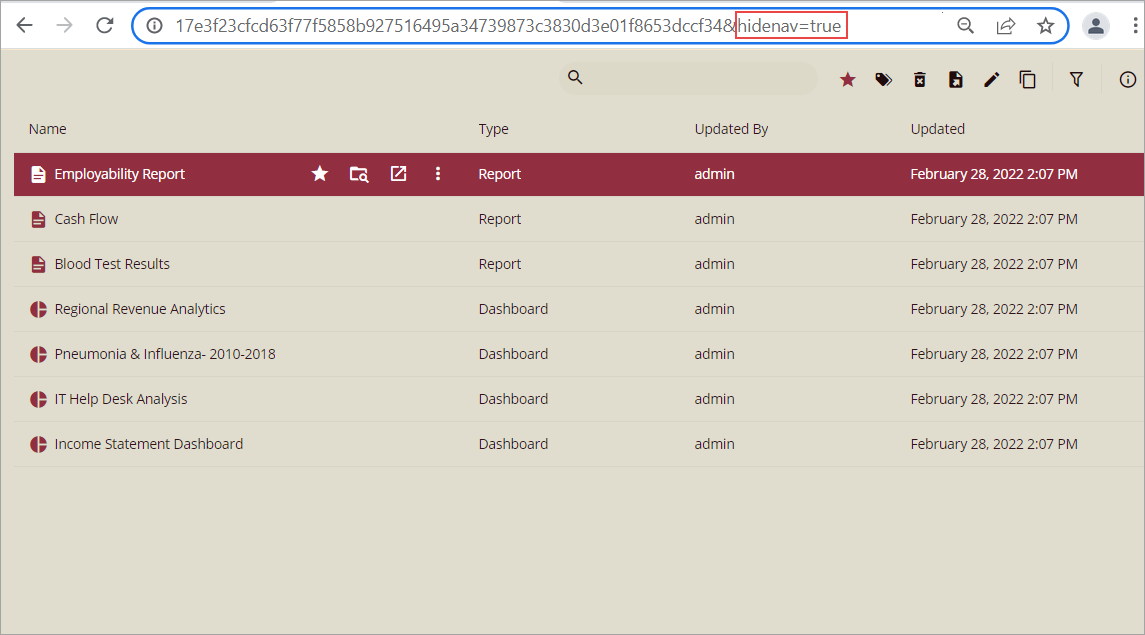
Examples
Following are some common examples for 'hidenav':
http://localhost:51980/integration/resource/?token={token}&hidenav=truehttp://localhost:51980/integration/?token={token}&hidenav=truehidenavlogo parameter
The Wyn logo on the left menu bar can be hidden from the end-users by using the hidenavlogo parameter on the Document and Resource portals.
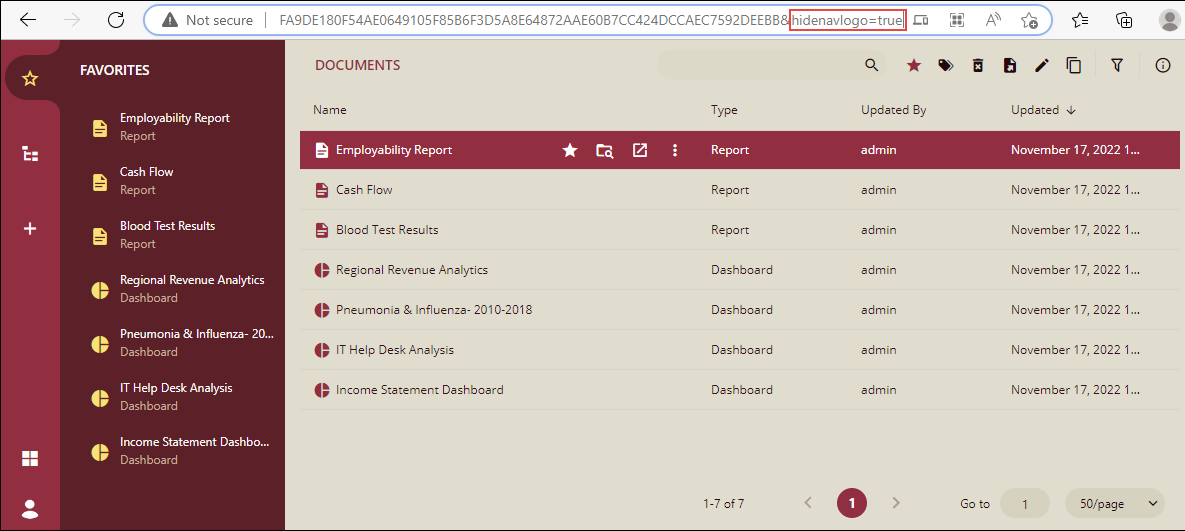
Examples
Following are some common examples for 'hidenavlogo':
http://localhost:51980/integration/resource/categories//documents/?token=&hidenavlogo=truehttp://localhost:51980/integration/categories//documents/?token=&hidenavlogo=trueonlyinfo parameter
Info panel is displayed separately by using onlyinfo parameter in the URL.
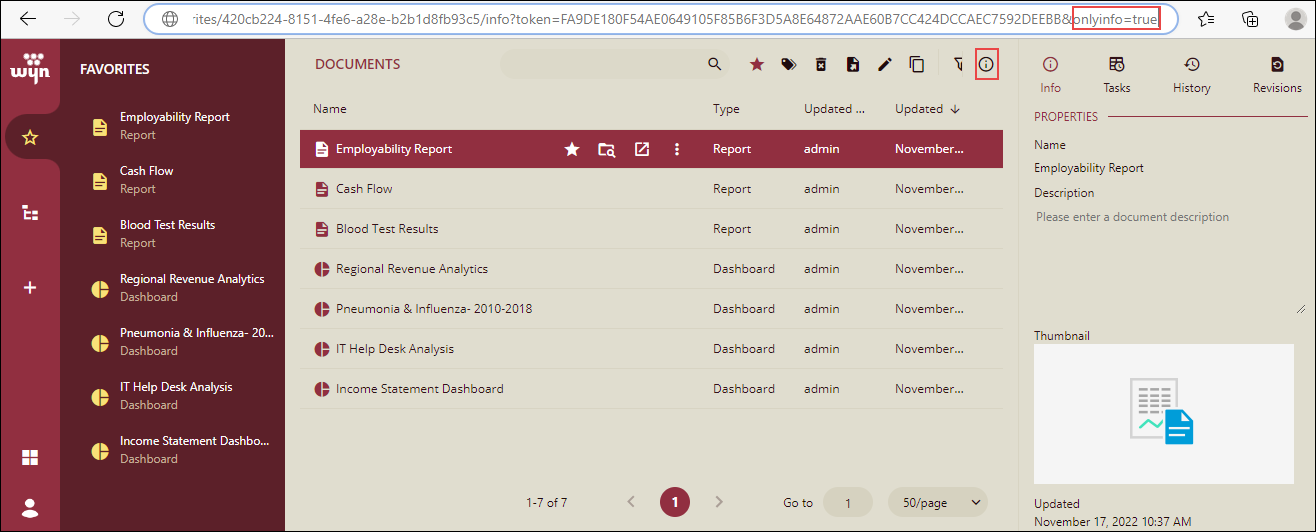
Only the Info panel is displayed.
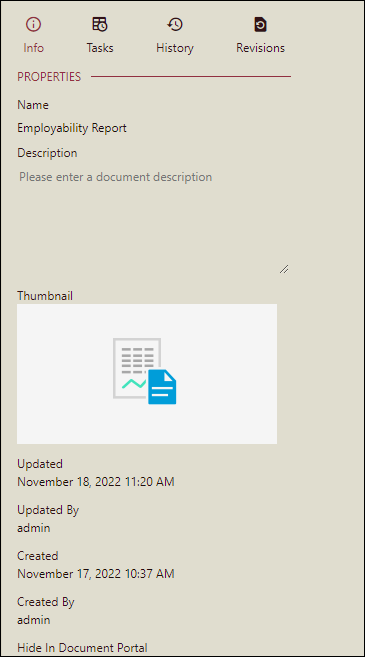
Examples
Following are some common examples of 'onlyinfo':
http://localhost:51980/integration/resource/categories//documents//info?token=&onlyinfo=truehttp://localhost:51980/integration/categories//documents//info?token=&onlyinfo=true


