- Getting Started
- Administration Guide
-
User Guide
- An Introduction to Wyn Enterprise
- Document Portal for End Users
-
Data Governance and Modeling
- Data Binding Concepts
-
Introduction to Data Sources
- Connect to Oracle
- Connect to SQL Server
- Connect to MySQL
- Connect to Postgres
- Connect to Snowflake
- Connect to SQLite
- Connect to DM
- Connect to TiDB
- Connect to AnalyticDB(MySQL)
- Connect to GreenPlum
- Connect to TimeScale
- Connect to Amazon Redshift
- Connect to MariaDB
- Connect to ClickHouseV2
- Connect to MonetDB
- Connect to Kingbase
- Connect to GBase8a
- Connect to GBase8s
- Connect to ClickHouse
- Connect to IBM DB2
- Connect to IBM DB2 iSeries/AS400
- Connect to Doris
- Connect to Kylin
- Connect to StarRocks
- Connect to Google BigQuery
- Connect to Hive (beta)
- Connect to ElasticSearch (beta)
- Connect to Hana
- Connect to Excel
- Connect to JSON
- Connect to CSV
- Connect to XML
- Connect to MongoDB
- Connect to ElasticSearchDSL
- Connect to InfluxDB
- Connect to SSAS
- Connect to ODBC
- Connect to OData
- Connect to TDengine
- Connect to Teradata
- Connect to a Custom Data Provider
- Introduction to Data Model
- Introduction to Direct Query Model
- Introduction to Cached Model
- Introduction to Datasets
- How To
- Secure Data Management
- Working with Resources
- Working with Reports
- Working with Dashboards
- View and Manage Documents
- Understanding Wyn Analytical Expressions
- Section 508 Compliance
- Subscribe to RSS Feed for Wyn Builds Site
- Developer Guide
Manage Pre-Request
Pre-Request supports the pre-call of another API request for a specific endpoint. Pre-Request works as an additional entity in the configuration, similar to the endpoint or base address, with its configuration section.
However, unlike an endpoint, a Pre-Request does not include a Pre-Query configuration. Instead, it allows the creation of variables, with values extracted from the Pre-Request response using JSON path expressions. These variables can be used in subsequent base addresses, endpoints, or other Pre-requests that reference this.
Note: A Pre-request cannot define its base address (it will always be Null), and will inherit from a higher-level base address.
The Base Address, Endpoint, and other Pre-Requests can reference a Pre-Request. However, if an endpoint specifies its own Pre-Request, it overrides the Pre-Request defined by the Base Address.
Add Pre-Request
To add a Pre-request,
Click the + button.
On the Add Pre-Request popup specify the configuration details as explained below,
Basic Configuration
Name: Specify a unique name identifier for the Pre-Request.
Pre-Request Parameter: Add parameters to the Pre-Request using the + button. Enter a name, select a data type, and multi-value, add a delimiter, and set the default value of the parameter.
Pre-Request Configuration
Pre-Request: This section defines the Pre-Request details. The Pre-Request allows you to send an initial API request to retrieve data (e.g., authentication tokens, data values) that will be used in subsequent API calls. The response of the Pre-Request can be processed to extract values using JSON paths, which are then made available as variables for use in other requests.
Request Configuration:
URL: Specify the endpoint URL of the Pre-Request.
Request Method: Select the HTTP method (GET or POST).
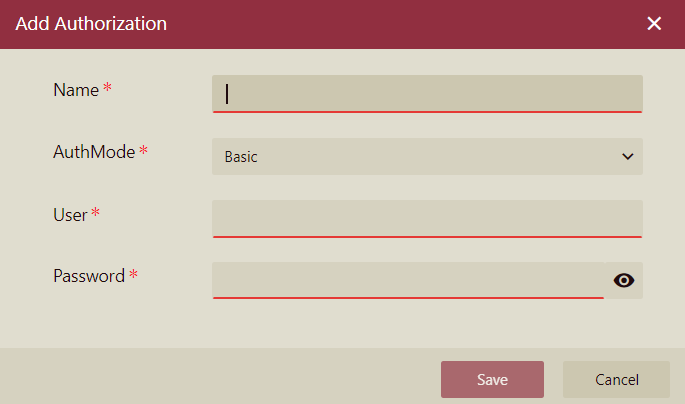
Authorization: Select an existing authorization detail. You can also add a new authorization using the Add Authorization popup. Click the + button and add the details (name, authentication mode, username, and password) in the Add Authorization popup. The available authentication modes (AuthMode) are explained below,
Basic: Involves sending a username and password encoded in base64 with each API request via the
Authorizationheader.OAuth2: A token-based authentication method where a client exchanges credentials for an access token, which is then used to authenticate API requests without sharing the credentials directly.

Request Header: Add request headers (header key and header value) using the + button.
Output Configuration
Variable: Specify the variables that will be parsed from the Pre-Request result using the JSON Path. Click the + button to add the Variable Name and JSON Path of the variable.
Note: The variable name must be unique within the scope of the data source file.
Use Pre-Request
A Pre-Request defines variables that can be used in the URL, header, and body of all entities (base addresses, endpoints, or other Pre-Requests) that reference it directly or indirectly. Use the following syntax to reference a variable to the Pre-Request:
${variableName}Note the following,
Each base address, endpoint, and Pre-Request can only have one Pre-Request unless the reference chain forms a ring (which is not allowed).
Pre-request and endpoint names must be globally unique within the data source file to avoid conflicts.


