-
Interactive DashboardsCreate interactive BI dashboards with dynamic visuals.
-
End-User BI ReportsCreate and deploy enterprise BI reports for use in any vertical.
-
Wyn AlertsSet up always-on threshold notifications and alerts.
-
Localization SupportChange titles, labels, text explanations, and more.
-
Wyn ArchitectureA lightweight server offers flexible deployment.
-
 Wyn Enterprise 7.1 is ReleasedThis release emphasizes Wyn document embedding and enhanced analytical express...
 -
 Choosing an Embedded BI Solution for SaaS ProvidersAdding BI features to your applications will improve your products, better serve your customers, and more. But where to start? In this guide, we discuss the many options.
-
Visual GalleryInteractive sample dashboards and reports.
-
BlogExplore Wyn, BI trends, and more.
-
WebinarsDiscover live and on-demand webinars.
-
Customer SuccessVisualize operational efficiency and streamline manufacturing processes.
-
Knowledge BaseGet quick answers with articles and guides.
-
VideosVideo tutorials, trends and best practices.
-
WhitepapersDetailed reports on the latest trends in BI.
-
 Choosing an Embedded BI Solution for SaaS ProvidersAdding BI features to your applications will impr...
 -

- Getting Started
- Administration Guide
-
User Guide
- An Introduction to Wyn Enterprise
- Document Portal for End Users
- Data Governance and Modeling
- View and Manage Documents
- Working with Resources
- Working with Reports
- Working with Dashboards
- Working with Notebooks
- Wyn Analytical Expressions
- Section 508 Compliance
- Subscribe to RSS Feed for Wyn Builds Site
- Developer Guide
Export Dashboard
Exporting is the best way to share the entire dashboard or just a single scenario from your dashboard. Exporting can also be useful to create a backup. Wyn Dashboards provide the following export options as described below:
Image: Exports the dashboard as an image saved in the PNG or SVG format.
PPT: Exports the dashboard in a PPT format.
Data: Saves the data of a dashboard scenario in an Excel file (in .xlsx format).
Raw Data: Exports the raw dashboard data of the selected scenario in an Excel file (in .xlsx format).
Note: Exported dashboards and dashboard scenarios are available in your system's Downloads folder.
Export Data of a Dashboard Scenario
Follow the below steps to export data of a dashboard scenario.
In the Dashboard Viewer, hover on the dashboard scenario to export data.
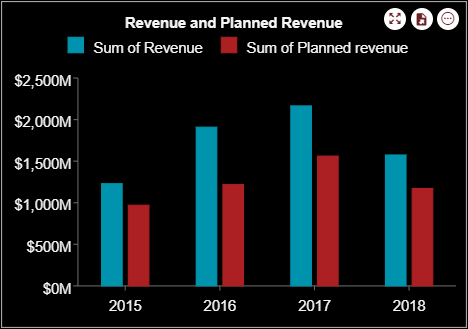
Click the Export button corresponding to the scenario and select Export Data or Export Raw Data.
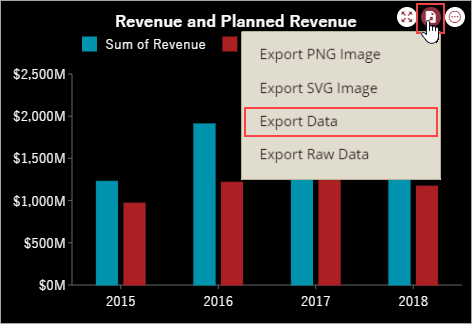
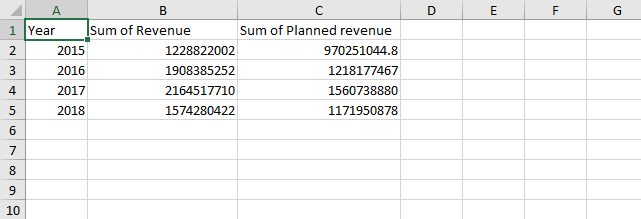
Dashboard scenario data is saved in a tabular format in the Excel file.
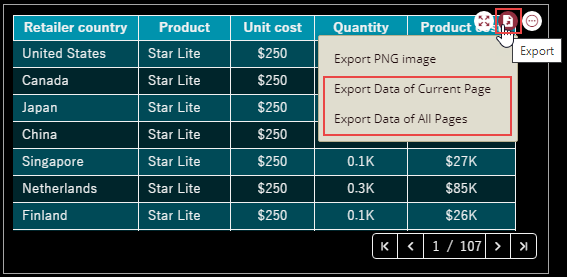
Note: For data tables, use the Export Data of Current Page or the Export Data of All Pages option to export the data.
Now, navigate to the Downloads folder and open the Excel file.
Export Dashboard Scenario as an Image
Follow the below steps to export the dashboard scenario as a PNG or an SVG image.
In the Dashboard Viewer, hover on the dashboard scenario that you want to export.
Click the Export button corresponding to the scenario and select Export SVG Image. To export the dashboard scenario as a PNG image, select Export PNG Image.
Note that the Export SVG Image option is not available in the case of tables (including data tables, pivot tables, and KPI matrices) and card chart scenarios.
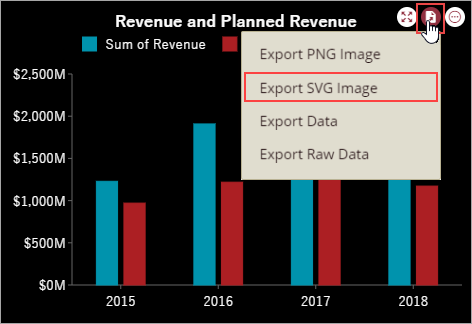
The dashboard scenario is saved as an image in SVG format.
Navigate to the Downloads folder and open the SVG image.
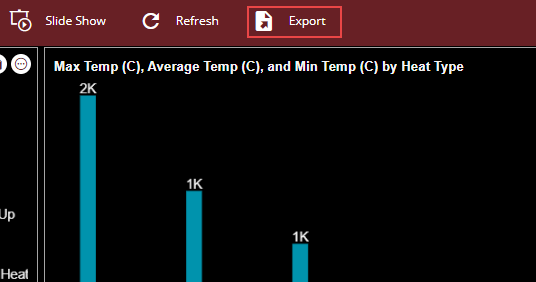
Export Complete Dashboard
Follow the below steps to export the complete dashboard as a PNG image or PPT.
In the Dashboard Viewer, click the Export button on top of the viewer.
In the Export dialog, specify the Export Format for the dashboard, that is, PNG Image or PPT. PNG Image exports the dashboard as a PNG image and PPT exports the dashboard as a PPT.
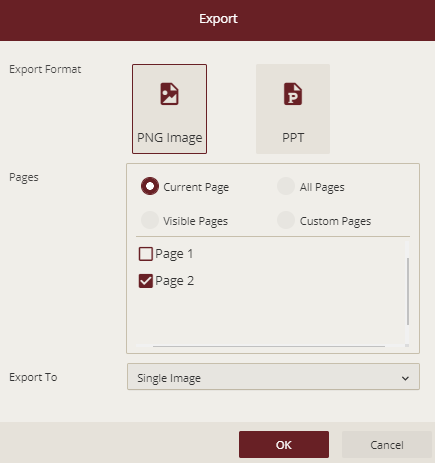
Select the dashboard pages you want to export, such as the current page, all pages, visible pages, or custom pages.
Choose whether you want to export the dashboard pages on a single page or multiple pages. For exporting the complete dashboard, select All Pages in the Export dialog.
After specifying all the export options in the dialog, click OK.
It takes a few minutes to export the dashboard and till then the dialog shows you the export progress as shown below.
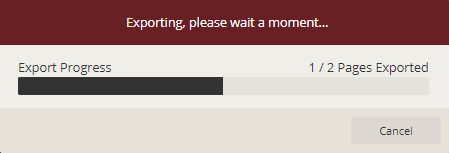
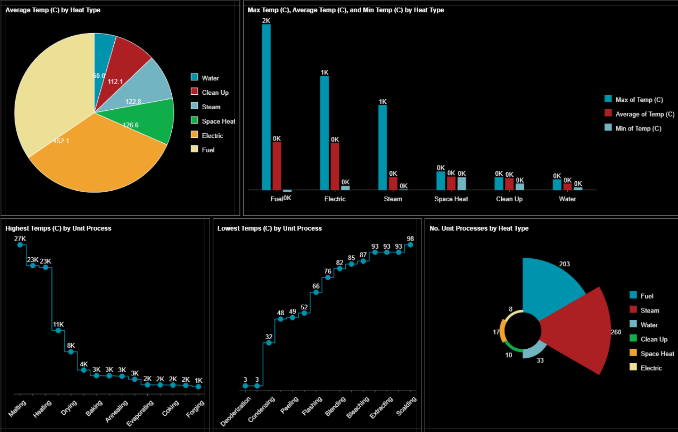
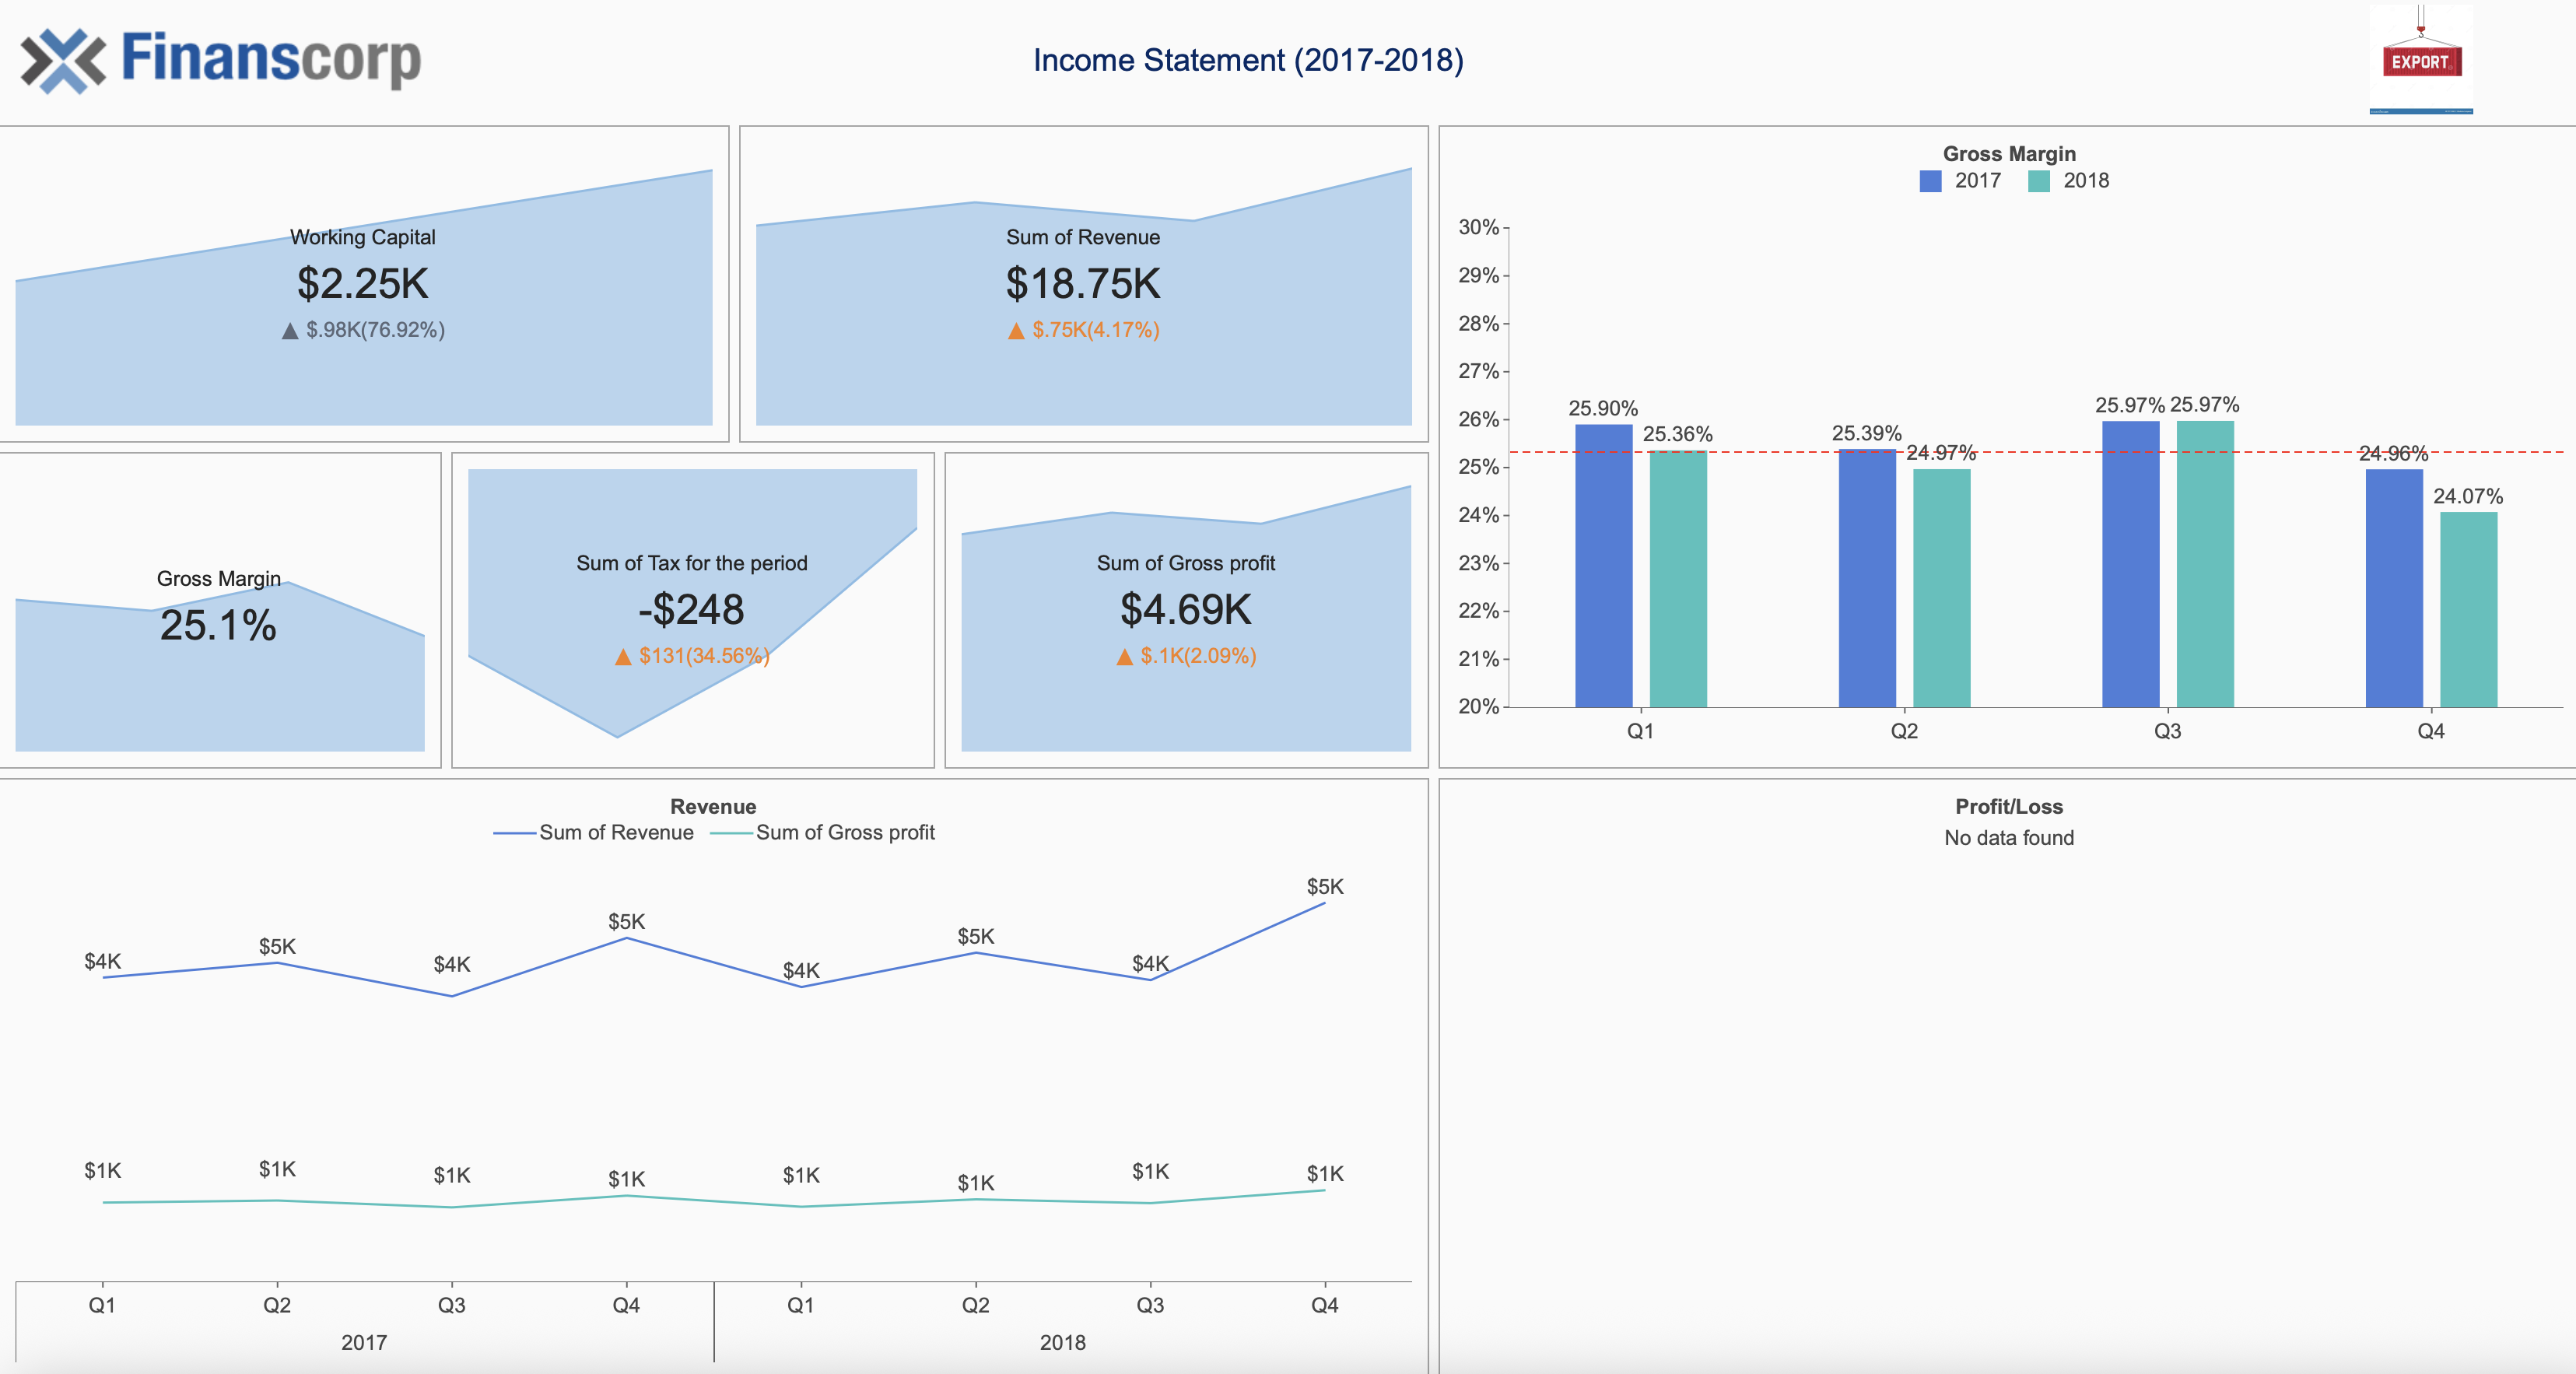
After the dashboard is successfully exported, open the image to view the exported dashboard. The following image shows the dashboard pages exported to a single image.
Adding an Export Command to an Image
You can turn any image in your dashboard into an export button by assigning it a command action. This is useful when you want to allow users to quickly export a specific scenario or data visualization directly from the dashboard view.
In this example, we’ll configure an image placed on a dashboard to export a scenario when clicked.
Steps
1. Add the Image to the Dashboard
In the Dashboard Designer, drag and drop an Image component onto the dashboard.
Place it wherever you want — for example, in the top-right corner of your dashboard.
Upload or select an image file (such as an export icon).
2. Set the Click Action to Command
With the image selected, go to the Inspector tab.
Scroll down to the Interaction section.
Under Click Action, open the dropdown and select Command.
3. Add the Export Command
A Command property will appear. Click + Add next to it.
In the Command Setting window that opens, use the Command dropdown to select Export.
Under Scenario, select the scenario you want to export from the dropdown list.
Under Export Type, choose one of the following options:
Export PNG Image – exports the scenario as a PNG file.
Export SVG Image – exports the scenario as an SVG file.
Export Data – exports the scenario’s underlying data.
Click OK to confirm and close the Command Setting window.

4. Preview and Test
Click Preview in the top ribbon.
In the preview mode, click the image you configured.
The export action you selected will automatically trigger — exporting the chosen scenario in the selected format.
Result
Your image now acts as an export button within the dashboard. When users click it, the configured scenario is immediately exported according to the specified export type.