- Getting Started
- Administration Guide
-
User Guide
- An Introduction to Wyn Enterprise
- Document Portal for End Users
-
Data Governance and Modeling
- Data Binding Concepts
-
Introduction to Data Sources
- Connect to Oracle
- Connect to SQL Server
- Connect to MySQL
- Connect to Postgres
- Connect to Snowflake
- Connect to SQLite
- Connect to DM
- Connect to TiDB
- Connect to AnalyticDB(MySQL)
- Connect to GreenPlum
- Connect to TimeScale
- Connect to Amazon Redshift
- Connect to MariaDB
- Connect to ClickHouseV2
- Connect to MonetDB
- Connect to Kingbase
- Connect to GBase8a
- Connect to GBase8s
- Connect to ClickHouse
- Connect to IBM DB2
- Connect to IBM DB2 iSeries/AS400
- Connect to Doris
- Connect to OceanBase(MySQL)
- Connect to Kylin
- Connect to StarRocks
- Connect to Google BigQuery
- Connect to Hive (beta)
- Connect to ElasticSearch (beta)
- Connect to Hana
- Connect to Excel
- Connect to JSON
- Connect to CSV
- Connect to XML
- Connect to MongoDB
- Connect to ElasticSearchDSL
- Connect to InfluxDB
- Connect to SSAS
- Connect to ODBC
- Connect to OData
- Connect to TDengine
- Connect to Teradata
- Connect to Custom Provider
- Introduction to Data Model
- Introduction to Direct Query Model
- Introduction to Cached Model
- Introduction to Datasets
- Data Flow Designer
- Secure Data Management
- How To
- View and Manage Documents
- Working with Resources
- Working with Reports
- Working with Dashboards
- Working with Notebooks
- Wyn Analytical Expressions
- Section 508 Compliance
- Subscribe to RSS Feed for Wyn Builds Site
- Developer Guide
Connect to CSV
To create a CSV data source in Wyn Enterprise, follow the below steps.
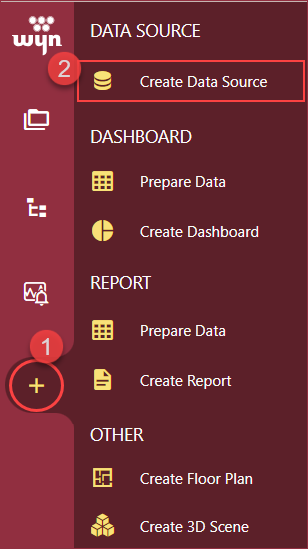
On the Resource Portal, navigate to Create (+) >> Create Data Source.

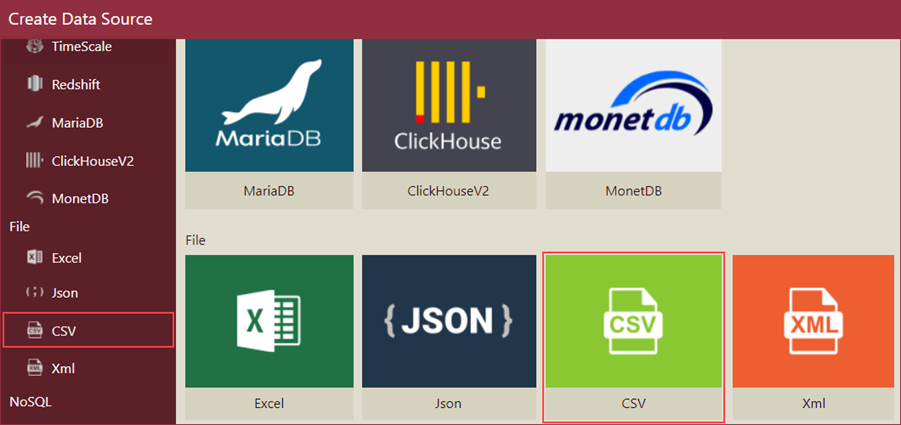
Select CSV in the data source list on the left or in the icon view on the right.

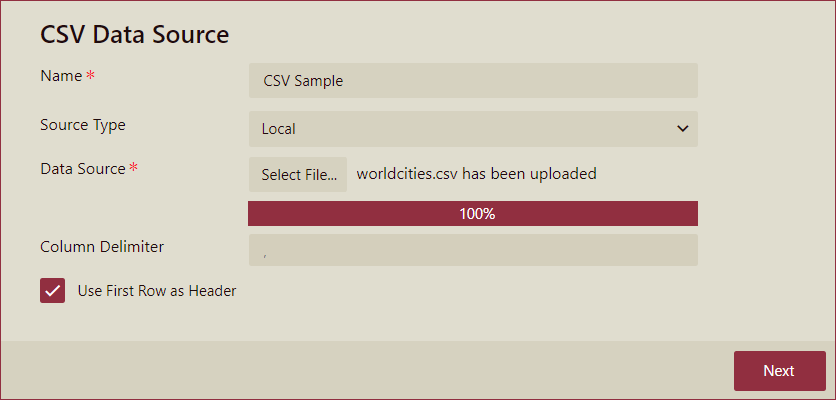
Fill in the database configuration information for the selected data source and click the Next button.

Field | Description |
|---|---|
Name* | Specify a name for the data source. |
SourceType | Select from the list that displays the following options - Local, Web, Embed, and File System. |
Data Source* |
|
Request Method | For the Web source type, select the Get or Post request method and set the following;
|
Column Delimiter | Column delimiter describes the delimiter of each column. The default value is**,** click to modify. |
Use First Row as Header | If this option is checked, the first line in the file will be used as the column header; if this option is not checked, the column names will be the default column names F1, F2, F3... |
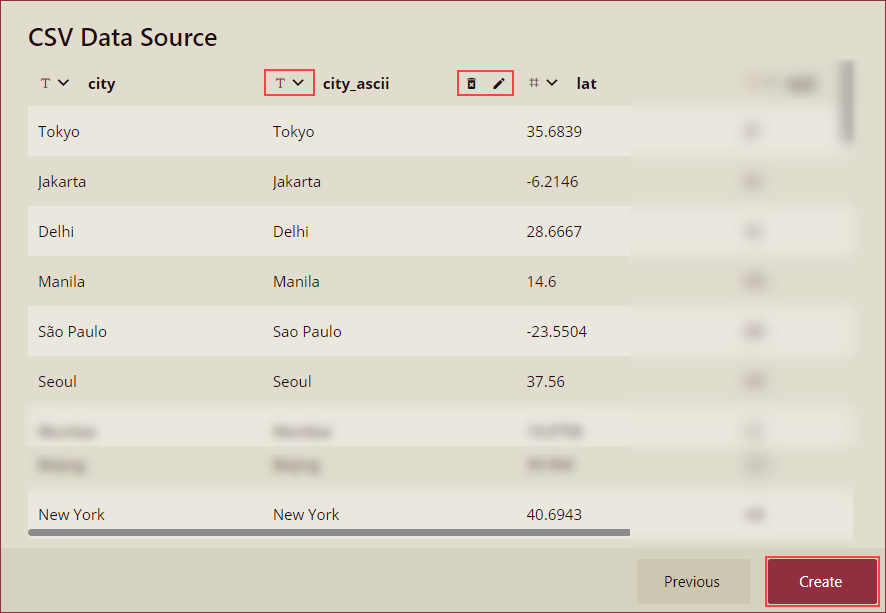
On clicking Next, you will be redirected to the data source editor where you will have the schema editing functions including,
Change Column Data Type: You can select up to 5 types of data types including Number, Text, Date, DateTime, and Boolean.
Delete Column: Click the delete icon next to a column name to remove the column.
Rename the Column: Click the edit icon next to a column name to rename the column.
Click the Create button to finish.

However, you cannot perform the following operations on the data source editor page.
Rename the table.
Rename the columns.
Add new columns.
Delete columns.
Reorganize columns.


