-
Interactive DashboardsCreate interactive BI dashboards with dynamic visuals.
-
End-User BI ReportsCreate and deploy enterprise BI reports for use in any vertical.
-
Wyn AlertsSet up always-on threshold notifications and alerts.
-
Localization SupportChange titles, labels, text explanations, and more.
-
Wyn ArchitectureA lightweight server offers flexible deployment.
-
 Wyn Enterprise 7.1 is ReleasedThis release emphasizes Wyn document embedding and enhanced analytical express...
 -
 Choosing an Embedded BI Solution for SaaS ProvidersAdding BI features to your applications will improve your products, better serve your customers, and more. But where to start? In this guide, we discuss the many options.
-
Visual GalleryInteractive sample dashboards and reports.
-
BlogExplore Wyn, BI trends, and more.
-
WebinarsDiscover live and on-demand webinars.
-
Customer SuccessVisualize operational efficiency and streamline manufacturing processes.
-
Knowledge BaseGet quick answers with articles and guides.
-
VideosVideo tutorials, trends and best practices.
-
WhitepapersDetailed reports on the latest trends in BI.
-
 Choosing an Embedded BI Solution for SaaS ProvidersAdding BI features to your applications will impr...
 -

- Getting Started
- Administration Guide
-
User Guide
- An Introduction to Wyn Enterprise
- Document Portal for End Users
- Data Governance and Modeling
- View and Manage Documents
- Working with Resources
- Working with Reports
- Working with Dashboards
- Working with Notebooks
- Wyn Analytical Expressions
- Section 508 Compliance
- Subscribe to RSS Feed for Wyn Builds Site
- Developer Guide
Layers
Wyn Reports Layers allow you to control the visibility and rendering of report controls at report design time. Layers help you organize report controls, especially in reports with many possibly overlapping controls. They are also helpful when you want certain controls to be visible in certain formats but not others (screen, print, or export).
Add a Layer to a Report
Click the Layers icon in the left panel of the Report designer. The Layer Panel lists the layers in the report and provides quick actions for managing a selected layer. It allows you to edit, delete, or reorder the position of layers within a report.
Option | Description |
|---|---|
Edit Layer | • Opens the properties of the selected layer. • Allows you to rename the layer or modify its settings. |
Delete Layer | • Removes the selected layer from the report. • All report items placed on that layer are also deleted. |
Bring to Front | • Moves the selected layer above all other layers. • Ensures this layer and its content appear on top when overlapping with other layers. |
Send to Back | • Moves the selected layer below all other layers. • Ensures other layers overlap this one. Useful for background layers (e.g., watermarks, background images). |


Layer Properties
Click Edit Layer to view the layer property. You can change the following properties for a layer
Property | Description |
|---|---|
Designer Lock | • Locks the layer in the designer when set to True. • Locked layers cannot be moved, resized, or edited. • Default: False. |
Designer Visible | • Controls whether the layer is visible inside the Report Designer. • True = visible in design mode. • False = hidden in designer but may still render in preview/export. |
Field Selector Availability | • Determines whether fields can be dragged into this layer. • True = available for field binding. • False = fields cannot be bound directly. |
Designer Transparency | • Adjusts the transparency level of the layer in the designer. • Value range: 0% (opaque) → 100% (transparent). • Useful for designing overlapping layers. |
Target Device
Property | Description |
|---|---|
All | • Enables the layer for all target devices (Screen, Paper, Export). • Overrides individual device settings if set to True. |
Screen | • Controls whether the layer appears when viewing reports on-screen (preview, dashboards). |
Paper | • Determines if the layer is rendered for printing. • Useful for print-only headers, watermarks, or disclaimers. |
Export | • Controls whether the layer is included in exported files (PDF, Excel, Word, etc.). • Set to False for draft or design-only layers. |
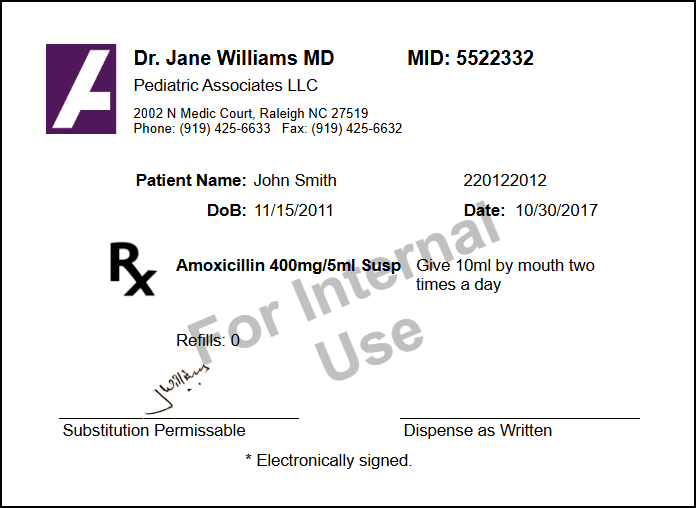
Example: Add a Watermark to a Report Using Layers
Leverage Layers in Wyn Reports when you want to make minor modifications—like adding a watermark—without altering the original report layout. Layers allow you to overlay elements on a report while keeping the base design intact.
Imagine a prescription or sales receipt report. The requirement is:
Display a watermark with the text “For Internal Use”.
Keep the original report layout unchanged.
Follow the following steps to add the watermark to the report:
Open the Report: Open your report in the Wyn Report Designer. The base layout is in the Default Layer.
Lock the Default Layer: In the Layers panel, select the Default Layer and enable Lock Element. This prevents accidental changes to the original report layout.
Add a New Layer: Create a new layer and name it Watermark Layer.
Add the Watermark
In the Watermark Layer, insert a TextBox control with the text
"For Internal Use".Adjust opacity, font size, and rotation so that the text appears diagonally and faded, like a watermark.
Send to Back: Select the Watermark Layer (or the TextBox itself) and choose Send to Back. This places the watermark behind the Default Layer content, ensuring it does not overlap or hide report details.
Preview and Verify: Preview the report. The watermark should appear faintly in the background without altering the base layout.