- Getting Started
- Administration Guide
-
User Guide
- An Introduction to Wyn Enterprise
- Document Portal for End Users
- Data Governance and Modeling
- Working-with-Resources
- Working with Reports
- Working with Dashboards
- View and Manage Documents
- Understanding Wyn Analytical Expressions
- Section 508 Compliance
- Developer Guide
Jump To
The Jump To add-on feature in the Wyn Enterprise application, creates shortcuts on one dashboard to another dashboard, report, or URL (internal or external) in a new window or a pop-up dialog. The Jump To feature helps you to quickly find additional details of a particular data series by jumping to another document or a URL. The Jump To feature is supported in most of the dashboard scenarios such as Charts and KPIs, Tables, Maps, Advanced Charts, Images, and Rich Text.
Create a Jump To Scenario
To create a jump to another document or URL from a dashboard follow the below instructions,
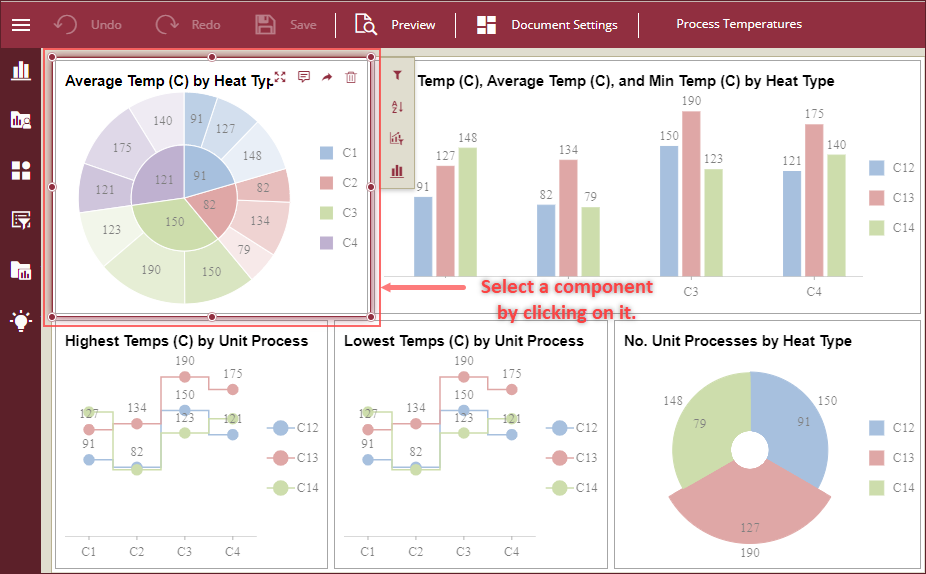
Navigate to the create or edit dashboard page and select a dashboard component.
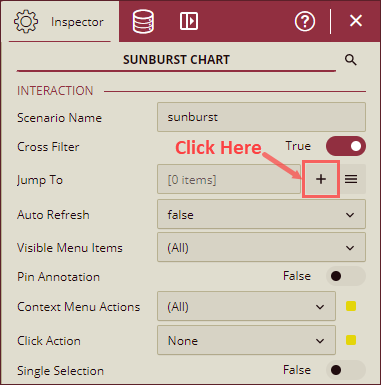
From the Inspector Panel on the right side of your screen, navigate to the Interaction section and click the + icon from the Jump To property.
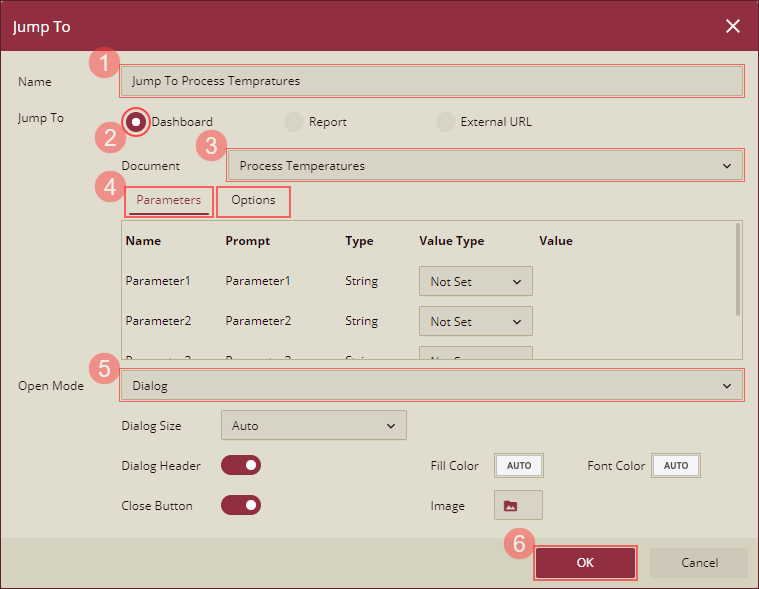
Jump To dialog will appear on your screen. Give a name to the Jump To scenario, select a scenario to jump to (Dashboard, Report, external URL, or internal URL). There are three scenarios when selecting a Jump To option as described below,
Dashboard or Report: Choose a target document from the Document drop-down. You can pass parameters to the target document from the Parameters tab and add various options like Show Toolbar, Page Size Mode, and Initial Page Number from the Options tab. Parameters and Options tabs are described in the Properties of Jump To Dialog section.
External URL: Enter a valid URL to a web link in the Url input box.

Internal Page: Choose a page from the Target Page dropdown to create an internal jump to another page of the dashboard.
Note: Jump To - Internal Page can only be used in Rich Text, Annotations, and Images.

Now, select an option from the Open Mode dropdown to open the Jump To scenario in a - dialog, new window, embedded mode, redirect mode, or modeless dialog. Open Mode options are described in the Properties of Jump To Dialog section.
Note: For the Dialog mode, you can customize the appearance of the dialog by setting the size, header, fill color, and font color. Dialog settings are described in the Properties of Jump To Dialog section.
Click the Ok button to save.
Jump To a Document Or URL
To view a Jump To scenario, follow the below instructions,
Open a dashboard in preview mode, right click on the dashboard component linked to the Jump To scenario of another document or URL, hover on the Jump option from the pop-out and click the appropriate Jump To scenario.
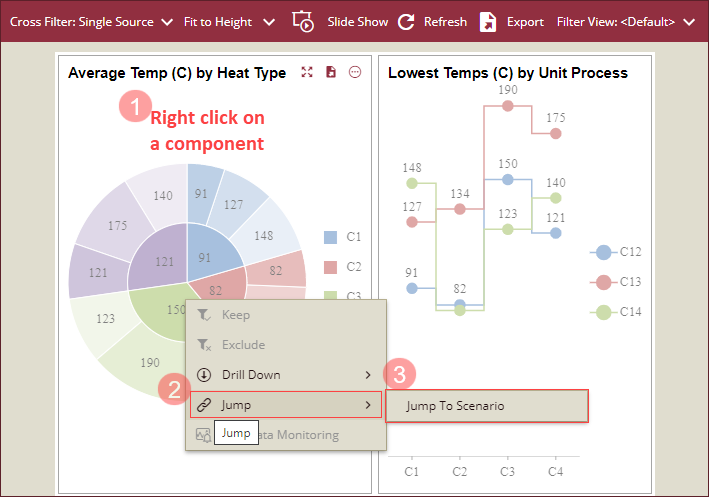
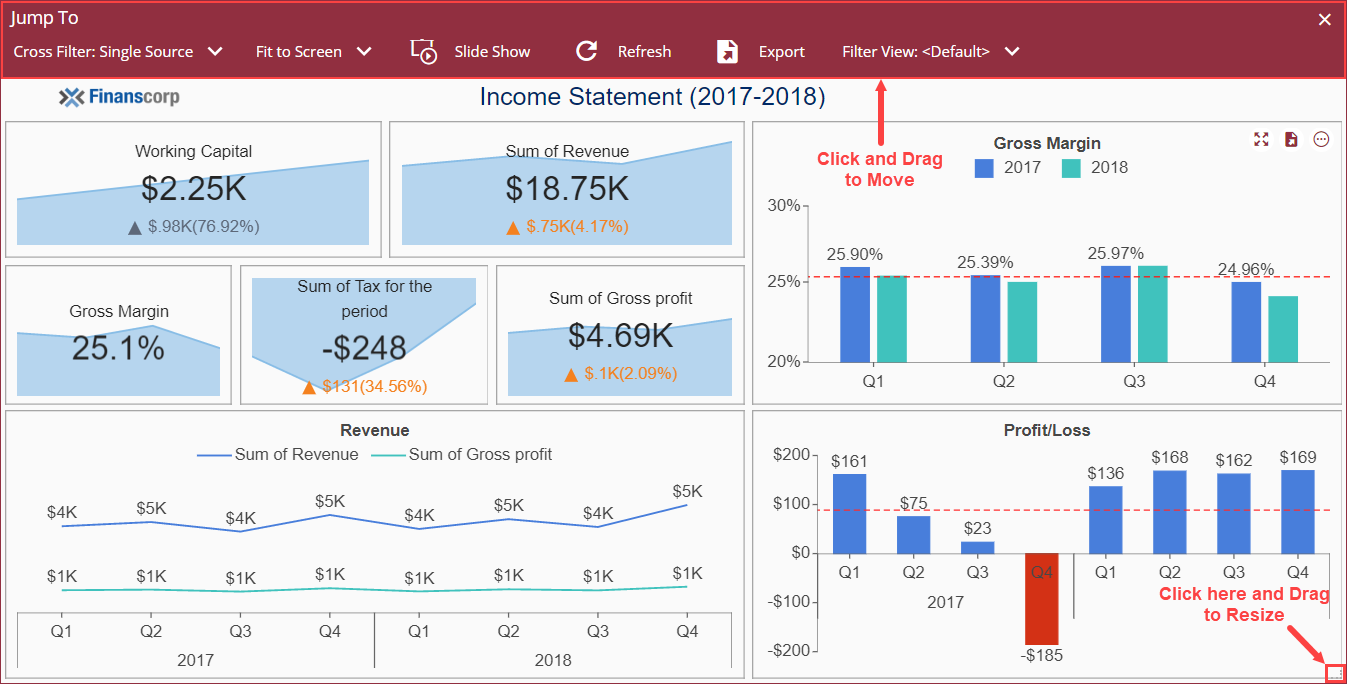
The Jump To scenario will appear on your screen in the mode selected from the Open Mode option while creating the Jump To scenario. To resize the Jump To dialog, click and drag the resize button on the bottom left corner of the dialog box. To move the Jump To dialog, click and drag the header section of the dialog box.
Parameter Binding When Jumping to Another Dashboard
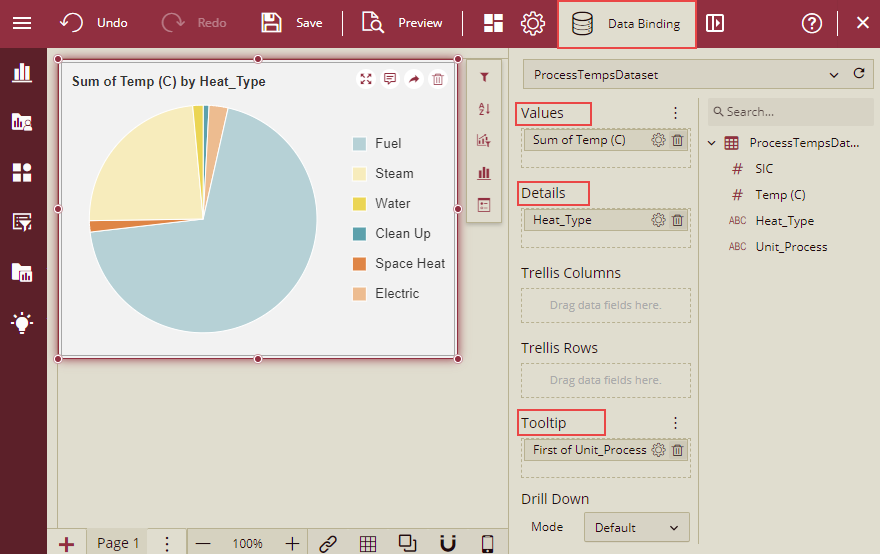
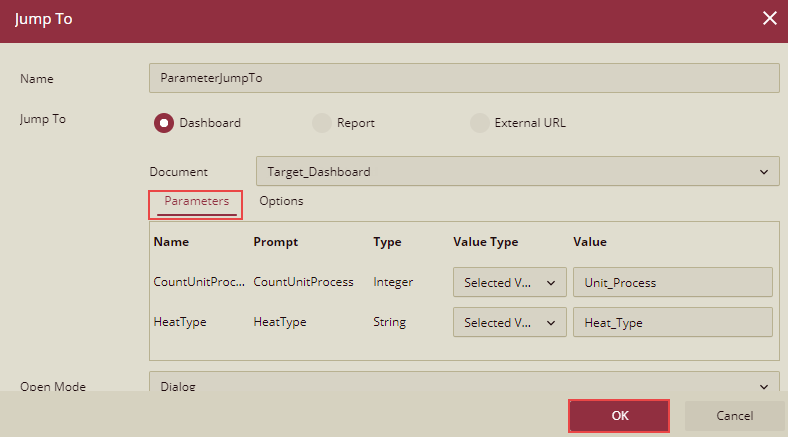
While jumping to another dashboard, you can bind the parameter to a data column which is not in the data binding panel, using the component’s data Tooltip. In this scenario, in the Jump To dialog, we are sending a field in a parameter which is not bound to the component. For example, as described below, in the source dashboard, a chart is bound to the Temperature and Heat_Type, while in the Jump To dialog of the chart, we have used the field Unit_Process in the parameter and this Unit_Process value is what we are getting from the chart’s data tooltip.
Example:
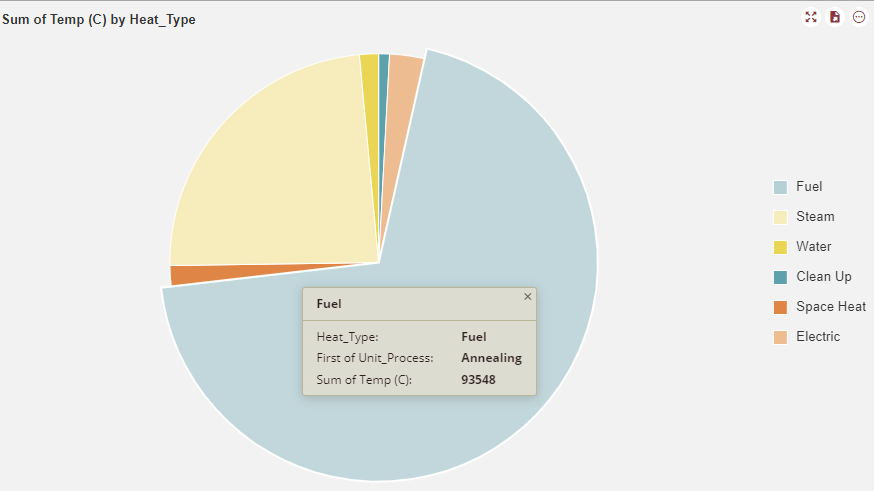
Create a source dashboard. In this example, we have taken a dashboard ParameterBinding_Dashboard as a source dashboard and have selected the ProcessTempsDataset data. In the DataBinding tab, we have taken Temp(C) and Heat_Type fields. We have added the field Unit_Process to the Tooltip.
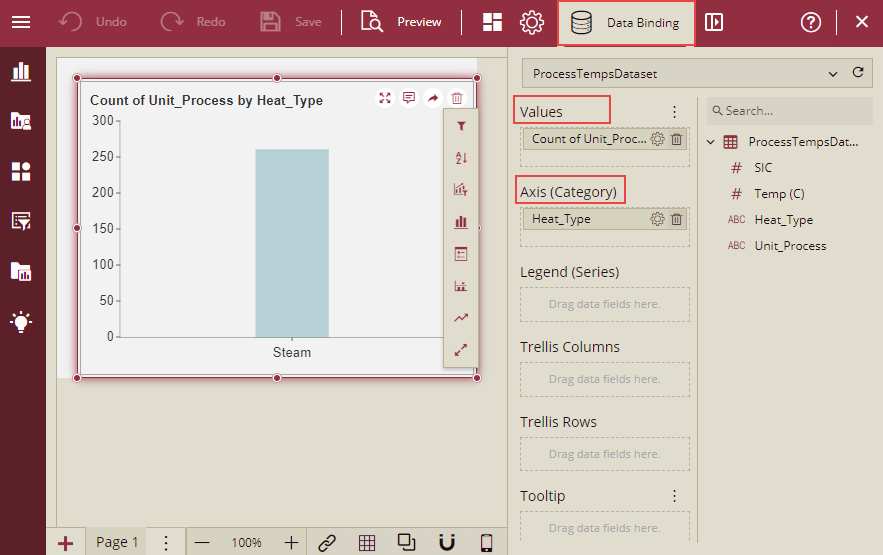
Create the target dashboard. In this example, we have taken a dashboard Target_Dashboard as a target dashboard and have selected the ProcessTempsDataset data. In the DataBinding tab, we have taken Unit_Process and Heat_Type fields.
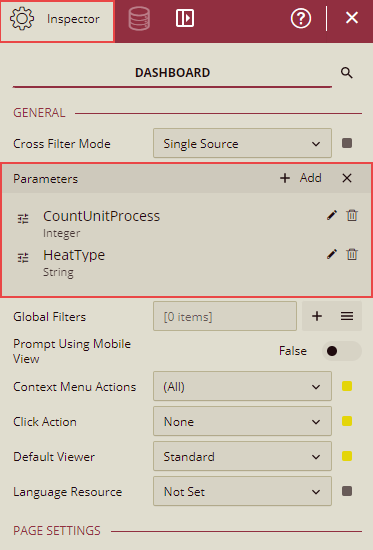
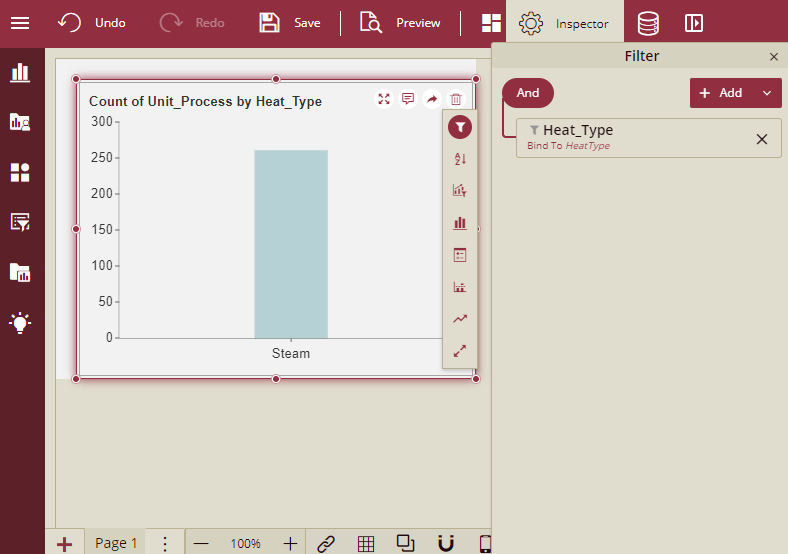
On the Inspector tab of the target dashboard, add the Parameters. We have added the field Unit_Process as a parameter which was added in a Tooltip in the source dashboard and was not bound to the data. Refer section Dashboard Parameters, for information about adding the parameters.
You can apply filters as well. We have applied filter based on the Heat_Type.
Now on the source dashboard, add a Jump To scenario and select the Value Type and Value for the parameters.
Now Preview the source dashboard and click on a particular Heat Type.
It will jump to the target dashboard and will display the details of count of the Process__Unit for the selected Heat_Type.
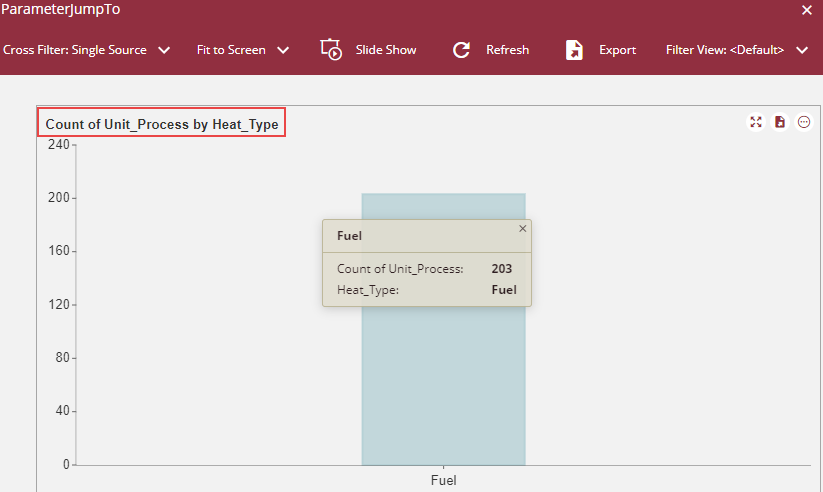
So, we can see from this example, that parameter Unit_Process that was not bound to the data on the source dashboard, is displayed on the target dashboard by adding the Unit_Process as tooltip in the source dashboard.
To Delete or Edit Jump To Scenario
To delete or edit a Jump To scenario, follow the below instructions,
Navigate to the edit mode of the dashboard, click a dashboard component and click the menu icon from the Inspector Panel.
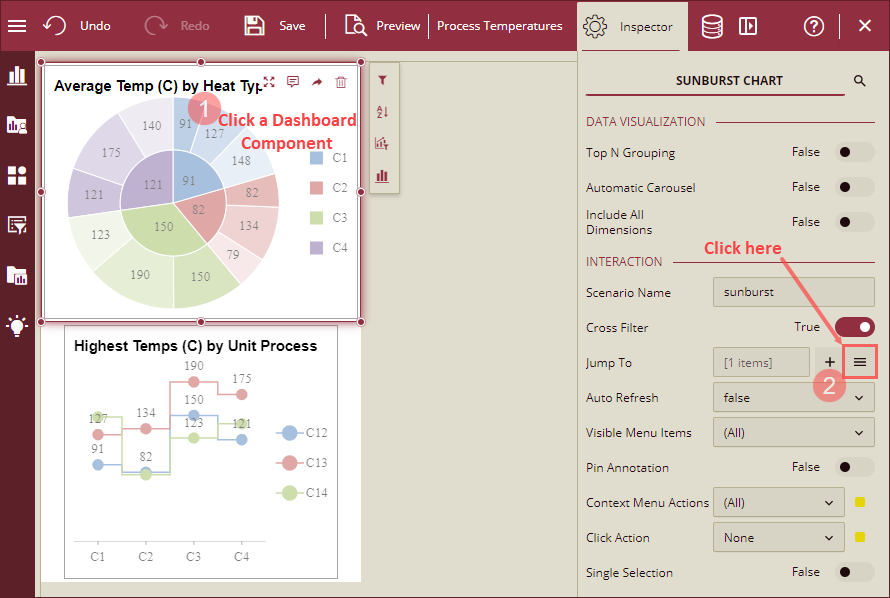
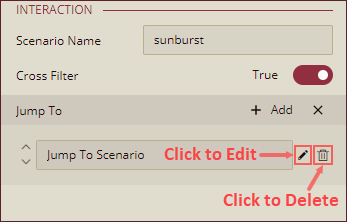
To edit the scenario, click the edit icon next to the scenario name.
To delete the scenario, click the delete icon next to the scenario name.
Properties Of Jump To Dialog
Properties of the Jump To dialog box are described below,
Name - Name of the Jump To scenario you are creating is specified here.
Jump To - Select a Jump To type to open a document. You can choose one option from the following using the radio button - Dasbaord, Report, External Url, or Internal Page.
Document - Document dropdown is available only when the Jump To - Dashboard or Report option is selected. Choose a document from the dropdown to open in the Jump To scenario.
Parameters - Parameters tab is available only when the Jump To - Dashboard or Report option is selected. Parameters of the target document are displayed in the Parameters tab. You can select a Value Type (Not Set, Constant, Selected Value, Slicer, Filtered Value and Parameter) and set the value of the parameter you want pass to the Jump To scenario.
Options - Options tab is available only when the Jump To - Dashboard or Report option is selected. Options to customize the appearance of the Jump To scenario are described below,
Show Toolbar - Select an option from the dropdown to either show, auto hide or hide the toolbar of the target document in the Jump To scenario.
Page Size Mode - Select an option from the dropdown to fit the target document in the Jump To dialog.
Initial Page Number - Set an initial page number to open when navigating to the Jump To scenario.
Open Mode - Open Mode option is available for the Jump To - Dashboard, Report or External URL options. Following options are available in the Open Mode dropdown,
Dialog: Jump To scenario will open in a dialog box. With this option, you cannot interact with the other features on the original document.
New Window: Jump To scenario will open in a new window.
Embedded: Jump To scenario will open in an embedded window with an option to navigate back to the original document.
Redirect: Jump To scenario will be redirected to a new page open in the same tab of your browser. You can navigate back to the original document using the Back button of the browser window.
Modeless Dialog: Jump To scenario will open in a dialog box and you can interact with the other features on the original document.
Dialog Settings - Customize the appearance of the Jump To dialog box using the following settings,
Dialog Size: Set the size of the Jump To dialog box. You can set the width and height of the dialog box in pixels or percentage.
Dialog Header: Use the toggle button to display or hide the header of the dialog box. To set the Fill Color and Font Color of the header enable the Dialog Header button.
Fill Color: Set a fill color of the header background of the Jump To dialog.
Font Color: Set a font color of the header of the Jump To dialog.
Close Button: Use to toggle button to show or hide the Close button on the Jump To dialog box.
Image: Use an image on the Dialog Header which is also used to close the dialog box by clicking on it. You can set an image only when the Close Button is enabled.
Note: When the selected Open Mode is Dialog and the Dialog Header is enabled, then only you can resize and move the Jump To dialog box. When the Dialog Header is disabled, Jump To dialog will open as in the earlier versions of Wyn Enterprise application.


