- Getting Started
- Administration Guide
-
User Guide
- An Introduction to Wyn Enterprise
- Document Portal for End Users
- Data Governance and Modeling
- Working with Resources
- Working with Reports
- Working with Dashboards
- View and Manage Documents
- Understanding Wyn Analytical Expressions
- Section 508 Compliance
- Subscribe to RSS Feed for Wyn Builds Site
- Developer Guide
Add Row and Column Groups
The Tablix data region organizes the data in groups by rows and columns. The row group expands vertically and the column group expands horizontally in the report.
The rows and columns inside the groups repeat once for each unique group value. The rows and columns outside the groups repeat once for the group.
You can create nested groups as well as adjacent groups in a tablix.
The easiest way to add a group in a tablix is through the Tablix Wizard. However, you can use the Cell Context Menu or the Group Editor to insert row and column groups. For more details, refer to the following sections -
Use the Tablix Wizard
The Tablix Wizard is the primary way to add row and column groups in a tablix. The wizard appears automatically when you drop the Tablix data region onto the design area or click the data region in the Report Toolbox. You can also use the Configure button to open the Tablix Wizard. For more information on Tablix Wizard, see the Tablix article.
The left pane in the wizard displays the available fields in the bound dataset.
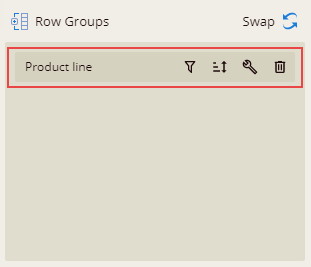
To create a row group, drag and drop the dataset field to the Row Groups area. You can create a group hierarchy by placing multiple fields in this area organized in a specific order.
To create a column group, drag and drop the dataset field to the Column Groups area. You can create a group hierarchy by placing multiple fields in this area organized in a specific order.
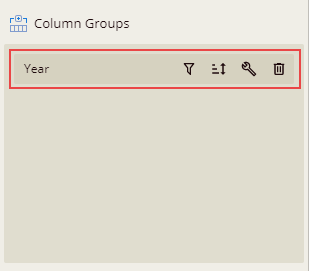
The corresponding buttons next to the fields placed in the Row Groups and Column Groups areas allow you to specify the sorting order and change the data format for the field. Use the Swap button in the Row Groups area to swap the rows and column groups.
Use the Cell Context Menu
The cell context menu in a tablix provides options to create both nested and adjacent groups. You can access these options by right-clicking the cell in the tablix data region.
Row Group - To insert a row group in a tablix, choose from the following options.
Parent - Inserts a parent row group.
Child - Inserts a child row group. This option is unavailable if there is no parent row group.
Adjacent Before - Inserts an adjacent row group above the selected cell.
Adjacent After - Inserts an adjacent row group below the selected cell.
Delete - Deletes the row group.
Enable Group - Inserts a parent/child row group based on the cell location. This option is available when no groups are associated with the selected cell.
Disable Group - Deletes the parent/child row group based on the cell location. This option is available when one or more groups are associated with the selected cell.
Column Group -To insert a column group in a tablix, choose from the following options.
Parent - Inserts a parent column group.
Child - Inserts a child column group. This option is unavailable if there is no parent column group.
Adjacent Left - Inserts an adjacent column group to the left of the selected cell.
Adjacent Right - Inserts an adjacent column group to the right of the selected cell.
Delete - Deletes the column group.
Enable Group - Inserts a parent/child column group based on the cell location. This option is available when no groups are associated with the selected cell.
Disable Group - Deletes the parent/child column group based on the cell location. This option is available when one or more groups are associated with the selected cell.
Use the Group Editor
The Group Editor in the Report Toolbox shows the row and column hierarchies for the currently selected Tablix data region. It also provides you options to add nested and adjacent groups to the chosen group in the editor.
To add a row group to the currently selected row group, click the Vertical Ellipsis icon and choose from the following options.
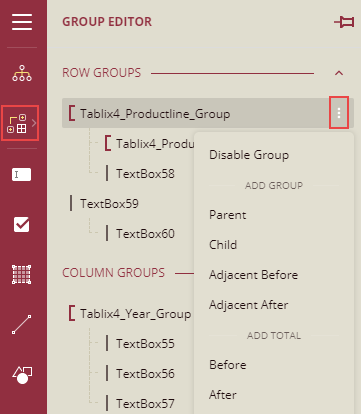
Parent - Inserts a parent row group.
Child - Inserts a child row group.
Adjacent Before - Inserts an adjacent row group above the selected row group.
Adjacent After - Inserts an adjacent row group below the selected row group.
Enable Group - Inserts a parent/child row group based on the textbox location. This option is available when no groups are associated with the selected textbox.
Disable Group - Deletes the parent/child row group based on the textbox location. This option is available when one or more group is associated with the textbox cell.
To add a column group to the currently selected column group, click the Vertical Ellipsis icon and choose from the following options.
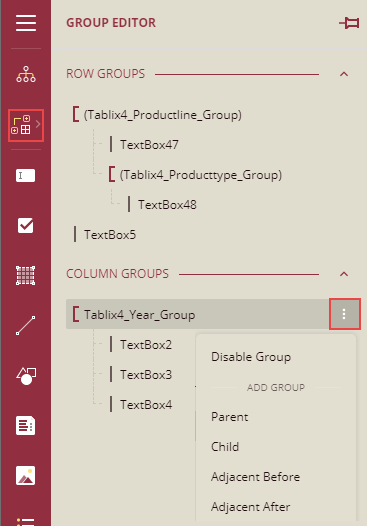
Parent - Inserts a parent column group.
Child - Inserts a child column group.
Adjacent Left - Inserts an adjacent column group to the left of the selected column group.
Adjacent Right - Inserts an adjacent column group to the right of the selected column group.
Enable Group - Inserts a parent/child column group based on the textbox location. This option is available when no groups are associated with the selected textbox.
Disable Group - Deletes the parent/child column group based on the textbox location. This option is available when one or more group is associated with the selected textbox.
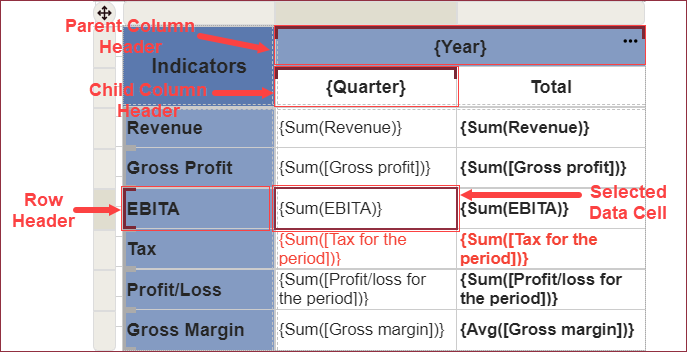
In the Tablix Group Editor, when a column is selected within a column hierarchy that is the column group, or a row is selected within a row hierarchy that is the row group highlights the specific row and column headers. In the below image, a data cell is selected in the {Quarter} column and the corresponding row and column headers are highlighted in the Tablix,
