-
Interactive DashboardsCreate interactive BI dashboards with dynamic visuals.
-
End-User BI ReportsCreate and deploy enterprise BI reports for use in any vertical.
-
Wyn AlertsSet up always-on threshold notifications and alerts.
-
Localization SupportChange titles, labels, text explanations, and more.
-
Wyn ArchitectureA lightweight server offers flexible deployment.
-
 Wyn Enterprise 7.1 is ReleasedThis release emphasizes Wyn document embedding and enhanced analytical express...
 -
 Choosing an Embedded BI Solution for SaaS ProvidersAdding BI features to your applications will improve your products, better serve your customers, and more. But where to start? In this guide, we discuss the many options.
-
Visual GalleryInteractive sample dashboards and reports.
-
BlogExplore Wyn, BI trends, and more.
-
WebinarsDiscover live and on-demand webinars.
-
Customer SuccessVisualize operational efficiency and streamline manufacturing processes.
-
Knowledge BaseGet quick answers with articles and guides.
-
VideosVideo tutorials, trends and best practices.
-
WhitepapersDetailed reports on the latest trends in BI.
-
 Choosing an Embedded BI Solution for SaaS ProvidersAdding BI features to your applications will impr...
 -

- Getting Started
- Administration Guide
-
User Guide
- An Introduction to Wyn Enterprise
- Document Portal for End Users
-
Data Governance and Modeling
- Data Binding Concepts
-
Introduction to Data Sources
- Connect to Oracle
- Connect to SQL Server
- Connect to MySQL
- Connect to Postgres
- Connect to Snowflake
- Connect to SQLite
- Connect to DM
- Connect to TiDB
- Connect to AnalyticDB(MySQL)
- Connect to GreenPlum
- Connect to TimeScale
- Connect to Amazon Redshift
- Connect to MariaDB
- Connect to ClickHouseV2
- Connect to MonetDB
- Connect to Kingbase
- Connect to GBase8a
- Connect to GBase8s
- Connect to ClickHouse
- Connect to IBM DB2
- Connect to IBM DB2 iSeries/AS400
- Connect to Doris
- Connect to OceanBase(MySQL)
- Connect to Kylin
- Connect to StarRocks
- Connect to Google BigQuery
- Connect to Hive (beta)
- Connect to ElasticSearch (beta)
- Connect to Hana
- Connect to Excel
- Connect to JSON
- Connect to CSV
- Connect to XML
- Connect to MongoDB
- Connect to ElasticSearchDSL
- Connect to InfluxDB
- Connect to SSAS
- Connect to ODBC
- Connect to OData
- Connect to TDengine
- Connect to Teradata
- Connect to Custom Provider
- Introduction to Data Model
- Introduction to Direct Query Model
- Introduction to Cached Model
- Introduction to Datasets
- Data Flow Designer
- Secure Data Management
- How To
- WynSQL
- View and Manage Documents
- Working with Resources
- Working with Reports
- Working with Dashboards
- Working with Notebooks
- Wyn Analytical Expressions
- Section 508 Compliance
- Subscribe to RSS Feed for Wyn Builds Site
- Developer Guide
Overwrite Data
After creating a data source, you can manage it in the portal. You can upload new Excel data to completely overwrite the previous data with the help of the Overwrite Data option as shown below.

Important Points
You can overwrite only the local Excel data source.
The data structure of new Excel should be identical to the data structure of old Excel.
The Excel file used for overwriting should have the same password as when the Excel data source was created.
After performing an overwrite operation on a data source, revisions on the Info page will not retain the history.
Steps to overwrite an Excel data source
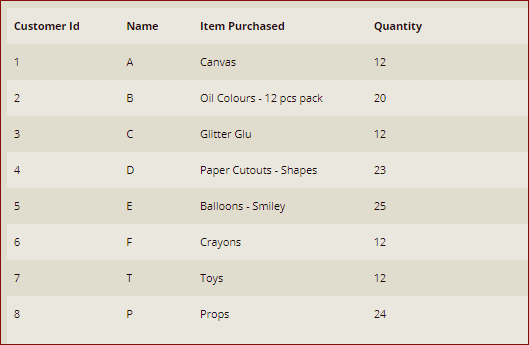
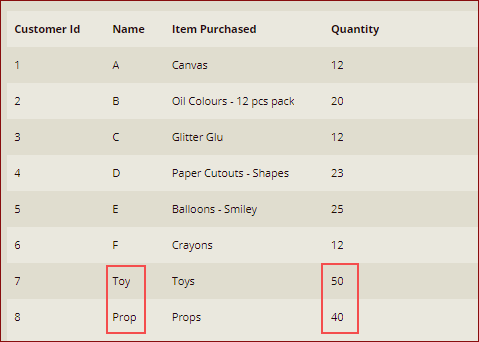
In this example, we will edit the Name and Quantity data for the Customer Id 7 and 8 in the Excel and overwrite the existing Excel.
Before overwriting, the data is as shown below.
We have edited the Name and Quantity data for the Customer Id 7 and 8 in the local Excel and we will overwrite the existing Excel with this new data by following the steps below.
Select the Excel Data source that you want to overwrite, click More
 and select the Overwrite Data option.
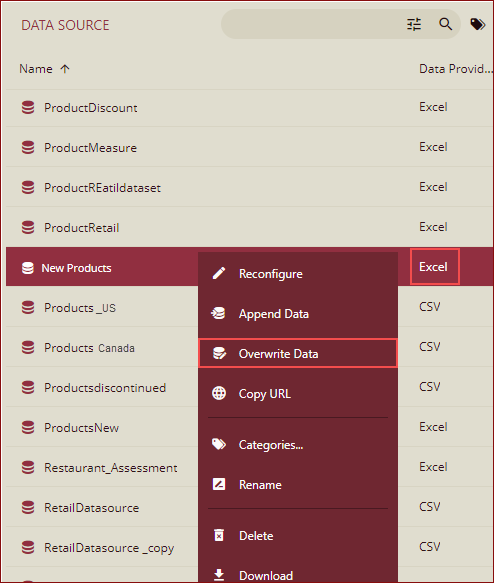
The Overwrite Data dialog box is displayed.
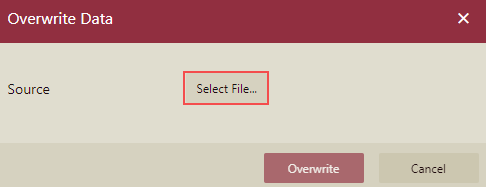
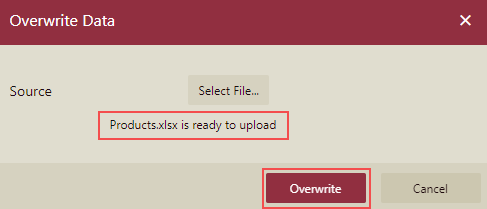
Select the Excel file to overwrite the data and click the Overwrite button.
A confirmation message is displayed. Click Dismiss on the message box.

The data is overwritten as shown below.
Note: After creating an Excel data source, if any data is changed, you cannot fully overwrite the data by using the Append option. You need to reconfigure the data source, and then upload the file again. The Append data option cannot meet the requirement of overwriting the data. Whereas, the Overwrite option can fully overwrite the data without reconfiguring and uploading the file again.