-
Interactive DashboardsCreate interactive BI dashboards with dynamic visuals.
-
End-User BI ReportsCreate and deploy enterprise BI reports for use in any vertical.
-
Wyn AlertsSet up always-on threshold notifications and alerts.
-
Localization SupportChange titles, labels, text explanations, and more.
-
Wyn ArchitectureA lightweight server offers flexible deployment.
-
 Wyn Enterprise 7.1 is ReleasedThis release emphasizes Wyn document embedding and enhanced analytical express...
 -
 Choosing an Embedded BI Solution for SaaS ProvidersAdding BI features to your applications will improve your products, better serve your customers, and more. But where to start? In this guide, we discuss the many options.
-
Visual GalleryInteractive sample dashboards and reports.
-
BlogExplore Wyn, BI trends, and more.
-
WebinarsDiscover live and on-demand webinars.
-
Customer SuccessVisualize operational efficiency and streamline manufacturing processes.
-
Knowledge BaseGet quick answers with articles and guides.
-
VideosVideo tutorials, trends and best practices.
-
WhitepapersDetailed reports on the latest trends in BI.
-
 Choosing an Embedded BI Solution for SaaS ProvidersAdding BI features to your applications will impr...
 -

- Getting Started
- Administration Guide
-
User Guide
- An Introduction to Wyn Enterprise
- Document Portal for End Users
- Data Governance and Modeling
- View and Manage Documents
- Working with Resources
-
Working with Reports
- Report Designer
- Data Binding in Reports
- Master Reports
- Report Controls
- Data Analysis and Interactivity
- Expression Editor
- Page Layout
- Styles and Themes
- Preview Report
- Export Report
- Report Templates
- Using Report Designer
- Report Render Mode
- Time Zone Setting
- Working with Dashboards
- Working with Notebooks
- Wyn Analytical Expressions
- Section 508 Compliance
- Subscribe to RSS Feed for Wyn Builds Site
- Developer Guide
Add Rows and Columns
Once you create a table in the report designer, you can insert and delete additional rows and columns in your table based on your requirements.
To Add Rows and Columns to a Table Data Region
Add rows to a table.
Method 1
Select the cell in the row (or the entire row) where you want to add a row.
Right-click the selected cell (or row), and choose one of the following insert options from the context menu.
To add a new row above the selected row, choose the Row > Insert Row - Above option.
To add a new row below the selected row, choose the Row > Insert Row - Below option.

Method 2
Click anywhere inside the table.
A row handler will appear when you place the cursor to the left of the table row. Click the row handler to add a new row.
Method 3
Select the cell in the row (or the entire row) where you want to add a row.
Right-click the selected cell (or row), and choose the Row > More option from the context menu.
In the Insert Rows dialog box that appears, specify the number of rows you want to insert and their position (i.e., above or below) to the selected cell (or row) in the table. The Count field in the dialog accepts values ranging from 1 to 20.
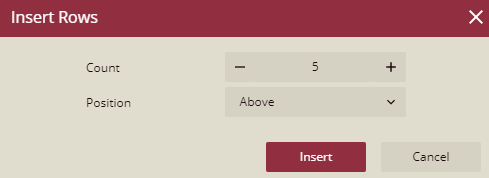
Click the Insert button.
Add columns to a table.
Method 1
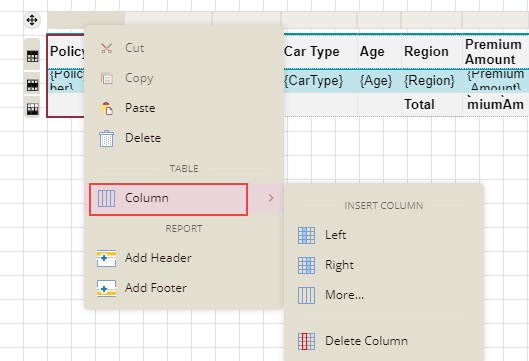
Select the cell in the column (or the entire column) where you want to add a column.
Right-click the selected cell (or column), and choose one of the following insert options from the context menu.
To add a new column to the left of the selected column, choose the Column > Insert Column - Left option.
To add a new column to the right of the selected column, choose the Column > Insert Column - Right option.
Method 2
Click anywhere inside the table.
A column handler will appear when you place the cursor on the top of the table column. Click the column handler to add a new column.
Method 3
Select the cell in the column (or the entire column) where you want to add a column.
Right-click the selected cell (or column), and choose the Column > More option from the context menu.
In the Insert Columns dialog box that appears, specify the number of columns you want to insert and their position (i.e., left or right) concerning the selected cell (or column) in the table. The Count field in the dialog accepts values ranging from 1 to 20.
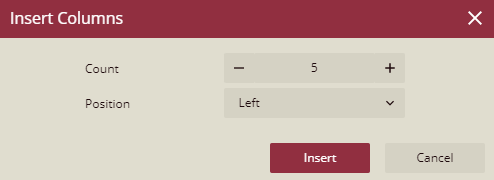
Click the Insert button.
To Delete Rows and Columns from a Table Data Region
Delete rows from a table.
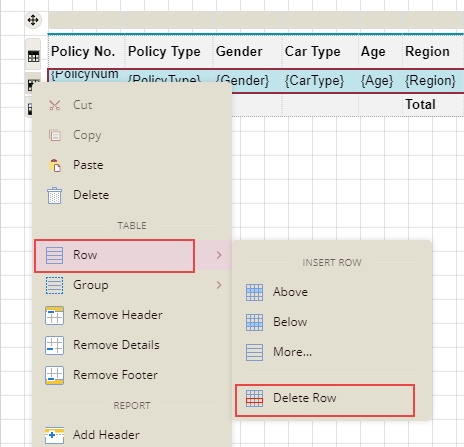
Select the cell in the row (or the entire row) that you want to delete.
Right-click the selected cell (or row), and choose the Row > Delete Row option from the context menu.
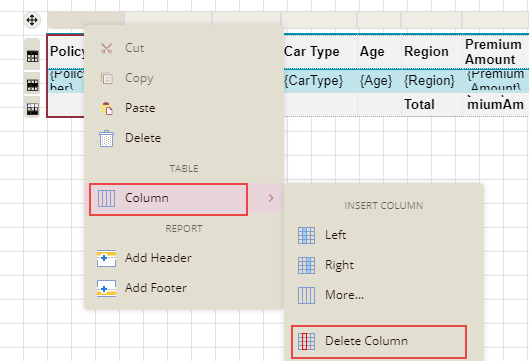
Delete columns from a table.
Select the cell in the column (or the entire column) that you want to delete.
Right-click the selected cell (or column), and choose the Column > Delete Column option from the context menu.